
Android笔记
xml中的各种字符串数据建议放在values目录下的string.xml中
<resources>
    <string name="app_name">HelloWorld</string>
</resources>
1. 活动
1.1 创建活动
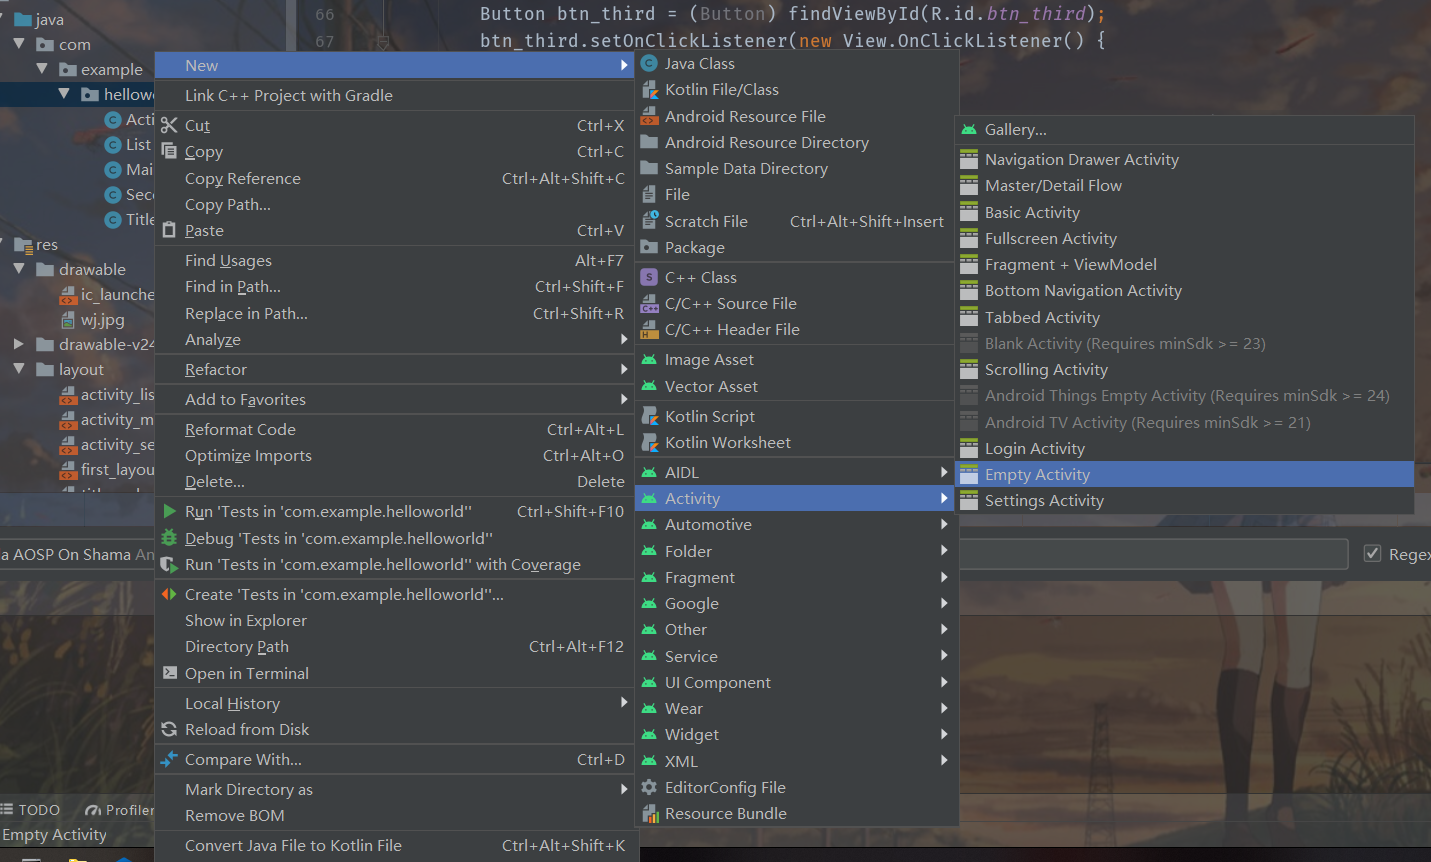
在包下右键创建新的活动
1.2 创建并加载布局
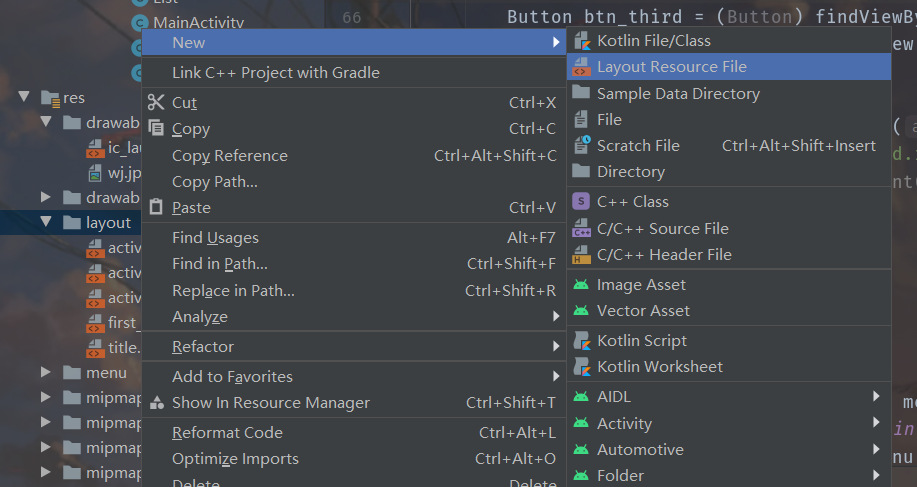
在资源目录下的layout文件夹下右键创建新的布局资源(Android Studio默认创建)
配置好布局之后在活动类下添加布局
public class List extends AppCompatActivity {
    @Override
    protected void onCreate(Bundle savedInstanceState) {
        super.onCreate(savedInstanceState);
        setContentView(R.layout.activity_list);
}
1.3在活动中使用Toast
Toast是安卓应用中一种比较常用的提示方式
添加方法也比较简单
Toast.makeText(this, "click add", Toast.LENGTH_SHORT).show();
makeText方法参数:
- this:上下文,如果嵌套太深this指向会错误,可改为当前活动.this、getContext(),也可以在外层定义一个
Context that = this;用来传递this - “click add”:字符串,Toast要显示的信息,可以是变量
- Toast.LENGTH.SHORT:显示时间2秒,LONG是3.5秒
show()方法不要忘记添加
1.4在活动中使用menu
在res下创建menu目录,新建xml文件,内容格式如下
<?xml version="1.0" encoding="utf-8"?>
<menu xmlns:android="http://schemas.android.com/apk/res/android">
    <item android:id="@+id/add_item"
        android:title="Add"/>
    <item android:id="@+id/sub_item"
        android:title="Sub"/>
</menu>
在要添加menu的活动中添加菜单,格式如下
@Override
public boolean onCreateOptionsMenu(Menu menu) {
    getMenuInflater().inflate(R.menu.main, menu);
    return super.onCreateOptionsMenu(menu);
}

@Override
public boolean onOptionsItemSelected(@NonNull MenuItem item) {
    Context that = this;
    switch (item.getItemId()) {
        case R.id.add_item:
            Toast.makeText(that, "click add", Toast.LENGTH_SHORT).show();
            break;
        case R.id.sub_item:
            Toast.makeText(this, "click sub", Toast.LENGTH_SHORT).show();
            break;
        default:
            break;
    }
    return super.onOptionsItemSelected(item);
}
1.5在活动之间穿梭
一个安卓应用通常不止一个活动,需要在不同的活动之间来回穿梭来完成各种操作
1.5.1显式穿梭
顾名思义,显示穿梭很明显能看出要跳转到那个活动
在页面中有一个按钮,点击按钮触发切换活动的事件
Button btn_third = (Button) findViewById(R.id.btn_third);
btn_third.setOnClickListener(new View.OnClickListener() {

    @Override
    public void onClick(View v) {
        Intent intent3 = new Intent(MainActivity.this, List.class);
        startActivity(intent3);
    }
});
先给button添加事件监听,当触发时间时,使用Intent穿梭事件
Intent构造函数:
- MainActivity.this:上下文
- List.class:要跳转的活动(反射)
活动需要在Mainfest中注册,这些在创建活动时Android Studio默认添加了,如果没有会报错
1.5.2隐式穿梭
隐式穿梭不会很容易看出要跳转的目的、
首先,隐式穿梭需要配置Mainfest
<activity android:name=".List">
    <intent-filter>
        <action android:name="com.example.hello.MAIN" />
        <category android:name="android.intent.category.DEFAULT" />
        <category android:name="com.example.hello.MY_CATEGORY" />
    </intent-filter>
</activity>
然后在跳转时使用另一种方式
Button btn_third = (Button) findViewById(R.id.btn_third);
btn_third.setOnClickListener(new View.OnClickListener() {

    @Override
    public void onClick(View v) {
        Intent intent3 = new Intent("com.example.hello.MAIN");
        // 只使用了android.intent.category.DEFAULT,这里可以不添加category,如果自定义了category就必须要添加
        intent3.addCategory("com.example.hello.MY_CATEGORY");
        startActivity(intent3);
    }
});
配置时注意action和category的包路径,只有action和category一致才会进行跳转
更多隐式穿梭用法
跳转网页
点击事件如下
Intent intent = new Intent(Intent.ACTION_VIEW);
intent.setData(Uri.parse("http://www.baidu.com"));
startActivity(intent);
在Mainfest对应事件中添加data标签
<activity android:name=".SecondActivity">
    <intent-filter tools:ignore="AppLinkUrlError">
        <action android:name="android.intent.action.VIEW" />
        <category android:name="android.intent.category.DEFAULT" />
        <data android:scheme="http" />
    </intent-filter>
</activity>
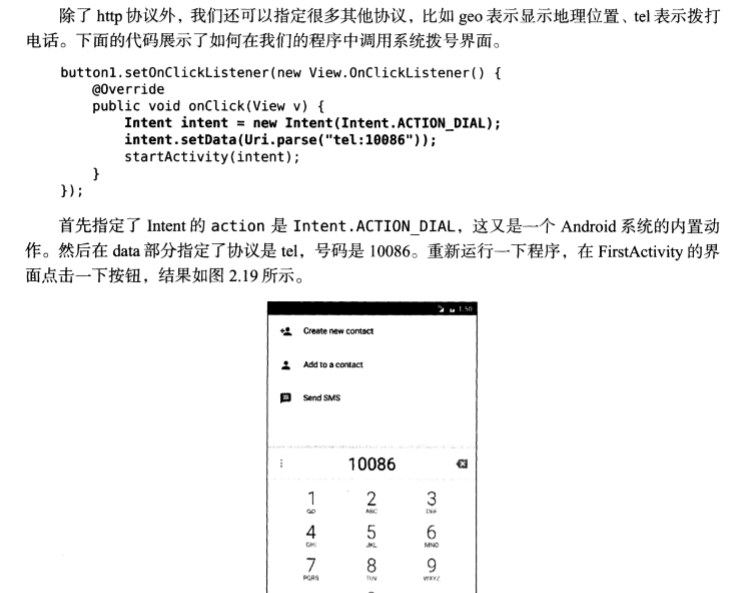
拨打电话
1.5.3 活动之间传递数据
在许多情况下,活动之间切换需要携带数据,Intent提供了putExtra方法来传递数据,在MainActivity中通过按钮触发事件,携带参数跳转到SecondActivity
Button btn = (Button) findViewById(R.id.button1);
btn.setOnClickListener(new View.OnClickListener() {
    @Override
    public void onClick(View v) {
        Intent intent = new Intent(MainActivity.this, SecondActivity.class);
        intent.putExtra("extra_value1", 10);
        intent.putExtra("extra_value2", "by first");
        startActivityForResult(intent, 1);
    }
});
startActivityForResult(intent, 1);不同的请求通过请求码进行区分
在SecondActivity中接收参数并显示到页面上
final Intent intent = getIntent();
String str = intent.getStringExtra("extra_value2");
int i = intent.getIntExtra("extra_value1", -1);
// int类型的数据接收时可以设置默认值
String string = str + i;

TextView textView = (TextView) findViewById(R.id.textView);
textView.setText(string);
1.5.4向上一个活动返回数据
当然,SecondActivity也可以向MainActivity传递数据
@Override
public void onBackPressed() {
    //        super.onBackPressed();
    Intent intent1 = new Intent();
    intent1.putExtra("data_return", "I am second");
    setResult(RESULT_OK, intent1);
    finish();
}
当按下返回键时(可以通过其他事件触发),向主页面传递数据,这里要设置result返回的状态
在主活动中接收SecondActivity传回来的数据
@Override
protected void onActivityResult(int requestCode, int resultCode, @Nullable Intent data) {
    super.onActivityResult(requestCode, resultCode, data);
    switch (requestCode) {
        case 1:
            if (resultCode == RESULT_OK) {
                assert data != null;
                String returnStr = data.getStringExtra("data_return");
                Toast.makeText(this, returnStr, Toast.LENGTH_SHORT).show();
            }
            break;
        default:
            break;
    }
}
onActivityResult(requestCode, resultCode, data)
- requestCode:请求码,在发送请求时携带的code
- resultCode:响应码,活动返回数据时设置的code
- data:接收的数据
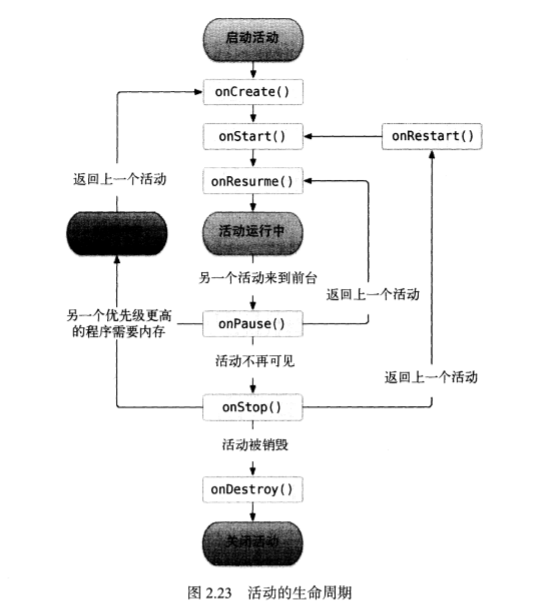
1.6 活动的生命周期
1.7 活动的启动模式
参考活动的启动模式
2. UI
组件相关省略
2.1 布局
2.1.1 线性布局LinearLayout
android:layout_width="match_parent"控制宽度,父组件的宽度,改为wrap_content就是自身元素的宽度android:layout_height="match_parent"控制高度android:orientation="vertical"控制纵向排列,如果改为vertical就会变为水平排列android:layout_gravity="right"控制元素的对齐方式android:layout_weight="1"类似于css中的flex:1
2.1.2 相对布局RelativeLayout
相对于parent进行定位
android:layout_alignParentLeft=”true”
android:layout_alignParentright=”true”
android:layout_alignParentTop=”true”
android:layout_alignParentBottom=”true”
android:layout_centerInParent=”true”
相对于控件进行定位
android:layout_above=”@id/button3”上
android:layout_below=”@id/button3”下
android:layout_toLeftOf=”@id/button3”
android:layout_toRightOf=”@id/button3”
android:layout_alignBottom=”@id/button3”两个控件底边对齐
alignBottom、alignTop、alignLeft、alignRight
2.1.3帧布局FrameLayout
2.1.4 百分比布局
由Android X支持库提供
导入支持库
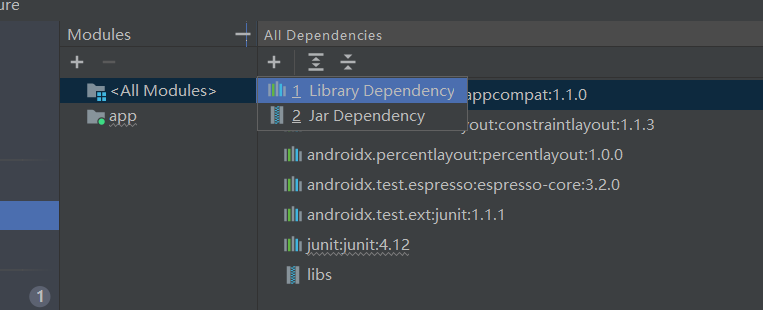
搜索percentLayout,添加依赖
然后布局文件中使用百分比布局
<androidx.percentlayout.widget.PercentFrameLayout
 android:layout_width="match_parent"
 android:layout_height="wrap_content">

    <ImageView
               android:id="@+id/imageView"
               android:layout_width="wrap_content"
               android:layout_height="wrap_content"
               android:layout_gravity="right"
               app:layout_widthPercent="50%"
               android:src="@drawable/wj"
               tools:ignore="RtlHardcoded" />


    <Button
            android:id="@+id/btn_close"
            android:layout_width="wrap_content"
            android:layout_height="wrap_content"
            android:layout_gravity="left"
            app:layout_widthPercent="50%"
            android:text="关闭" />
    </LinearLayout>
</androidx.percentlayout.widget.PercentFrameLayout>
2.2 控件
2.2.1 创建自定义控件
首先新建控件的title.xml布局
<?xml version="1.0" encoding="utf-8"?>
<LinearLayout xmlns:android="http://schemas.android.com/apk/res/android"
    android:layout_width="match_parent"
    android:layout_height="wrap_content">

    <Button
        android:id="@+id/back_btn_title"
        android:layout_width="wrap_content"
        android:layout_height="wrap_content"
        android:background="#409eff"
        android:text="返回" />

    <TextView
        android:id="@+id/title"
        android:layout_width="wrap_content"
        android:layout_height="match_parent"
        android:background="#409eff"
        android:layout_weight="1"
        android:text="TextView" />

    <Button
        android:id="@+id/edit_btn_title"
        android:layout_width="wrap_content"
        android:layout_height="wrap_content"
        android:background="#409eff"
        android:text="菜单" />
</LinearLayout>
然后在想要引入title的布局中引入<include layout="@layout/title" />即可
但是这样给title控件添加事件的时候需要给每一个活动都添加,太过于繁琐
于是有了简便的方法
public class TitleLayout extends LinearLayout {
    public TitleLayout(Context context, @Nullable AttributeSet attrs) {
        super(context, attrs);
        LayoutInflater.from(context).inflate(R.layout.title, this);

        Button back_btn = (Button)findViewById(R.id.back_btn_title);
        Button edit_btn = (Button)findViewById(R.id.edit_btn_title);
        back_btn.setOnClickListener(new OnClickListener() {
            @Override
            public void onClick(View v) {
                ((Activity)getContext()).finish();
            }
        });

        edit_btn.setOnClickListener(new OnClickListener() {
            @Override
            public void onClick(View v) {
                Toast.makeText(getContext(), "click edit", Toast.LENGTH_SHORT).show();
            }
        });
    }
}
然后在想要引入控件的活动xml中使用包名引入
<LinearLayout
    android:layout_width="match_parent"
    android:layout_height="wrap_content">
    <com.example.helloworld.TitleLayout
        android:layout_width="wrap_content"
        android:layout_height="wrap_content"
        android:layout_weight="1" />
</LinearLayout>
2.2.2 ListView列表控件
首先创建ListView布局
<?xml version="1.0" encoding="utf-8"?>
<LinearLayout xmlns:android="http://schemas.android.com/apk/res/android"
    android:layout_width="match_parent"
    android:layout_height="match_parent" >
    <ListView
        android:id="@+id/list"
        android:layout_width="match_parent"
        android:layout_height="match_parent" />
</LinearLayout>
然后在活动中添加
public class List extends AppCompatActivity {

    private String[] data = {"apple", "banana", "peach", "fire",
            "apple", "banana", "peach", "fire",
            "apple", "banana", "peach", "fire",
            "apple", "banana", "peach", "fire"};

    @Override
    protected void onCreate(Bundle savedInstanceState) {
        super.onCreate(savedInstanceState);
        setContentView(R.layout.activity_list);
        ArrayAdapter<String> adapter = new ArrayAdapter<String>(List.this, android.R.layout.simple_list_item_1, data);
        ListView listView = (ListView) findViewById(R.id.list);
        listView.setAdapter(adapter);
    }
}
定制ListView
图标
新建一个菜单类,属性是名称和图标
public class Fruit {
    private String name;
    private int imageId;

    public Fruit(String name, int imageId) {
        this.name = name;
        this.imageId = imageId;
    }

    public String getName() {
        return name;
    }

    public int getImageId() {
        return imageId;
    }
}
新建list选项布局
<?xml version="1.0" encoding="utf-8"?>
<LinearLayout xmlns:android="http://schemas.android.com/apk/res/android"
    xmlns:tools="http://schemas.android.com/tools"
    android:layout_width="match_parent"
    android:layout_height="wrap_content">

    <ImageView
        android:id="@+id/fruit_image"
        android:layout_width="50dp"
        android:layout_height="50dp" />

    <TextView
        android:id="@+id/fruit_name"
        android:layout_width="wrap_content"
        android:layout_height="wrap_content"
        android:layout_gravity="center_vertical"
        android:layout_marginLeft="10dp" />

</LinearLayout>
新建适配器继承自ArrayAdapter
public class FruitAdapter extends ArrayAdapter {
    private int resourceId;
    public FruitAdapter(@NonNull Context context, int resource, @NonNull List<Fruit> objects) {
        super(context, resource, objects);
        resourceId = resource;
    }

    @NonNull
    @Override
    public View getView(int position, @Nullable View convertView, @NonNull ViewGroup parent) {
        Fruit fruit = (Fruit) getItem(position);
        @SuppressLint("ViewHolder") View view = LayoutInflater.from(getContext()).inflate(resourceId, parent, false);
        ImageView fruitImage = (ImageView) view.findViewById(R.id.fruit_image);
        TextView fruitName = (TextView) view.findViewById(R.id.fruit_name);
        fruitImage.setImageResource(fruit.getImageId());
        fruitName.setText(fruit.getName());
        return view;
    }
}
最后再修改List活动
public class FruitList extends AppCompatActivity {
    private List<Fruit> fruitList = new ArrayList<>();
    @Override
    protected void onCreate(Bundle savedInstanceState) {
        super.onCreate(savedInstanceState);
        setContentView(R.layout.activity_list);
        addData();
        FruitAdapter fruitAdapter = new FruitAdapter(FruitList.this, R.layout.fruit_item, fruitList);
        ListView listView = (ListView)findViewById(R.id.list);
        listView.setAdapter(fruitAdapter);

    }
    // 初始化list
    private void addData() {
        for(int i = 0; i < 10; i++) {
            Fruit apple = new Fruit("apple", R.drawable.icon);
            fruitList.add(apple);
        }
    }
}
然后运行出来的List就带上了图标
点击事件
在List活动中添加事件监听
listView.setOnItemClickListener(new AdapterView.OnItemClickListener() {
    @Override
    public void onItemClick(AdapterView<?> parent, View view, int position, long id) {
        Fruit fruit = fruitList.get(position);
        Toast.makeText(FruitList.this, fruit.getName(), Toast.LENGTH_SHORT).show();
    }
});
优化
public View getView(int position, @Nullable View convertView, @NonNull ViewGroup parent) {
    Fruit fruit = (Fruit) getItem(position);
    //        @SuppressLint("ViewHolder") View view = LayoutInflater.from(getContext()).inflate(resourceId, parent, false);
    View view;
    if(convertView == null) {
        view = LayoutInflater.from(getContext()).inflate(resourceId, parent, false);
    } else {
        view = convertView;
    }
    ImageView fruitImage = (ImageView) view.findViewById(R.id.fruit_image);
    TextView fruitName = (TextView) view.findViewById(R.id.fruit_name);
    fruitImage.setImageResource(fruit.getImageId());
    fruitName.setText(fruit.getName());
    return view;
}
对convertView进行判断,当为空时使用LayoutInflater加载布局,不为空时直接使用convertView,提高了运行效率
public class FruitAdapter extends ArrayAdapter {
    private int resourceId;
    public FruitAdapter(@NonNull Context context, int resource, @NonNull List<Fruit> objects) {
        super(context, resource, objects);
        resourceId = resource;
    }

    @NonNull
    @Override
    public View getView(int position, @Nullable View convertView, @NonNull ViewGroup parent) {
        Fruit fruit = (Fruit) getItem(position);
//        @SuppressLint("ViewHolder") View view = LayoutInflater.from(getContext()).inflate(resourceId, parent, false);
        View view;
        ViewHolder viewHolder;
        if(convertView == null) {
            view = LayoutInflater.from(getContext()).inflate(resourceId, parent, false);
            viewHolder = new ViewHolder();
            viewHolder.fruitImage = (ImageView)view.findViewById(R.id.fruit_image);
            viewHolder.fruitName = (TextView)view.findViewById(R.id.fruit_name);
            view.setTag(viewHolder);
        } else {
            view = convertView;
            viewHolder = (ViewHolder) view.getTag();
        }
        viewHolder.fruitImage.setImageResource(fruit.getImageId());
        viewHolder.fruitName.setText(fruit.getName());
        return view;
    }

    class ViewHolder {
        ImageView fruitImage;
        TextView fruitName;
    }
}
修改FruitAdapter,新建内部类,对控件实例进行缓存,新建实例时通过setTag方法将实例存储,convertView不为空时使用getTag获取缓存的实例
2.2.3 RecycleView
3. 碎片
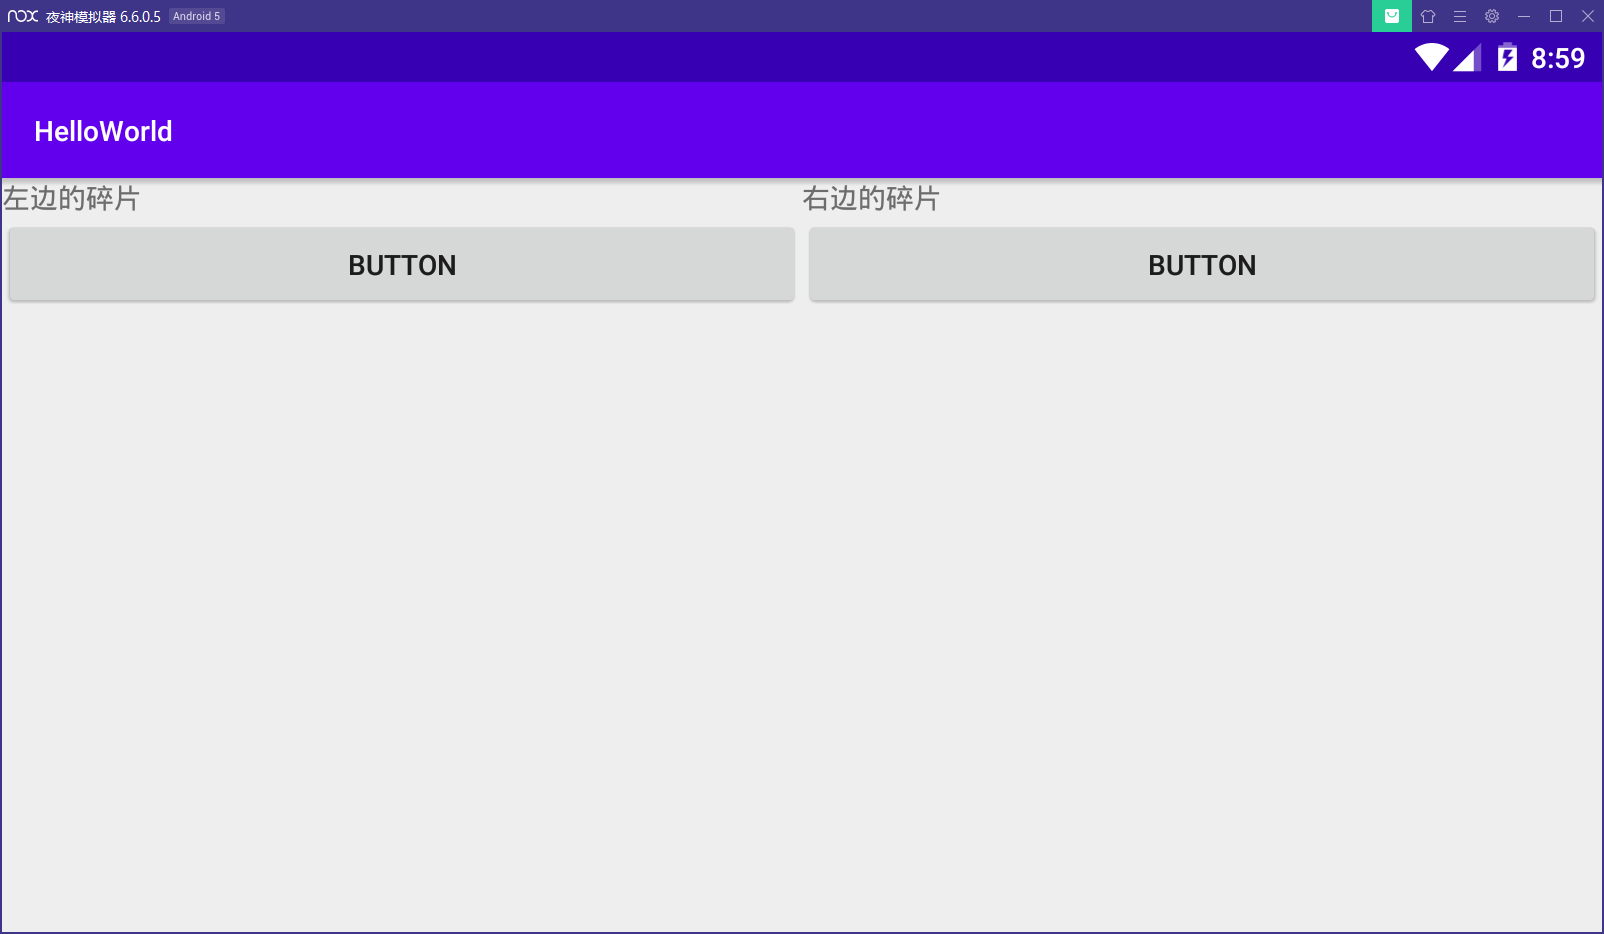
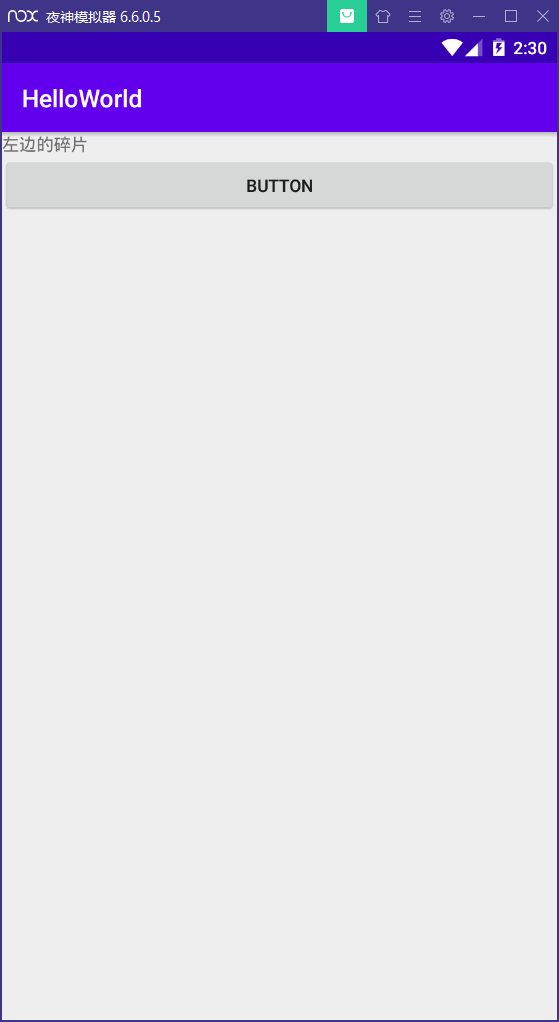
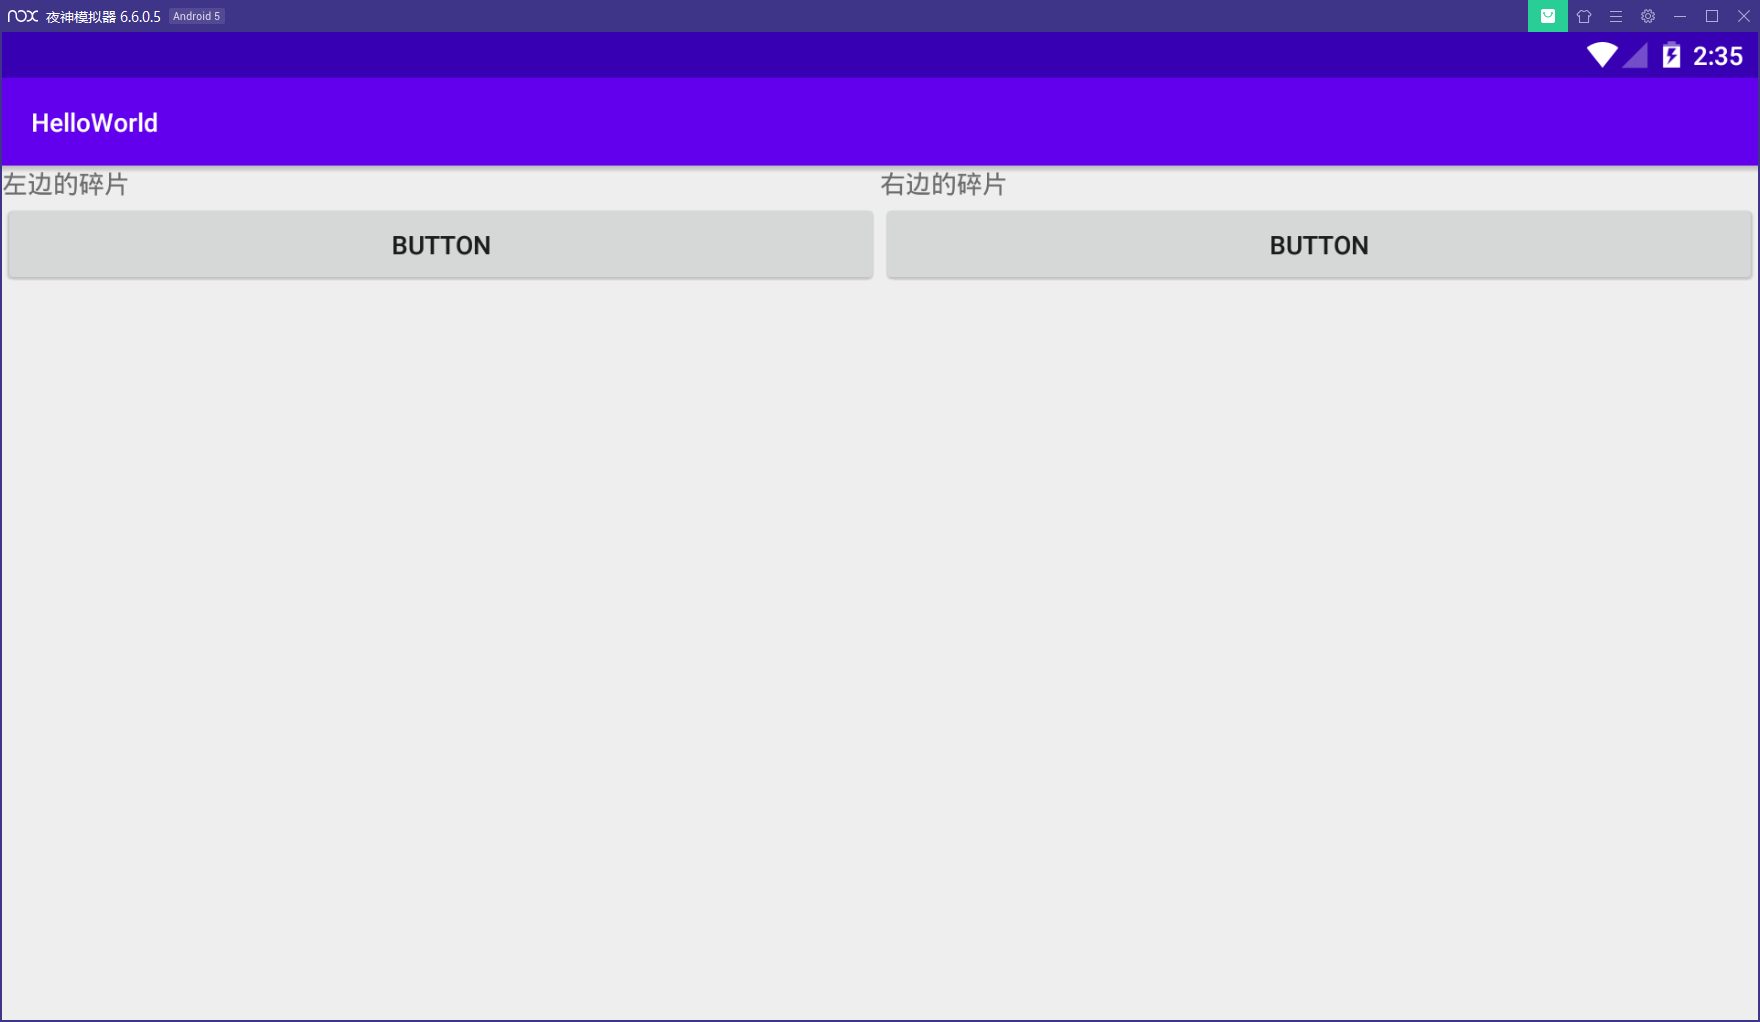
碎片可以有效解决手机平板分辨率不同产生的布局难看的问题,当屏幕分辨率大的时候引入两个碎片
3.1 碎片使用
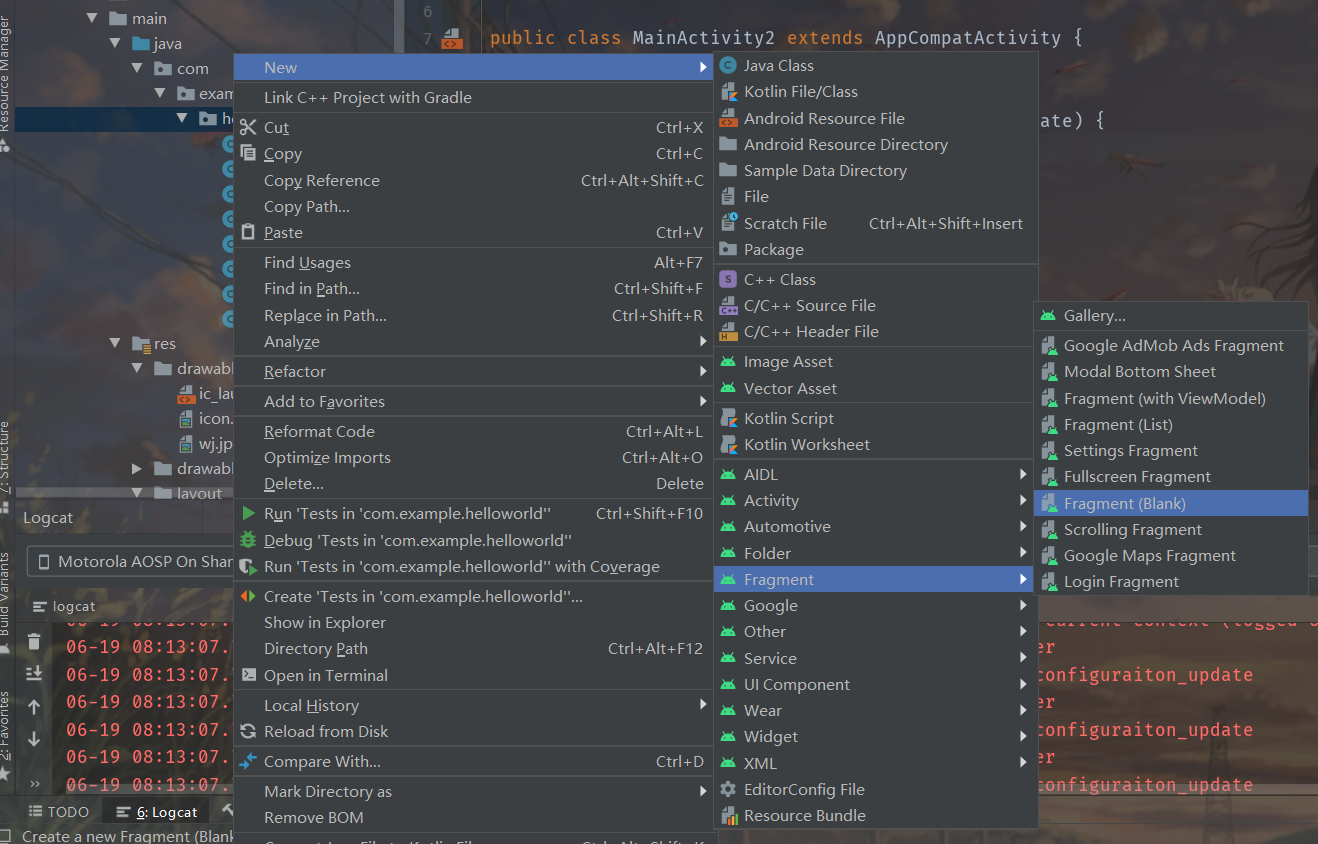
创建碎片
设置好碎片布局之后在活动的xml布局中引入fragment,选择要引入的碎片,调整布局
效果如图
3.2 动态使用碎片
再创建一个新的右侧碎片
修改当前活动
public class MainActivity2 extends AppCompatActivity implements View.OnClickListener {

    @Override
    protected void onCreate(Bundle savedInstanceState) {
        super.onCreate(savedInstanceState);
        setContentView(R.layout.activity_main2);
        Button button = (Button)findViewById(R.id.left_btn);
        button.setOnClickListener(this);
        replaceFragment(new FragmentRight());
    }

    @Override
    public void onClick(View v) {
        switch (v.getId()) {
            case R.id.left_btn:
                replaceFragment(new FragmentAnotherRight());
                break;
            default:
                break;
        }
    }

    public void replaceFragment(Fragment fragment) {
        FragmentManager fragmentManager = getSupportFragmentManager();
        FragmentTransaction fragmentTransaction = fragmentManager.beginTransaction();
        fragmentTransaction.replace(R.id.right_layout, fragment);
        fragmentTransaction.commit();
    }
}
活动创建时初始化一个右侧碎片,当左侧按钮触发时更换一个右侧碎片
3.3 返回栈
实现了动态添加碎片之后还有一个问题,当点击返回按钮时会直接退出活动,要返回上一个碎片就需要添加一个返回栈
只需要修改replaceFragment方法,调用addToBackStack方法,一般传入null即可
    public void replaceFragment(Fragment fragment) {
        FragmentManager fragmentManager = getSupportFragmentManager();
        FragmentTransaction fragmentTransaction = fragmentManager.beginTransaction();
        fragmentTransaction.replace(R.id.right_layout, fragment);
        fragmentTransaction.addToBackStack(null);
        fragmentTransaction.commit();
    }
3.4 碎片通信
3.5 碎片生命周期

3.6 使用限定符响应式布局
在res目录下新建layout-large或者layout-sw600dp文件夹,新建一个同名的活动布局,当满足条件时,安卓会自动加载相应的布局
普通的布局只有一个fragment大屏设备的引入两个fragment
手机模拟器
平板模拟器
4. 广播机制
4.1 简介
- 标准广播:异步执行,所有的广播接收器会在同一时间接收到广播消息,不能被截断
- 有序广播:同步执行,只有一个接收器能接受广播消息,接收完才能依次执行,可以被截断
4.2 接收广播
4.2.1 动态注册
广播接收器可以动态的对自己感兴趣的广播进行注册,可以在代码中注册也可以在AndroidMainfest中注册,前者称为动态注册,后者称为静态注册
4.2.1.1 动态注册监听网络变化
在代码中进行注册
public class MainActivity extends AppCompatActivity {

    private IntentFilter intentFilter;
    private NetworkChangeReceiver changeReceiver;

    @Override
    protected void onCreate(Bundle savedInstanceState) {
        super.onCreate(savedInstanceState);
        setContentView(R.layout.activity_main);
        ActivityController.addActivity(this);


        // 广播
        intentFilter = new IntentFilter();
        intentFilter.addAction("android.net.conn.CONNECTIVITY_CHANGE");
        changeReceiver = new NetworkChangeReceiver();
        registerReceiver(changeReceiver, intentFilter);

    }

    @Override
    public void onDestroy() {

        super.onDestroy();
        unregisterReceiver(changeReceiver);
    }
}
public class NetworkChangeReceiver extends BroadcastReceiver {

    @Override
    public void onReceive(Context context, Intent intent) {
        ConnectivityManager connectivityManager = (ConnectivityManager)context.getSystemService(Context.CONNECTIVITY_SERVICE);
        NetworkInfo networkInfo = connectivityManager.getActiveNetworkInfo();
        if(networkInfo != null && networkInfo.isConnected()) {
            Toast.makeText(context, "网络已连接", Toast.LENGTH_SHORT).show();
        }else {
            Toast.makeText(context, "网络未连接", Toast.LENGTH_SHORT).show();
        }
    }
}
connectivityManager.getActiveNetworkInfo();需要添加权限,Android Studio可以自动添加
当网络连接发生变化时会弹出Toast进行消息提示
4.2.2 静态注册
开机自启
new -> other -> Broadcast Recriver
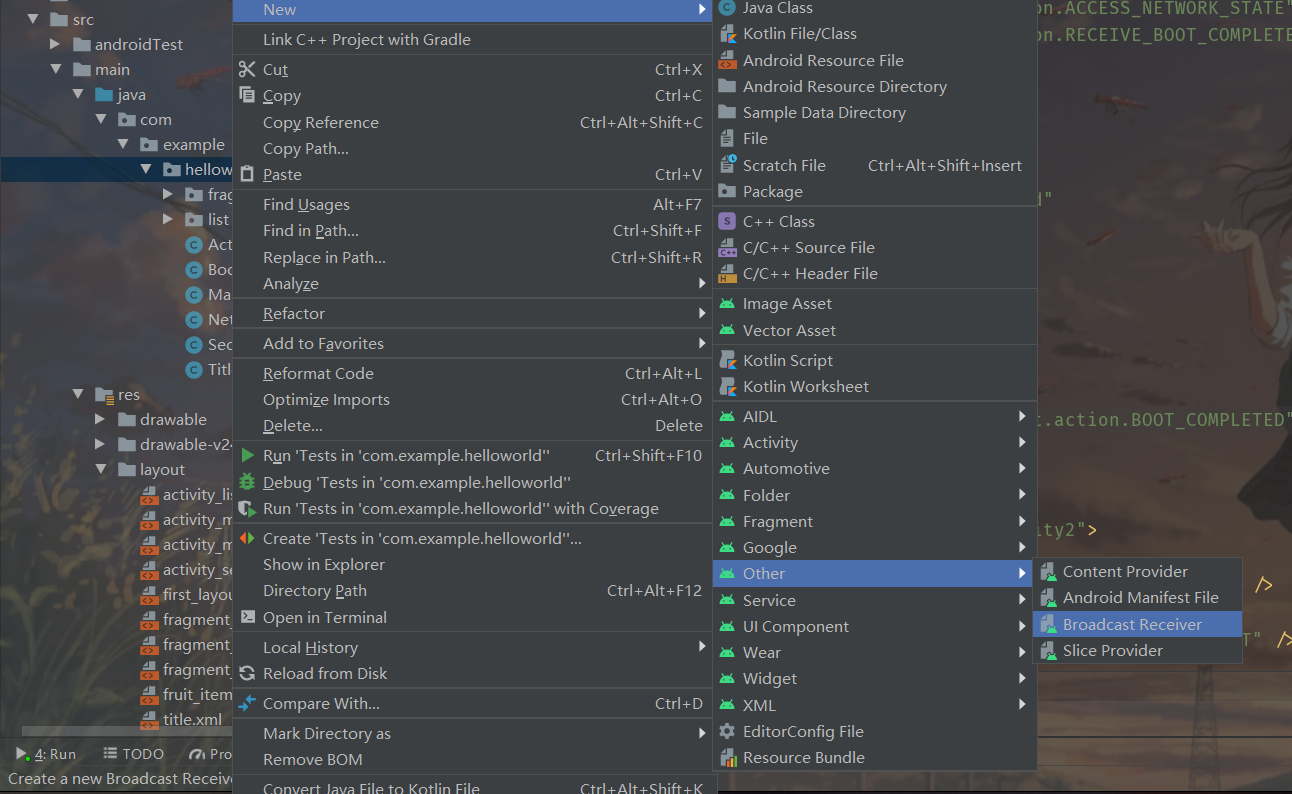
在AndroidMainfest.xml中添加代码
<uses-permission android:name="android.permission.RECEIVE_BOOT_COMPLETED" />
···
<application>
    ···
    <receiver
        android:name=".BootCompleteReceiver"
        android:enabled="true"
        android:exported="true">
        <intent-filter>
            <action android:name="android.intent.action.BOOT_COMPLETED"/>
        </intent-filter>
    </receiver>
</application>
4.3 发送自定义广播
4.3.1 标准广播
新建一个广播接收器,并静态注册,这里的action是自定义的不再是系统服务
在活动中通过按钮发送广播并携带数据
Button btn_receiver = (Button)findViewById(R.id.btn_receiver);
btn_receiver.setOnClickListener(new View.OnClickListener() {
    @Override
    public void onClick(View v) {
        Intent intent = new Intent("com.example.helloworld.MY_RECEIVER");
        intent.putExtra("my_blog", "test");
        sendBroadcast(intent);
    }
});
在接收器中接收数据并显示
public class MyReceiver extends BroadcastReceiver {

    @Override
    public void onReceive(Context context, Intent intent) {
        String msg = intent.getStringExtra("my_blog");
        Toast.makeText(context, msg, Toast.LENGTH_SHORT).show();
    }
}
4.3.2 有序广播
4.4 本地广播
全局系统的广播存在安全隐患容易被其他程序截获,本地广播只能在程序内部进行传递,提高安全性
导入第三方依赖LocalBroadcastManager
新建本地广播接收器
在活动中动态注册接收器,并添加事件发送广播
public class MainActivity extends AppCompatActivity {

    private IntentFilter intentFilter;
    private LocalBroadcastManager localBroadcastManager;
    private LocalReceiver localReceiver;

    @Override
    protected void onCreate(Bundle savedInstanceState) {
        super.onCreate(savedInstanceState);
        setContentView(R.layout.activity_main);

        ActivityController.addActivity(this);

        intentFilter = new IntentFilter();
        localBroadcastManager = LocalBroadcastManager.getInstance(this);
        intentFilter.addAction("com.example.helloworld.LOCAL_BROADCAST");
        localReceiver = new LocalReceiver();
        localBroadcastManager.registerReceiver(localReceiver, intentFilter);


        Button btn_local = (Button)findViewById(R.id.btn_local);
        btn_local.setOnClickListener(new View.OnClickListener() {
            @Override
            public void onClick(View v) {
                Intent intent = new Intent("com.example.helloworld.LOCAL_BROADCAST");
                intent.putExtra("my_blog", "test local");
                localBroadcastManager.sendBroadcast(intent);
            }
        });

    }

    @Override
    public void onDestroy() {

        super.onDestroy();
        localBroadcastManager.unregisterReceiver(localReceiver);
    }
}
本地广播只能动态注册
4.5 最佳实践——强制下线
- 创建广播接收器接收强制下线广播
- 接收器添加提示框提示强制下线
- 关闭所有活动,通过ActivityController
- 重启登陆活动
5. 数据持久化
5.1 文件存储
新建一个文件操作活动,在布局文件中添加一个EditText
<EditText
    android:id="@+id/file_edit"
    android:layout_width="wrap_content"
    android:layout_height="match_parent"
    android:hint="edit in here" />
5.1.1 将数据存储到文件
在活动中添加代码,编写保存文件的方法并且在活动销毁时触发保存事件
public class FileActivity extends AppCompatActivity {

    private EditText editText;

    @Override
    protected void onCreate(Bundle savedInstanceState) {
        super.onCreate(savedInstanceState);
        setContentView(R.layout.activity_file);
        editText = (EditText)findViewById(R.id.file_edit);

    }

    @Override
    protected void onDestroy() {
        super.onDestroy();
        String input = editText.getText().toString();
        save(input);
    }

    public void save(String inputText) {
        FileOutputStream fileOutputStream = null;
        BufferedWriter bufferedWriter = null;

        try {
            fileOutputStream = openFileOutput("data", Context.MODE_PRIVATE);
            bufferedWriter = new BufferedWriter(new OutputStreamWriter(fileOutputStream));
            bufferedWriter.write(inputText);
        } catch (IOException e) {
            e.printStackTrace();
        } finally {
            if(bufferedWriter != null) {
                try {
                    bufferedWriter.close();
                    Toast.makeText(FileActivity.this, "saved success", Toast.LENGTH_SHORT).show();
                } catch (IOException e) {
                    e.printStackTrace();
                }
            }
        }
    }

}

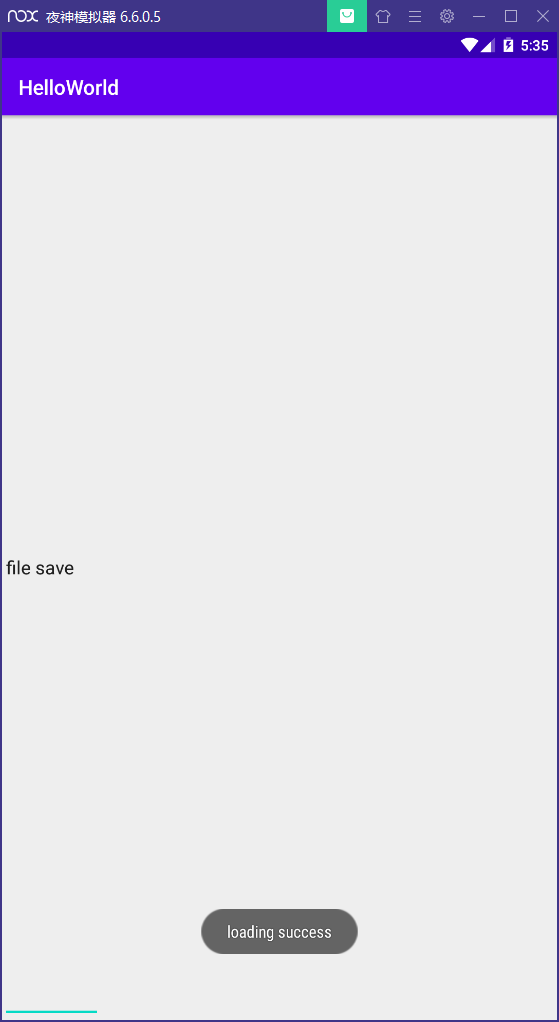
5.1.2 从文件中读取数据
在活动中增加加载方法,活动创建时先读取文件,有文件直接加载
public class FileActivity extends AppCompatActivity {

    private EditText editText;

    @Override
    protected void onCreate(Bundle savedInstanceState) {
        super.onCreate(savedInstanceState);
        setContentView(R.layout.activity_file);
        editText = (EditText)findViewById(R.id.file_edit);

        String text = load();
        if(!TextUtils.isEmpty(text)) {
            editText.setText(text);
            editText.setSelection(text.length());
            Toast.makeText(FileActivity.this, "loading success", Toast.LENGTH_SHORT).show();
        }
    }

···

    public String load() {
        FileInputStream in = null;
        BufferedReader reader = null;
        StringBuilder content = new StringBuilder();

        try {
            in = openFileInput("data");
            reader = new BufferedReader(new InputStreamReader(in));
            String line = "";
            while((line = reader.readLine()) != null) {
                content.append(line);
            }
        } catch (IOException e) {
            e.printStackTrace();
        } finally {
            if(reader != null) {
                try {
                    reader.close();
                } catch (IOException e) {
                    e.printStackTrace();
                }
            }
        }
        return content.toString();
    }
}
5.2 SharedPreferences存储
存储文件是xml格式
首先创建一个活动,布局中添加两个按钮,一个save一个load
5.2.1将数据存储到SharedPreferences中
首先需要获取SharedPreferences对象,Android中提供了三种方式获取SharedPreferences对象
- Context类中的getSharedPreferences()方法,两个参数:指定SharedPreferences文件名;指定操作模式,目前
只有MODE_PRIVATE可选 - Activity类中getPreferences()方法:只有一个参数:操作模式。(默认当前活动名为SharedPreferences文件名)
- PreferenceManager类中getDefaultSharedPreferences()方法:
静态方法,接收一个Context参数,使用当前包名为前缀来命名SharedPreferences文件
SharedPreferences.Editor editor = getSharedPreferences("data_preference", MODE_PRIVATE).edit();
editor.putString("name", "Tom");
editor.putInt("age", 20);
editor.putBoolean("married", false);
editor.apply();
5.2.2从SharedPreferences中读取数据
从上面可以看出SharedPreferences存储文件非常简单,读取文件更为简便,从SharedPreferences对象中一系列get方法即可获得数据
SharedPreferences editor_load = getSharedPreferences("data_preference", MODE_PRIVATE);
String name = editor_load.getString("name", "");
int age = editor_load.getInt("age", 0);
Boolean married = editor_load.getBoolean("married", false);
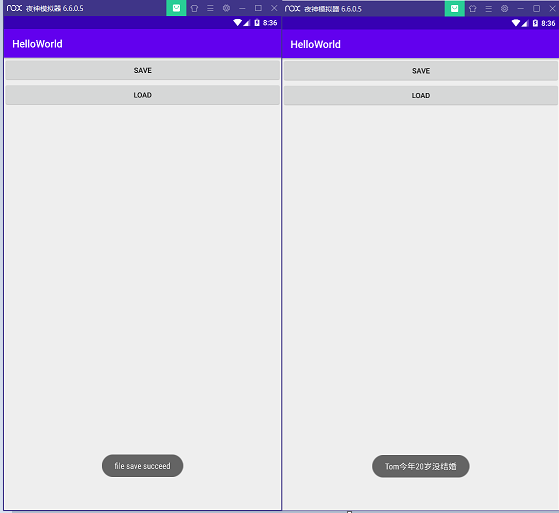
5.2.3 代码及效果展示
public class PreferencesActivity extends AppCompatActivity implements View.OnClickListener {

    @Override
    protected void onCreate(Bundle savedInstanceState) {
        super.onCreate(savedInstanceState);
        setContentView(R.layout.activity_preferences);

        Button btn_save = (Button)findViewById(R.id.btn_preference_save);
        btn_save.setOnClickListener(this);
        Button btn_load = (Button)findViewById(R.id.btn_preference_load);
        btn_load.setOnClickListener(this);
    }

    @Override
    public void onClick(View v) {
        switch (v.getId()) {
            case R.id.btn_preference_save:
                SharedPreferences.Editor editor = getSharedPreferences("data_preference", MODE_PRIVATE).edit();
                editor.putString("name", "Tom");
                editor.putInt("age", 20);
                editor.putBoolean("married", false);
                editor.apply();
                Toast.makeText(PreferencesActivity.this, "file save succeed", Toast.LENGTH_SHORT).show();
                break;
            case R.id.btn_preference_load:
                SharedPreferences editor_load = getSharedPreferences("data_preference", MODE_PRIVATE);
                String name = editor_load.getString("name", "");
                int age = editor_load.getInt("age", 0);
                Boolean married = editor_load.getBoolean("married", false);
                String marry = married?"结婚了":"没结婚";
                Toast.makeText(PreferencesActivity.this, name+"今年"+age+"岁"+marry, Toast.LENGTH_SHORT).show();
                break;
            default:
                break;
        }
    }
}
5.3 数据库SQLite
SQLite是一款轻量级关系数据库,支持SQL语法,遵循ACID
5.3.1 创建数据库
略
5.3.2 LitePal操作数据库
通过JavaBean操作数据库
引入依赖
LitePal
配置xml映射
app.src.main目录下新建assets目录,新建litepal.xml配置文件
<?xml version="1.0" encoding="utf-8" ?>
<litepal>
    <dbname value="BookStore" />
    <version value="1" />
    <list></list>
</litepal>
修改Mainfest,application新加属性android:name="org.litepal.LitePalApplication"
创建数据库
创建JavaBean
添加活动代码,当数据库访问一次之后就创建了

对数据进行操作需要让JavaBean继承DataSupport
添加数据

更新数据
一种方法是将要修改的数据值全部set然后save在set要修改的值再次save
另一种方法用updateAll
book.setPrice(14.5);
book.updateAll("name = ? and author = ?", "Tom","第一行代码");
设置要修改的价格,然后使用updateAll方法,方法中的参数是约束条件,当当与where查询,只修改匹配到的信息
删除数据
使用DataSupport中的deleteAll方法,第一个参数是眼删除的表名,第二个参数是查询条件
DataSupport.deleteAll(Book.class, "price < ?", "14");
查询数据
使用 List<Book> list = DataSupport.findAll(Book.class);可以将所有的数据返回到一个List中
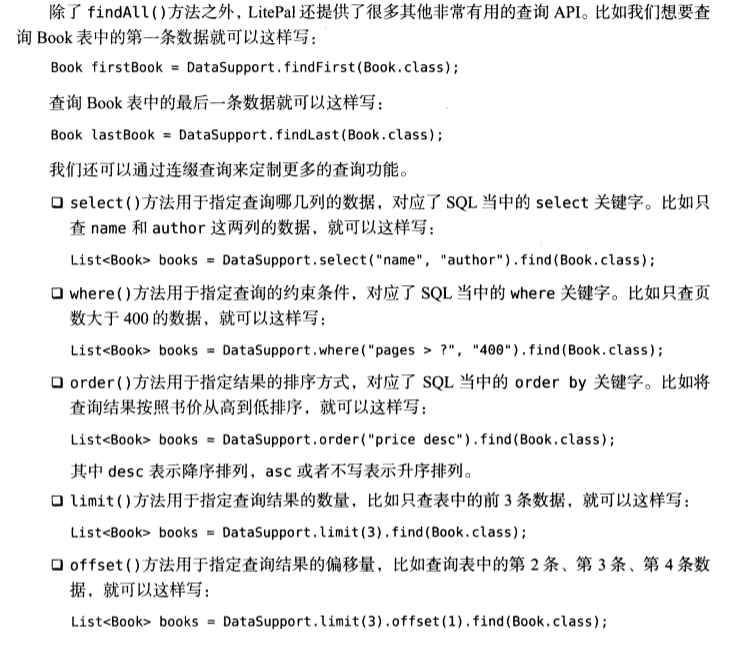
此外,还支持原生查询
Cursor cursor = DataSupport.findBySQL("select * from book where name = ?", "第一行代码");
返回的是一个Cuesor对象,需要将数据一一取出
6. 跨程序共享数据——内容提供器
6.1 运行时权限
安卓6.0以上加入了运行时权限,危险权限需要用户授权
参考代码
public class PermissionActivity extends AppCompatActivity {

    List<String> contacts = new ArrayList<>();
    ArrayAdapter<String> adapter;

    @Override
    protected void onCreate(Bundle savedInstanceState) {
        super.onCreate(savedInstanceState);
        setContentView(R.layout.activity_permission);

        ListView list = (ListView) findViewById(R.id.list_contact);
        adapter = new ArrayAdapter<String>(this, android.R.layout.simple_list_item_1, contacts);
        list.setAdapter(adapter);


        if (ContextCompat.checkSelfPermission(PermissionActivity.this, Manifest.permission.READ_CONTACTS)
            != PackageManager.PERMISSION_GRANTED) {
            ActivityCompat.requestPermissions(PermissionActivity.this, new String[]{Manifest.permission.READ_CONTACTS}, 1);
        } else {
            readContacts();
        }
    }

    private void readContacts() {
        Cursor cursor = null;
        try {
            cursor = getContentResolver().query(ContactsContract.CommonDataKinds.Phone.CONTENT_URI, null, null, null, null);
            if(cursor != null) {
                while (cursor.moveToNext()) {
                    String name = cursor.getString(cursor.getColumnIndex(ContactsContract.CommonDataKinds.Phone.DISPLAY_NAME));
                    String number = cursor.getString(cursor.getColumnIndex(ContactsContract.CommonDataKinds.Phone.NUMBER));
                    contacts.add(name+ "\n" +number);
                }
                adapter.notifyDataSetChanged();
            }
        } catch (Exception e) {
            e.printStackTrace();
        } finally {
            if(cursor != null) {
                cursor.close();
            }
        }
    }
    @Override
    public void onRequestPermissionsResult(int requestCode, @NonNull String[] permissions, @NonNull int[] grantResults) {
        super.onRequestPermissionsResult(requestCode, permissions, grantResults);
        switch (requestCode) {
            case 1:
                if (grantResults.length > 0 && grantResults[0] == PackageManager.PERMISSION_GRANTED) {
                    readContacts();
                } else {
                    Toast.makeText(PermissionActivity.this, "no permission", Toast.LENGTH_SHORT).show();
                }
                break;
            default:
                break;
        }
    }
}
6.2 创建内容提供器
7. 运用手机多媒体
7.1 使用通知
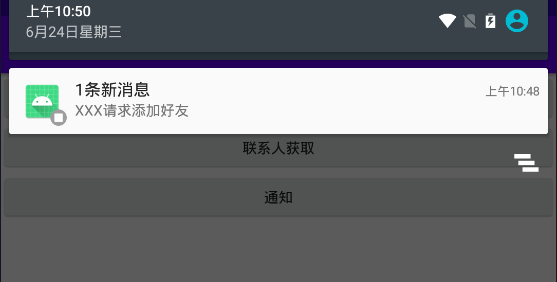
首先获取通知管理器对象,然后创建通知对象,通过通知管理器下发通知,每个通知的id都是不同的
代码示例通过按钮触发通知
Button btn_notification = (Button)findViewById(R.id.btn_notification);
btn_notification.setOnClickListener(new View.OnClickListener() {
    @Override
    public void onClick(View v) {
        NotificationManager manager = (NotificationManager)getSystemService(NOTIFICATION_SERVICE);
        Notification notification = new Notification.Builder(PermissionActivity.this)
                .setContentTitle("1条新消息")
                .setContentText("XXX请求添加好友")
                .setWhen(System.currentTimeMillis())
                .setSmallIcon(R.mipmap.ic_launcher)
                .setLargeIcon(BitmapFactory.decodeResource(getResources(), R.mipmap.ic_launcher))
                .build();
        manager.notify(1, notification);
    }
});
这里可以看到按钮点击之后通知栏显示了一条通知
但是,这里的通知不能点击,要再让它可以点击
这时需要用到PendingIntent,可以理解为延时的Intent
将代码稍作改装,就得到了可以点击的通知
Button btn_notification = (Button)findViewById(R.id.btn_notification);
btn_notification.setOnClickListener(new View.OnClickListener() {
    @Override
    public void onClick(View v) {
        Intent intent = new Intent(PermissionActivity.this, MainActivity.class);
        PendingIntent pendingIntent = PendingIntent.getActivity(PermissionActivity.this, 0, intent, 0);
        NotificationManager manager = (NotificationManager)getSystemService(NOTIFICATION_SERVICE);
        Notification notification = new Notification.Builder(PermissionActivity.this)
                .setContentTitle("1条新消息")
                .setContentText("XXX请求添加好友")
                .setWhen(System.currentTimeMillis())
                .setSmallIcon(R.mipmap.ic_launcher)
                .setLargeIcon(BitmapFactory.decodeResource(getResources(), R.mipmap.ic_launcher))
                .setContentIntent(pendingIntent)
                .build();
        manager.notify(1, notification);
    }
});
距离完成还差一步,点击通知之后通知应该是消失的
有两种方法:
通知追加setAutoCancel方法
···
    .setAutoCancel(true)
通过通知管理器的canael方法根据通知id消除通知
···
    NotificationManager manager = (NotificationManager)getSystemService(NOTIFICATION_SERVICE);
    manager.cancel(1)
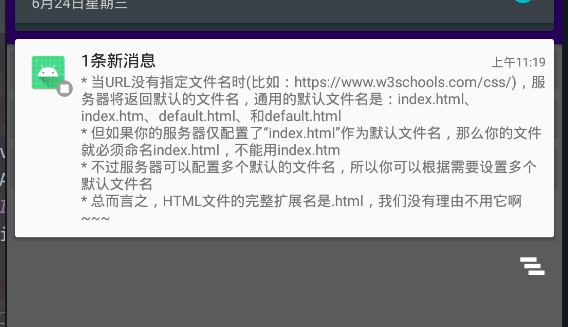
长文本通知
.setStyle(new Notification.BigTextStyle().bigText("* 当URL没有指定文件名时(比如:https://www.w3schools.com/css/)," +
                                "服务器将返回默认的文件名," +
                                "通用的默认文件名是:index.html、index.htm、default.html、和default.html\n" +
                                "* 但如果你的服务器仅配置了“index.html”作为默认文件名,那么你的文件就必须命名index.html,不能用index.htm\n" +
                                "* 不过服务器可以配置多个默认的文件名,所以你可以根据需要设置多个默认文件名\n" +
                                "* 总而言之,HTML文件的完整扩展名是.html,我们没有理由不用它啊~~~"))
图片通知:
.setStyle(new Notification.BigPictureStyle().bigPicture(BitmapFactory.decodeResource(getResources(), R.drawable.wj)))
7.2 调用摄像头和相册
8. 网络
8.1 webView
应用程序内引入网页,不需要打开系统浏览器
创建活动,布局添加webview组件
<?xml version="1.0" encoding="utf-8"?>
<LinearLayout xmlns:android="http://schemas.android.com/apk/res/android"
    xmlns:app="http://schemas.android.com/apk/res-auto"
    xmlns:tools="http://schemas.android.com/tools"
    android:layout_width="match_parent"
    android:layout_height="match_parent"
    tools:context=".WebActivity">

    <WebView
        android:id="@+id/web_view"
        android:layout_width="match_parent"
        android:layout_height="match_parent" />
</LinearLayout>
编辑活动代码
public class WebActivity extends AppCompatActivity {

    @SuppressLint("SetJavaScriptEnabled")
    @Override
    protected void onCreate(Bundle savedInstanceState) {
        super.onCreate(savedInstanceState);
        setContentView(R.layout.activity_web);

        WebView webView = (WebView)findViewById(R.id.web_view);
        // 设置允许js,否则网页逻辑可能无法运行
        webView.getSettings().setJavaScriptEnabled(true);
        webView.setWebViewClient(new WebViewClient());
        webView.loadUrl("http://www.baidu.com");
    }
}
该活动需要网络权限
<uses-permission android:name="android.permission.INTERNET"/>
8.2 HTTP协议访问网络
8.2.1 HttpURLConnection
安卓上发送HTTP请求有两种方式HttpURLConnection和HttpClient,由于HttpClientd的API数量多,扩展困难已经在6.0被移除
创建布局
    <Button
        android:id="@+id/btn_http"
        android:layout_width="match_parent"
        android:layout_height="wrap_content"
        android:text="HTTP请求" />
    <TextView
        android:id="@+id/text_http"
        android:layout_width="match_parent"
        android:layout_height="wrap_content" />
编辑活动代码
public class WebActivity extends AppCompatActivity {
    TextView responseText;

    @SuppressLint("SetJavaScriptEnabled")
    @Override
    protected void onCreate(Bundle savedInstanceState) {
        super.onCreate(savedInstanceState);
        setContentView(R.layout.activity_web);

        Button sentRequest = (Button)findViewById(R.id.btn_http);
        responseText = (TextView)findViewById(R.id.text_http);
        sentRequest.setOnClickListener(new View.OnClickListener() {
            @Override
            public void onClick(View v) {
                sendRequestWithHttpURLConnection();
            }
        });

    }

    private void sendRequestWithHttpURLConnection() {
        new Thread(new Runnable() {
            @Override
            public void run() {
                // 创建HttpURLConnection对象
                HttpURLConnection connection = null;
                BufferedReader reader = null;
                try {
                    // URL
                    URL url = new URL("http://www.baidu.com");
                    connection = (HttpURLConnection)url.openConnection();// 建立连接
                    connection.setRequestMethod("GET");// 请求方式
                    connection.setConnectTimeout(8000);// 超时时间
                    connection.setReadTimeout(8000);
                    InputStream in = connection.getInputStream(); // 获取输入流
                    reader = new BufferedReader(new InputStreamReader(in));
                    StringBuilder response = new StringBuilder();
                    String line;
                    while ((line = reader.readLine()) != null) {
                        response.append(line);
                    }
                    showResponse(response.toString());
                } catch (Exception e) {
                    e.printStackTrace();
                } finally {
                    // 完成后需要关闭连接
                    if(reader != null) {
                        try {
                            reader.close();
                        } catch (IOException e) {
                            e.printStackTrace();
                        }
                    }
                    if(connection != null) {
                        connection.disconnect();
                    }
                }
            }
        }).start();
    }

    private void showResponse(final String response) {
        runOnUiThread(new Runnable() {
            @Override
            public void run() {
                responseText.setText(response);
            }
        });
    }
}
耗时的操作不能再主线程中进行,开一个线程处理;
new Thread().start;不要忽略start更新UI不能在子线程中,会闪退,通过runOnUiThread切换回主线程
POST请求
connection.setRequestMethod("POST");// 请求方式
DataOutputStream out = new DataOutputStream(connection.getOutputStream());
out.writeBytes("name=Tom&password=123456");
在获取输入流之前把要提交的数据写入
8.2.2 使用OKHttp
在AndroidX中添加依赖okhttp(squareup公司的)
添加新的方法使用OkHttp,把button的绑定事件改为sendRequestWithOkHttp
private void sendRequestWithOkHttp() {
    new Thread(new Runnable() {
        @Override
        public void run() {
            try {
                OkHttpClient client = new OkHttpClient();
                Request request = new Request.Builder()
                        .url("http://www.baidu.com").build();
                Response response = client.newCall(request).execute();
                String responseData = Objects.requireNonNull(response.body()).string();
                showResponse(responseData);
            } catch (Exception e) {
                e.printStackTrace();
            }
        }
    }).start();
}
就可以看到跟原来一样的效果
8.3 解析XML数据
进行网络传输通常有两种格式XML和JSON
课本P334
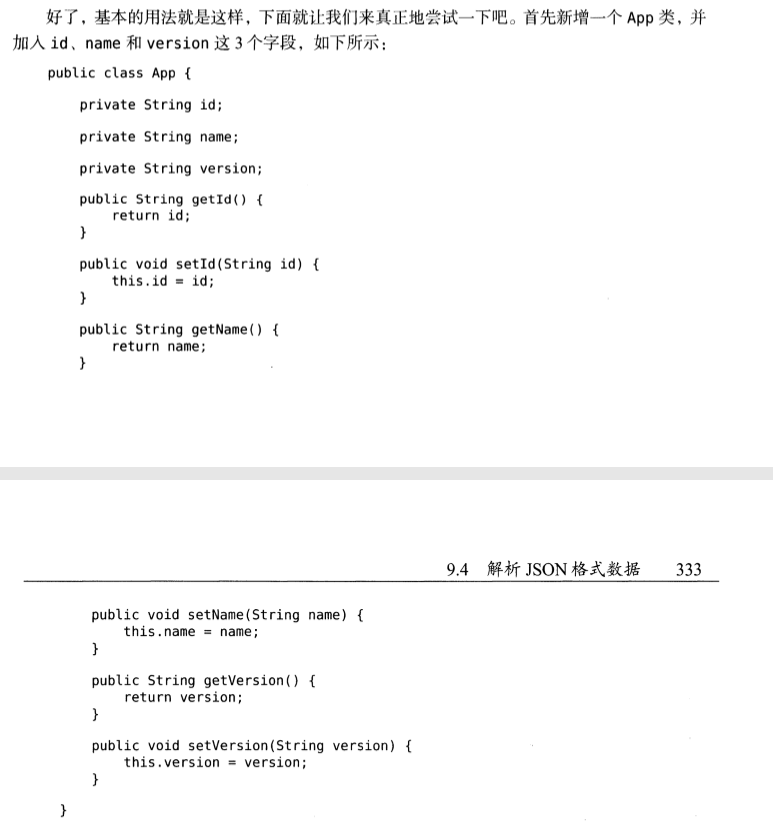
8.4 解析JSON数据
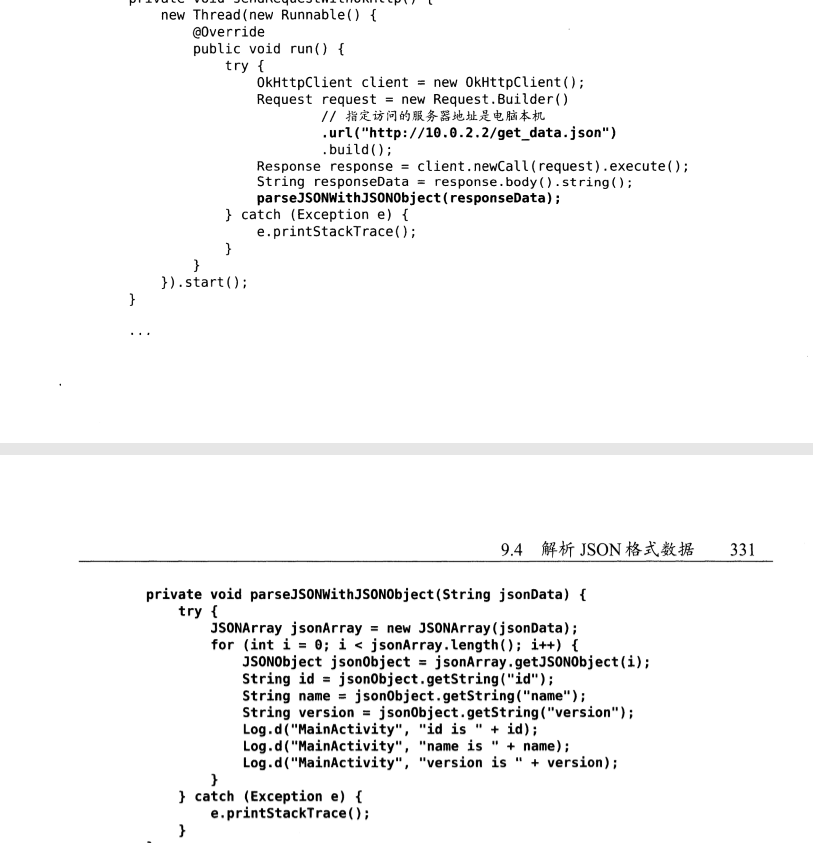
使用GSON
添加依赖gson
可以把JSON的格式映射成一个对象

8.5 网络方法封装
将网络方法封装到HttpUtil类中,方法作为静态方法直接调用
如
public class HttpUtil {
    public static void sendGetRequestWithOkHttp(String address, okhttp3.Callback callback) {
        OkHttpClient client = new OkHttpClient();
        Request request = new Request.Builder()
                .url(address)
                .build();
        client.newCall(request).enqueue(callback);
    }
}
调用
private void sendRequestWithOkHttp() {
    new Thread(new Runnable() {
        @Override
        public void run() {
            HttpUtil.sendGetRequestWithOkHttp("http://www.baidu.com", new okhttp3.Callback() {

                @Override
                public void onResponse(@NotNull Call call, @NotNull Response response) throws IOException {
                    String responseData = Objects.requireNonNull(response.body()).string();
                    showResponse(responseData);
                }

                @Override
                public void onFailure(@NotNull Call call, @NotNull IOException e) {
                    e.printStackTrace();
                }
            });
        }
    }).start();
}