
1 开始
1.1 简介
Nest.js是一个渐进的Node.js框架,可以在TypeScript和JavaScript (ES6、ES7、ES8)之上构建高效、可伸缩的企业级服务器端应用程序。它的核心思想是提供了一个层与层直接的耦合度极小、抽象化极高的一个架构体系
Nest框架底层HTTP平台默认是基于Express 实现的,所以无需担心第三方库的缺失。默认集成了mongoose、TypeOrm、Redis、Graphql、Socket.io,微服务等模块。Nest基于TypeScript编写并且结合了OOP(面向对象编程),FP(函数式编程)和 FRP(函数式响应编程)的相关理念,为node.js世界带来设计模式和成熟的解决方案。
1.2 安装与启动
全局安装nest——
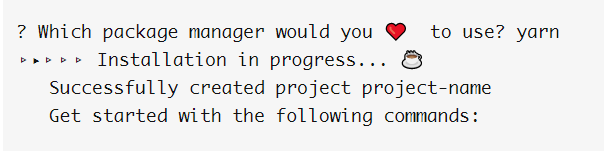
npm install @nest/cli -g创建项目——
nest new app-name创建过程中会让你选择包管理器,npm或者yarn
进入项目——
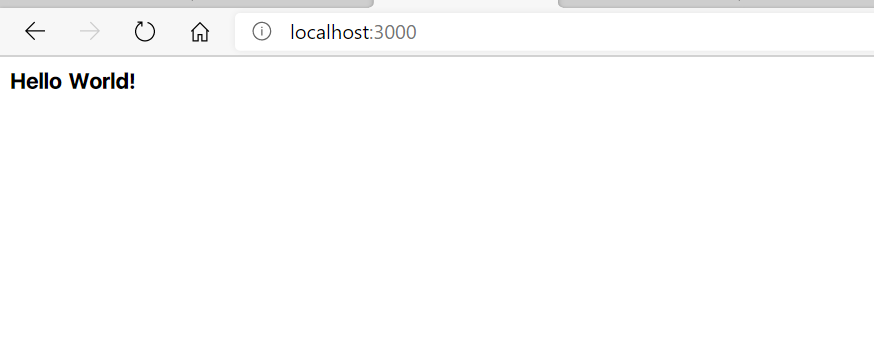
cd app-name启动项目——
npm run start
项目默认使用3000端口,打开浏览器输入http://localhost:3000,就可以看到默认的数据了
1.3 入口文件及文件结构
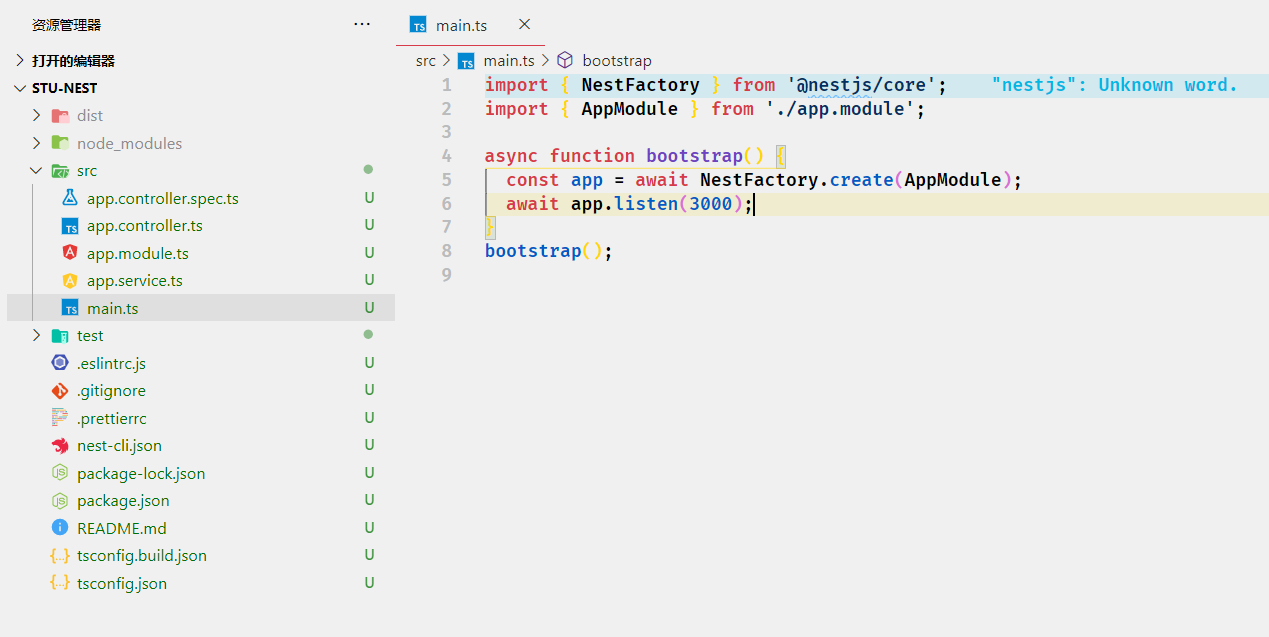
整个项目的入口文件是main.ts,只有8行,利用了nestjs的工厂创建了实例,监听3000端口
一般我们的分包的方式都是相同职责的文件放在一起(比如Egg.js),比如controller包下面都是controller,service包下面都是service,但是在nestjs中,这种方式不如按照功能分包来的方便(login包下面的所有文件都与login功能相关)
├─ app
│  ├─ dist	// 打包目录
│  ├─ src  // 源码
│  │  ├─ main.ts  // 入口
│  │  ├─ modules  // 业务逻辑代码
│  │  │  └─ login // 跟login相关的代码(controller、service、module等)
│  │  └─ app.module.ts // 总的模块组装文件
│  └─ test  // 测试相关
1.4 功能Demo
Controller中使用Service中的功能不再需要new一个Service示例,那样既浪费内存,又不容易维护。在NestJS中,使用类似Spring IoC的方式,将service注入到Controller中
以Hello功能为例进行代码演示:
在功能包下的module.ts中实现注入这一操作
import { Module } from '@nestjs/common';
import { HelloController } from './hello.controller';
import { HelloService } from './hello.service';

@Module({
  imports: [],
  controllers: [HelloController],
  providers: [HelloService],
})
export class HelloModule {}
在Controller中编写控制器代码
import { Controller, Get, Query } from '@nestjs/common';
import { HelloService } from './hello.service';

@Controller('/hello')
export class HelloController {
  constructor(private readonly helloService: HelloService) {}

  @Get()
  hi(@Query() { id }): string {
    console.log(id);
    return this.helloService.getHi() + id;
  }
}
可以看到在controller中没有出现任何new的字样,这时候运行代码你会发现
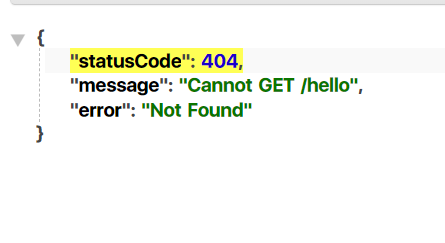
仍然找不到,因为没有在app.module.ts中进行组装,每一个功能就像一个器官,需要在这个文件中进行拼装才能正常工作
到这里答题的流程已经差不多看完了,下面开始详细介绍
2 控制器
2.1 创建Controller
运行命令 nest g controller hello,可以使用nest自动创建controller文件
2.2 路由
通过@Controller注解来创建一级路由,在Controller内部使用@Get、@Post等方法装饰器来创建不同http方法的子路由,例如
@Controller('/hello')
export class HelloController {
  constructor(private readonly helloService: HelloService) {}

  @Get('hi')
  hi(): string {
    return this.helloService.getHi();
  }
}
这段代码生成的路由就是/hello/hi,使用GET请求访问
2.3 参数
2.3.1 Query
GET请求中一般使用@Query()注解来修饰方法中的参数
@Controller('/hello')
export class HelloController {
  constructor(private readonly helloService: HelloService) {}

  @Get('hi')
  hi(@Query() { id }): string {
    return this.helloService.getHi() + '——' + id;
  }
}
通过query的形式携带参数

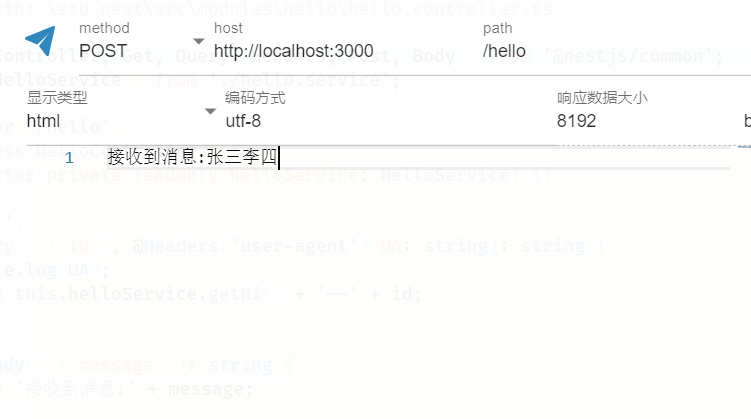
2.3.2 Body
在POST请求中一般使用@Body()注解来获取数据
@Post()
save(@Body() { message }): string {
  return '接收到消息:' + message;
}
使用http工具发送post请求来测试一下
2.3.3 Headers
使用@Headers()注解来获取requestHeader中的数据
@Get('hi')
hi(@Query() { id }, @Headers() header): string {
  console.log(header);
  return this.helloService.getHi() + '——' + id;
}

还可以获取某一特定的请求头,比如获取请求中的UA
@Get('hi')
hi(@Query() { id }, @Headers('user-agent') UA: string): string {
  console.log(UA);
  return this.helloService.getHi() + '——' + id;
}

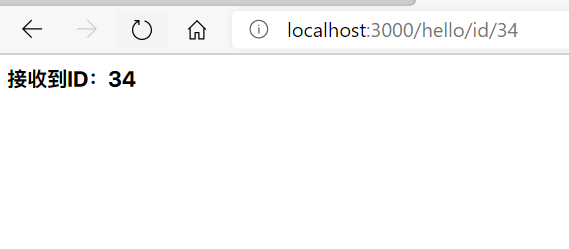
2.3.4 Param
@Param()一般用在动态路由,形如:http://localhost:3000/hello/id/123,后面的123是动态的,可以是其他数据
@Get('id/:id')
getId(@Param() { id }): string {
  return '接收到ID:' + id;
}
2.4 集成swagger文档
运行命令安装swagger
npm install @nestjs/swagger swagger-ui-express --save
在main.ts中进行配置
import { NestFactory } from '@nestjs/core';
import { SwaggerModule, DocumentBuilder } from '@nestjs/swagger';
import { AppModule } from './app.module';

async function bootstrap() {
  const app = await NestFactory.create(AppModule);

  const options = new DocumentBuilder()
    .setTitle('Nest RESTful API')
    .setDescription('接口文档')
    .setVersion('1.0')
    .addBearerAuth()
    .build();
  const document = SwaggerModule.createDocument(app, options);
  SwaggerModule.setup('doc', app, document);

  await app.listen(3000);
}
bootstrap();
然后就可以通过设置的路径去访问了
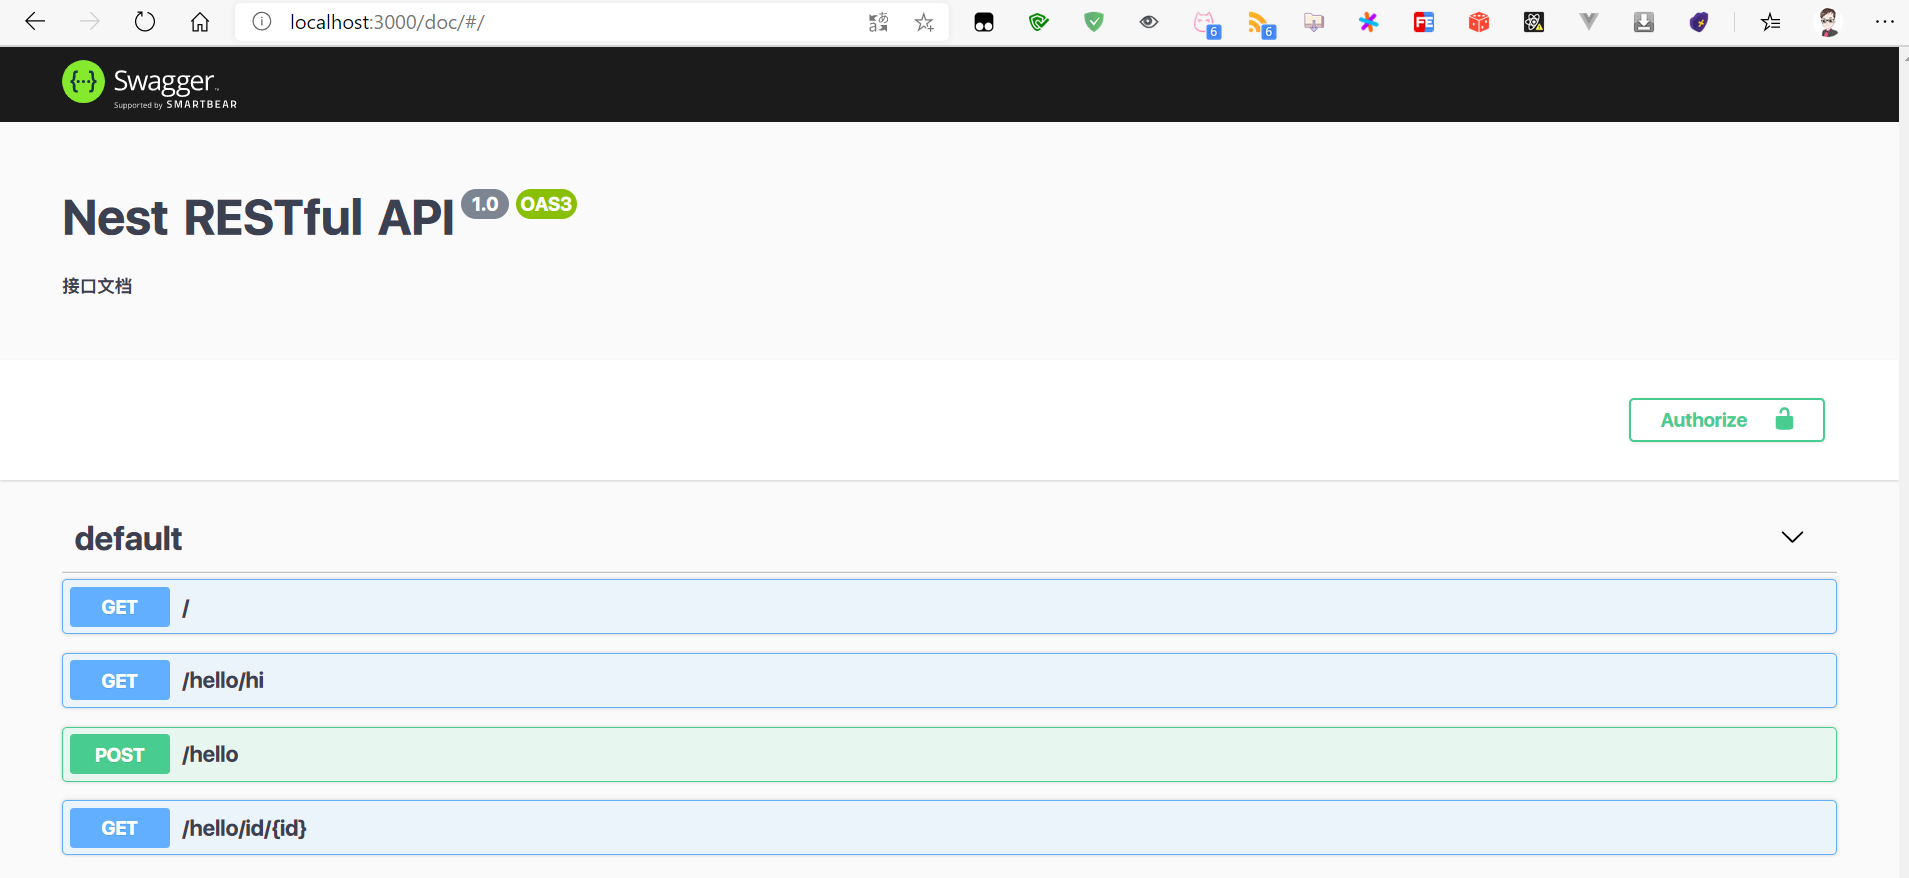
具体的使用方法见官网文档
3 服务
3.1 创建服务
可以使用命令行创建服务
nest g service user
运行命令后,nest会自动创建相关文件,并可以自动注册在module中
由创建HelloService服务来示例,首先新建hello.service.ts文件,然后将其定义为provider,使用@Injectable()来修饰
import { Injectable } from '@nestjs/common';

@Injectable()
export class HelloService {
  getHi(): string {
    return 'Hi';
  }
}
@Injectable({scope: Scope.REQUEST})选择作用域
| scope名称 | 说明 |
|---|---|
| SINGLETON | 单例模式,整个应用内只存在一份实例 |
| REQUEST | 每个请求初始化一次 |
| TRANSIENT | 每次注入都会实例化 |
3.2 依赖注入
在Controller的构造函数中通过constructor(private readonly helloService: HelloService) {}来将Service注入到Controller中
乎所有的东西都可以被当作提供者(Provider),比如: service, repository, factory, helper,他们都可以通过constructor 注入依赖关系
可选的依赖项
默认情况下,如果依赖注入的对象不存在会提示错误,中断应用运行,此时可以使用@Optional()来指明选择性注入,但依赖注入的对象不存在时不会发生错误。
@Controller('users')
export class UserController {
    constructor(@Optional() private readonly userService:UserService){}
}
基于属性的注入
类似于springboot的service注入,不在构造函数中注入,而是作为一个属性
@Controller('users')
export class UserController {
    @Inject()
    private readonly userService:UserService;
}
3.3 注册provider
编写完的service需要在module中进行注册providers: [],否则无法生效
3.4 导出
如果module中的部分文件需要被其他文件依赖,使用exports: []导出
4 中间件
Nest 中间件实际上等价于 express 中间件。
中间件函数可以执行以下任务:
- 执行任何代码。
- 对请求和响应对象进行更改。
- 结束请求-响应周期。
- 调用堆栈中的下一个中间件函数。
- 如果当前的中间件函数没有结束请求-响应周期, 它必须调用next()将控制传递给下一个中间件函数。否则, 请求将被挂起。
4.1 自定义中间件
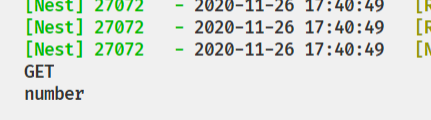
编写一个自定义中间件用来打印每个请求的方法
import { Injectable, NestMiddleware } from '@nestjs/common';
import { Request, Response } from 'express';

@Injectable()
export class LoggerMiddleware implements NestMiddleware {
  use(req: Request, res: Response, next: () => void) {
    console.log(req.method);
    next();
  }
}
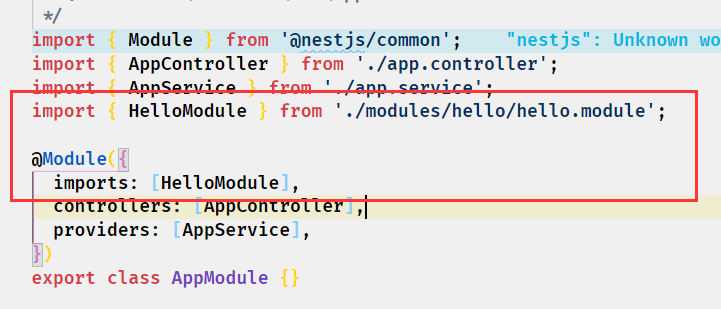
然后在app.module.ts中挂载中间件
@Module({
  imports: [HelloModule],
  controllers: [AppController],
  providers: [AppService],
})
export class AppModule {
  configure(consumer: MiddlewareConsumer) {
    consumer
      .apply(LoggerMiddleware)	// 应用中间件
      .exclude({ path: 'hello', method: RequestMethod.POST })	// 哪些路由和哪些方法不经过中间件
      .forRoutes('hello');	// 中间件服务的路由
  }
}
5 异常过滤
内置的异常层负责处理整个应用程序中的所有抛出的异常。当捕获到未处理的异常时,最终用户将收到友好的响应。
5.1 编写过滤器
需要继承ExceptionFilter,进去看一下接口的结构

需要实现catch方法,接收两个参数:异常和参数主机,然后来编码实现这个接口
import {
  ArgumentsHost,
  Catch,
  ExceptionFilter,
  HttpException,
} from '@nestjs/common';

@Catch(HttpException)
export class HttpExceptionFilter implements ExceptionFilter<HttpException> {
  catch(exception: HttpException, host: ArgumentsHost) {
    const ctx = host.switchToHttp();
    const response = ctx.getResponse();
    const request = ctx.getRequest();
    const status = exception.getStatus();
    console.log(exception);
    const exceptionRes: any = exception.getResponse();
    const { error, message } = exceptionRes;

    response.status(status).json({
      status,
      timestamp: new Date().toISOString(),
      path: request.url,
      error,
      message,
    });
  }
}
5.2 挂载
全局使用
在main.ts中通过 app.useGlobalFilters(new HttpExceptionFilter());
来全局挂载过滤器
局部使用
在不同模块的Controller中通过注解添加
@UseFilters(new HttpExceptionFilter())
@Controller('/hello')
export class HelloController {
constructor(private readonly helloService: HelloService) {}
/**
* 传入ID获取数据
* @param id ID
* @param UA user-agent
*/
@Get('hi')
@ApiQuery({ name: 'id', required: true })
@ApiResponse({
status: 200,
description: 'get...',
type: Hello,
})
hi(@Query() { id }, @Headers('user-agent') UA): string {
console.log(UA);
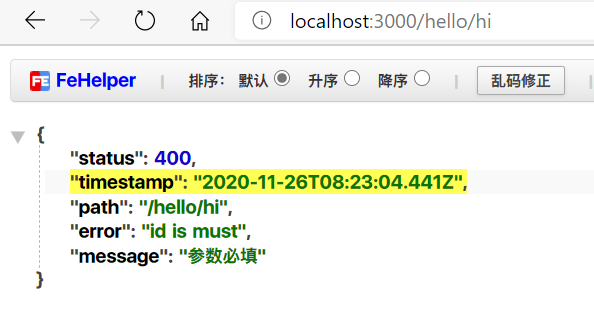
if (!id)
throw new HttpException(
{
status: HttpStatus.BAD_REQUEST,
message: '参数必填',
error: 'id is must',
},
HttpStatus.BAD_REQUEST,
);
return this.helloService.getHi() + '——' + id;
}
}
然后再去访问这个路由,就可以获得格式化的异常
6 管道
6.1 内置管道
通过路由获取参数时,获取到的值都会是string类型,就像下面代码中
@Get('id/:id')
@ApiParam({ name: 'id', required: true })
getId(@Param('id') id: number): string {
  console.log(typeof id);
  return '接收到ID:' + id;
}
即使声明了id是number,通过typeof检测仍然打印string

这时候就可以使用内置管道来解决,将代码做如下修改
@Get('id/:id')
@ApiParam({ name: 'id', required: true })
getId(@Param('id', new ParseIntPipe()) id: number): string {
  console.log(typeof id);
  return '接收到ID:' + id;
}
就可以将路由中获取的参数转换为number类型
管道也可以全局使用,也是在main.ts中使用useGlobalPipe()来挂载全局管道
7 守卫
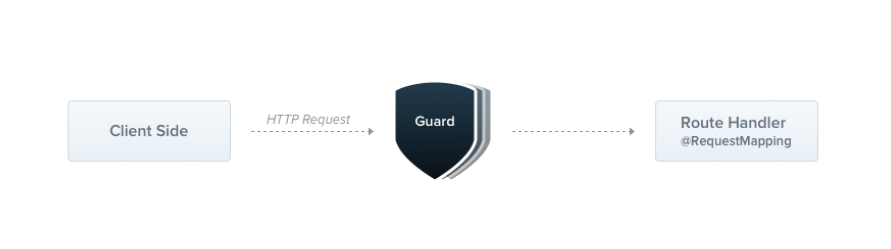
守卫是一个使用@Injectable()装饰器的类。 守卫应该实现CanActivate接口。
7.1 定义守卫
使用注解修饰然后实现接口方法
import { Injectable, CanActivate, ExecutionContext } from '@nestjs/common';
import { Reflector } from '@nestjs/core';  // 反射器

@Injectable()
export class Guard implements CanActivate {
  constructor(private readonly reflector: Reflector) {}

  canActivate(context: ExecutionContext): boolean {
    // 使用反射获取到自定义装饰器roles中传入的roles
    const roles = this.reflector.get<string[]>('roles', context.getHandler());
    // 如果没有获取到roles,说明不需要守卫
    if (!roles) {
      return true;
    }
    const request = context.switchToHttp().getRequest();
    const { user } = request.query;
    return !!roles.find((role) => role === user);
  }
}
自定义装饰器roles
import { SetMetadata } from '@nestjs/common';

// 守卫中通过反射获取这里传入的值
export const Roles = (...roles: string[]) => SetMetadata('roles', roles);
7.2 挂载守卫
局部挂载
使用注解@UseGuards()对某一Controller挂载守卫,在需要进行守卫的方法上使用自定义装饰器传入开放权限的角色
@UseFilters(new HttpExceptionFilter())
@UseGuards(RolesGuard)
@Controller('/hello')
export class HelloController {
  constructor(private readonly helloService: HelloService) {}

  /**
   * 传入ID获取数据
   * @param id ID
   * @param UA user-agent
   */
  @Get('hi')
  @ApiQuery({ name: 'id', required: true })
  @ApiResponse({
    status: 200,
    description: 'get...',
    type: Hello,
  })
  @Roles('admin')
  hi(@Query() { id }, @Headers('user-agent') UA): string {
    console.log(UA);
    if (!id)
      throw new HttpException(
        {
          status: HttpStatus.BAD_REQUEST,
          message: '参数必填',
          error: 'id is must',
        },
        HttpStatus.BAD_REQUEST,
      );
    return this.helloService.getHi() + '——' + id;
  }
}
挂在守卫之后只有user的值为admin时才会获取到数据
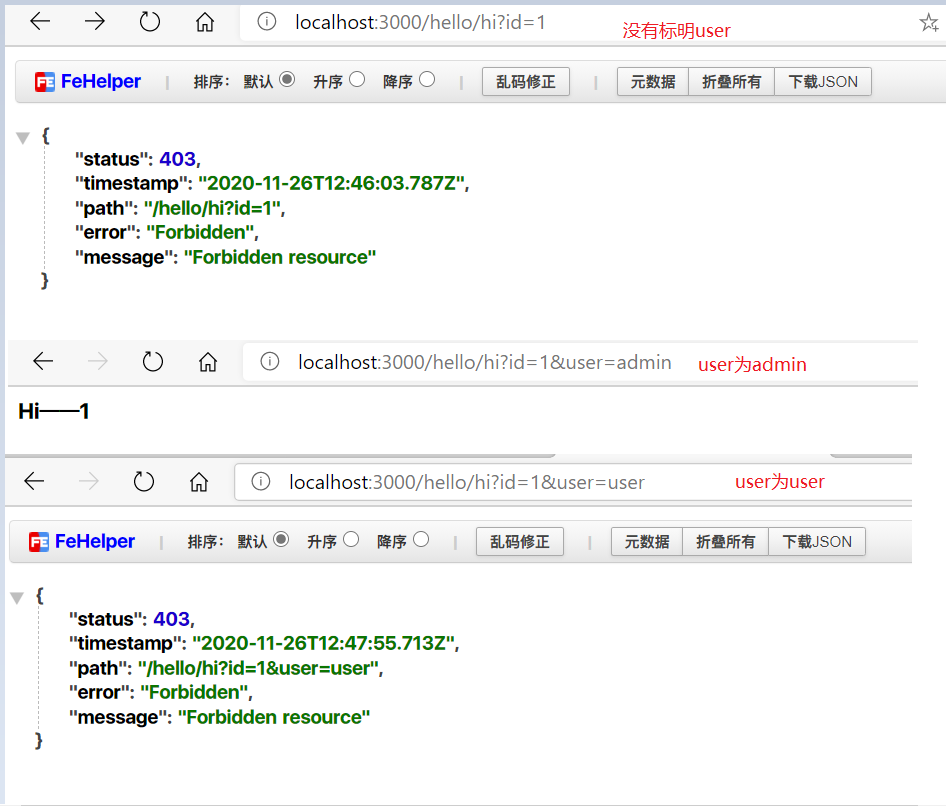
正常的业务中不可能使用明文来判断权限
全局挂载
app.useGlobalGuards(new RolesGuard());
8 配置文件集中管理
8.1 邮件服务的配置集中管理
使用到的npm包:@nestjs-modules/mailer nodemailer
!!!注意是@nestjs-modules,@nest-modules会报错
准备工作:获取邮箱授权码,QQ邮箱示例
8.1.1 编写邮件服务
email.controller.ts
@Controller('/email')
@UseFilters(new HttpExceptionFilter())
export class EmailController {
  constructor(private readonly emailService: EmailService) {}

  @Get('send')
  @ApiTags('email')
  @ApiQuery({ name: 'email', required: true })
  send(@Query('email') email: string): string {
    if (!email) {
      throw new HttpException(
        {
          status: HttpStatus.BAD_REQUEST,
          message: '参数必填',
          error: 'email is must',
        },
        HttpStatus.BAD_REQUEST,
      );
    }
    this.emailService.sendEmail(email);
    return 'ok';
  }
}
email.service.ts
@Injectable()
export class EmailService {
  constructor(private readonly mailerService: MailerService) {}
  sendEmail(email: string): void {
    this.mailerService.sendMail({
      to: email,
      from: '1984779164@qq.com',
      subject: 'email test',
      template: 'welcome',
      // html: '<h1>Welcome</h1>',
    });
  }
}
这里面的html是直接发送的,template需要编译,在打包之后的dist目录下可能会找不到文件,需要在nest-cli.json文件中添加配置项
{
  "collection": "@nestjs/schematics",
  "sourceRoot": "src",
  "compilerOptions": {
    "assets": ["template/**/*"]
  }
}
email.module.ts
@Module({
  imports: [],
  controllers: [EmailController],
  providers: [EmailService],
})
export class EmailModule {}
app.module.ts
@Module({
  imports: [
    MailerModule.forRootAsync({
      useFactory: () => ({
        transport: 'smtps://1984779164@qq.com:XXXXX@smtp.qq.com', // XXXX->邮箱授权码
        defaults: {
          from: '"nest-modules" <modules@nestjs.com>',
        },
        template: {
          dir: path.join(__dirname, './template/email'),
          adapter: new PugAdapter(),
          options: {
            strict: true,
          },
        },
      }),
    }),
    HelloModule,
    EmailModule,
  ],
  controllers: [AppController],
  providers: [AppService],
})
export class AppModule {}
在swagger中测试

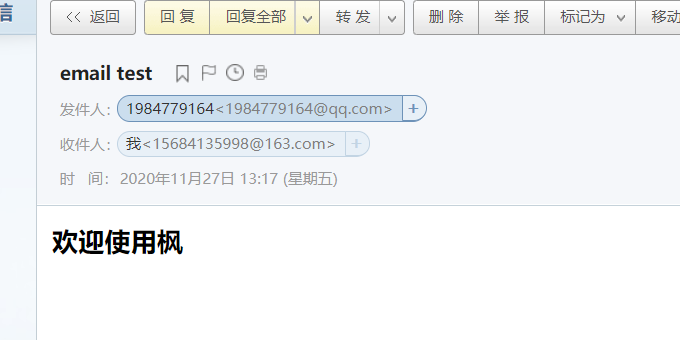
然后就可以收到邮件了
8.1.2 提取配置项
虽然功能实现了,但是配置直接放在代码中不仅会显得特别臃肿(还有其他的配置如数据库等),而且不易于管理,那么下面我们就来提取配置项来集中管理
需要使用的包:nestjs-config
安装完npm包之后,在app.module.ts同级目录下创建config文件夹,一定要在同级目录,然后新建email.ts文件,将刚才app.modules.ts中的有关邮件的配置信息复制过来
export default {
  transport: 'smtps://1984779164@qq.com:XXXXXXX@smtp.qq.com',
  defaults: {
    from: '"nest-modules" <modules@nestjs.com>',
  },
  template: {
    dir: join(__dirname, '../template/email'),
    adapter: new PugAdapter(),
    options: {
      strict: true,
    },
  },
};
将app.module.ts中的配置做如下修改
@Module({
  imports: [
    ConfigModule.load(resolve(__dirname, 'config', '**/!(*.d).{ts,js}')),
    MailerModule.forRootAsync({
      useFactory: (config: ConfigService) => config.get('email'),
      inject: [ConfigService],
    }),
    HelloModule,
    EmailModule,
  ],
  controllers: [AppController],
  providers: [AppService],
})
export class AppModule {}
导入ConfigModule模块,然后向MailerModule中注入ConfigService,然后使用传入的service来获取配置文件
大功告成!!!
8.2 数据库配置集中管理
nest提供了orm映射
使用到的包: @nestjs/typeorm typeorm mysql
首先需要在app.module.ts中注册TypeOrmModule,已经有了上面的例子,这次我们直接创建配置文件database.ts
export default {
  type: 'mysql',
  host: 'localhost',
  port: 3306,
  username: 'liuhao',
  password: '123456',
  database: 'nest',
  entities: [join(__dirname, '../', '**/**.entity{.ts,.js}')],
  synchronize: true,
};
然后在app.module.ts中添加配置
TypeOrmModule.forRootAsync({
  useFactory: (config: ConfigService) => config.get('database'),
  inject: [ConfigService],
}),
然后编写controller
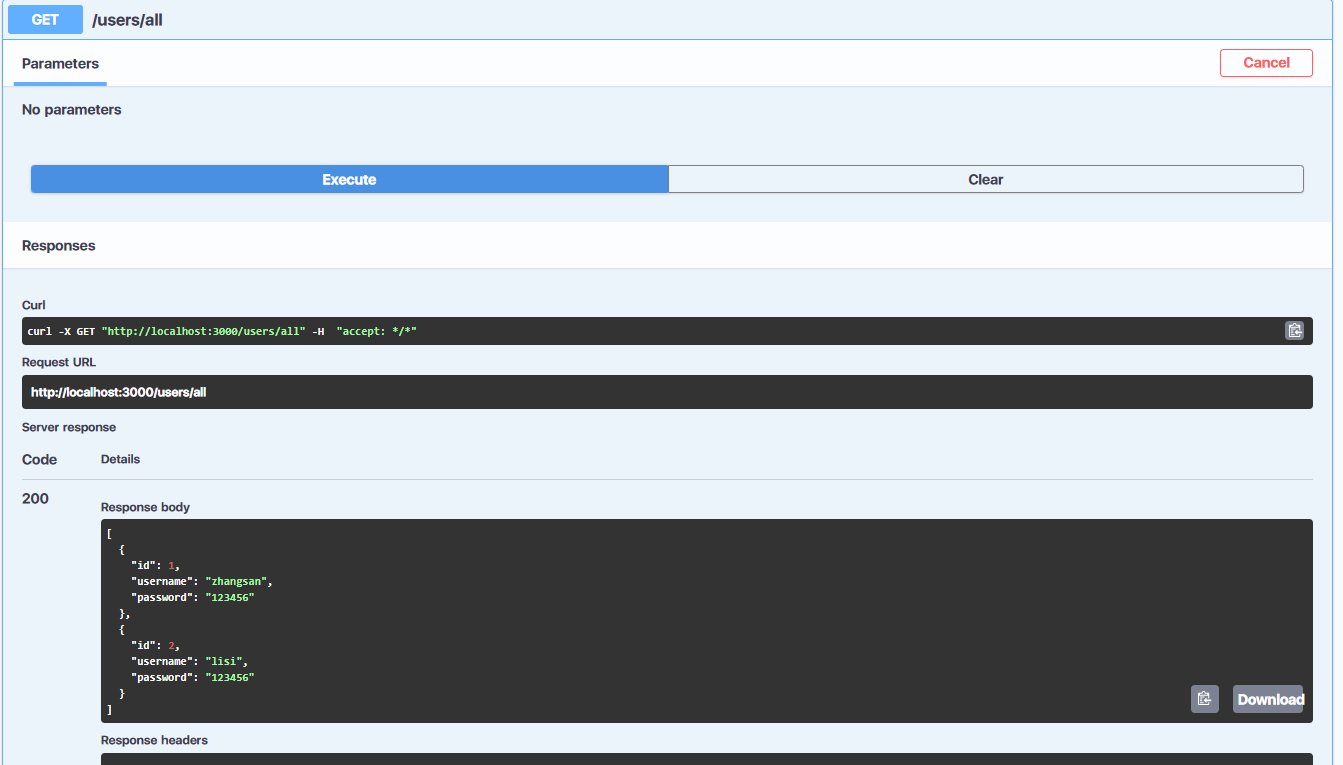
@Controller('users')
@ApiTags('users')
export class UsersController {
  constructor(private readonly usersService: UsersService) {}

  @Get('all')
  getAll() {
    return this.usersService.findAll();
  }

  @Post('save')
  async createOne(@Body() user: User) {
    await this.usersService.create(user);
    return true;
  }
}
还有service
@Injectable()
export class UsersService {
  constructor(
    @InjectRepository(UsersEntity)
    private readonly usersRepository: Repository<UsersEntity>,
    private connection: Connection,
  ) {

  /**
   * 查询所有用户
   */
  async findAll(): Promise<UsersEntity[]> {
    return await this.usersRepository.find();
  }

  /**
   * 创建用户
   * @param user 用户实体
   */
  async create(user): Promise<UsersEntity[]> {
    const { username } = user;
    const u = await getRepository(UsersEntity).findOne({ where: { username } });
    if (u) {
      throw new HttpException(
        {
          message: 'Input data validation faild',
          error: 'name must unique',
        },
        HttpStatus.BAD_REQUEST,
      );
    }
    return await this.usersRepository.save(user);
  }
}
user的实体也需要我们来配置,用实体来对应数据库的表结构——TypeORM文档
@Entity()
export class UsersEntity {
  @PrimaryGeneratedColumn()
  id: number;

  @Column({ length: 255 })
  username: string;

  @Column({ length: 255 })
  password: string;
}
最后一步我们需要在module中注入service和entity
@Module({
  imports: [TypeOrmModule.forFeature([UsersEntity])],
  providers: [UsersService],
  exports: [UsersService],
  controllers: [UsersController],
})
export class UsersModule {}
然后就可以在swagger中测试我们的代码

然后在数据库可视化界面看一下
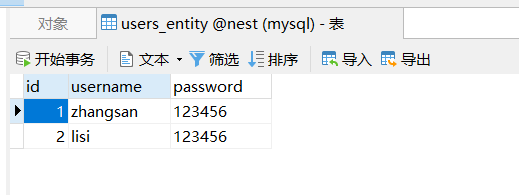
一个简单的数据库操作就完成了
9 简易服务监控
使用到的npm包:nest-status-monitor @nestjs/platform-socket.io
安装完之后在config目录下创建status.ts文件
export default {
  pageTitle: 'Nest.js Monitoring Page',
  port: 3000,
  path: '/status',
  ignoreStartsWith: '/health/alive',
  spans: [
    {
      interval: 1, // Every second
      retention: 60, // Keep 60 datapoints in memory
    },
    {
      interval: 5, // Every 5 seconds
      retention: 60,
    },
    {
      interval: 15, // Every 15 seconds
      retention: 60,
    },
  ],
  chartVisibility: {
    cpu: true,
    mem: true,
    load: true,
    responseTime: true,
    rps: true,
    statusCodes: true,
  },
  healthChecks: [],
};
在app.module.ts中引入配置文件,由于该包未实现注入,所以直接添加就行了
StatusMonitorModule.setUp(statusMonitorConfig),
StatusMonitorModule是从包中导入的方法,statusMonitorConfig是我们写的配置文件
10 JWT(json web token)
用到的包:@nestjs/passport passport passport-local @nestjs/jwt passport-jwt
本示例仅是模仿登录,真正的登录业务需要配合数据库
先看一下要用到的文件
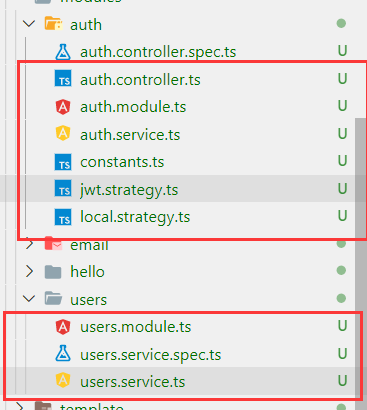
代码就不在这贴出来了,主要说一下逻辑
首先从controller开始看
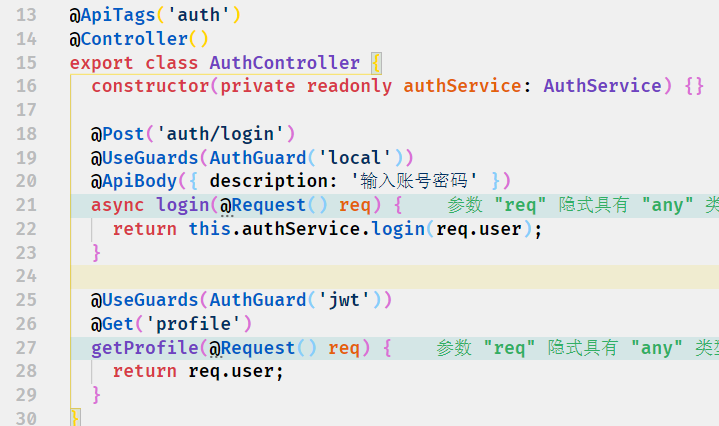
controller中有两个方法,一个是登录,另一个是登陆之后获取信息,两个方法用到了两个不同的守卫(策略模式),一个是未登录时获取token,另一个是登陆之后通过token获取数据
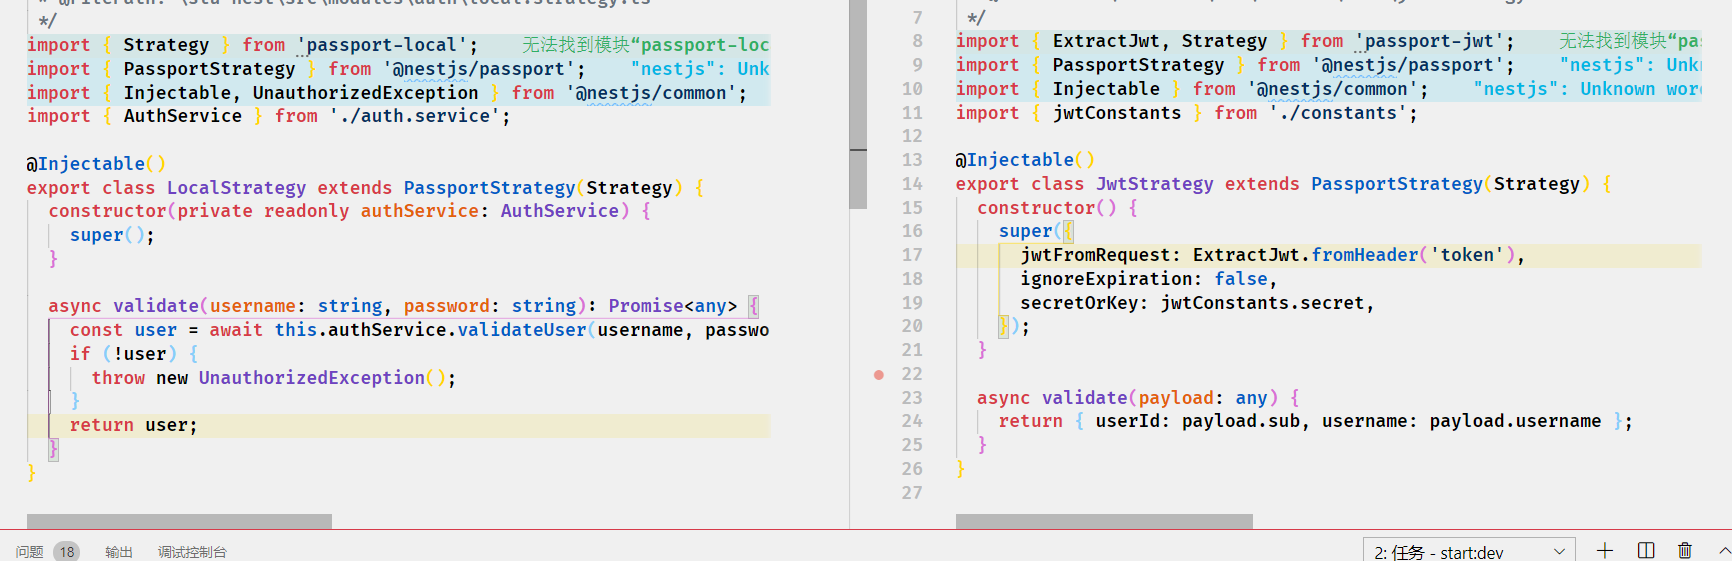
这两个策略中(左边是local,右边是jwt)
1.local策略做的事是获取到用户名密码,通过注入的authService中的验证方法来验证用户名是否存在和用户名密码是否匹配,验证通过后返回user实体,否则抛出异常;
authService
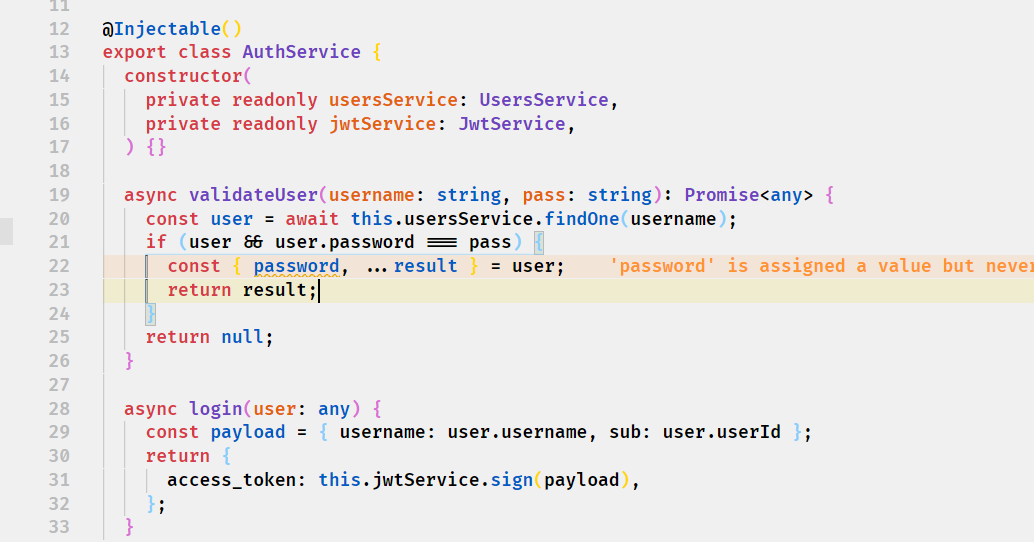
controller中再使用获取到的user实体调用authService中的login方法注册一个token然后返回
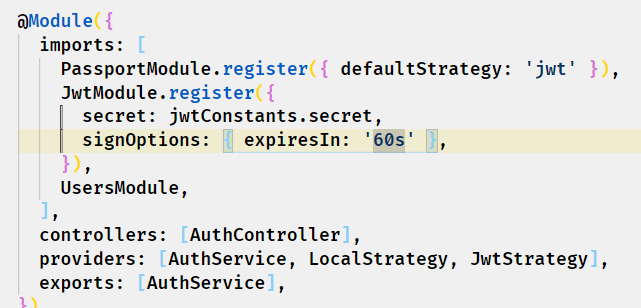
在auth.module.ts中进行注册token的配置
2.jwt策略做的事是从request的header中获取token值,然后检验token的合法性,再从token中解析信息返回