runtime-core(二)
Fragment 和 Text 类型节点
上一节的内容其实存在一点小瑕疵
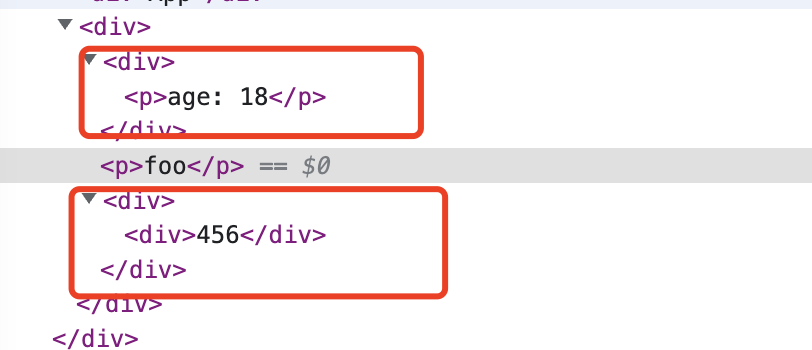
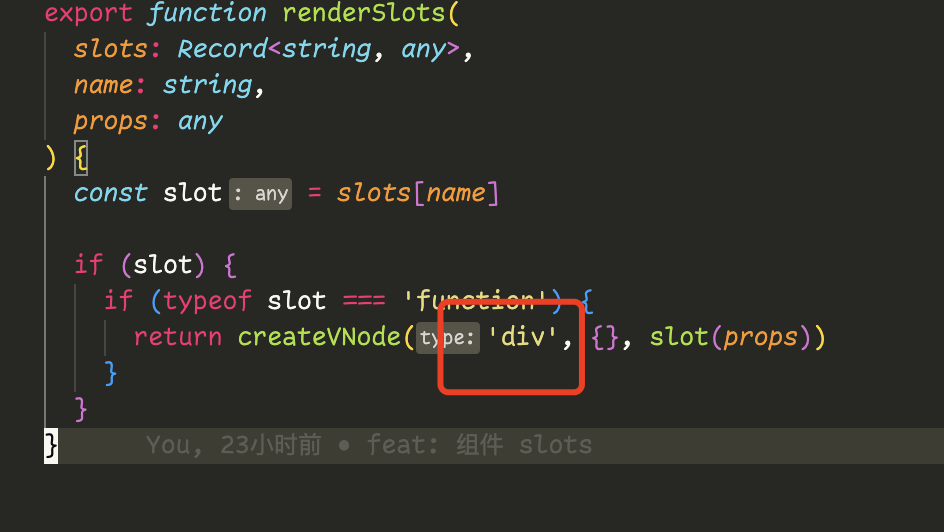
所有的 slots 在渲染的时候都会包裹一层 div,这是因为我们的 renderSlots 函数渲染时额外包裹了一层 div 元素
解决办法是在渲染 children 的时候,只渲染子组件,不渲染额外的 div,也就是我们这一节的 Fragment
我们给设置一个特殊的 type,对其进行特殊的处理,Fragment 类型的元素只渲染子元素不额外包裹 div 元素
function patch(vNode: any, container: any) {
  const { type, shapeFlags } = vNode

  switch (type) {
    case 'Fragment':
      mountChildren(vNode.children, container)
      break

    default:
      // console.log(vNode.type);
      if (shapeFlags & ShapeFlags.ELEMENT) {
        //  * 如果是 element 则处理 element,
        // element
        processElement(vNode, container)
      } else if (shapeFlags & ShapeFlags.STATEFUL_COMPONENT) {
        // * 如果是 component 就处理 component
        // component
        processComponent(vNode, container)
      }
  }
}
OK 现在已经没有多余的 div 元素了
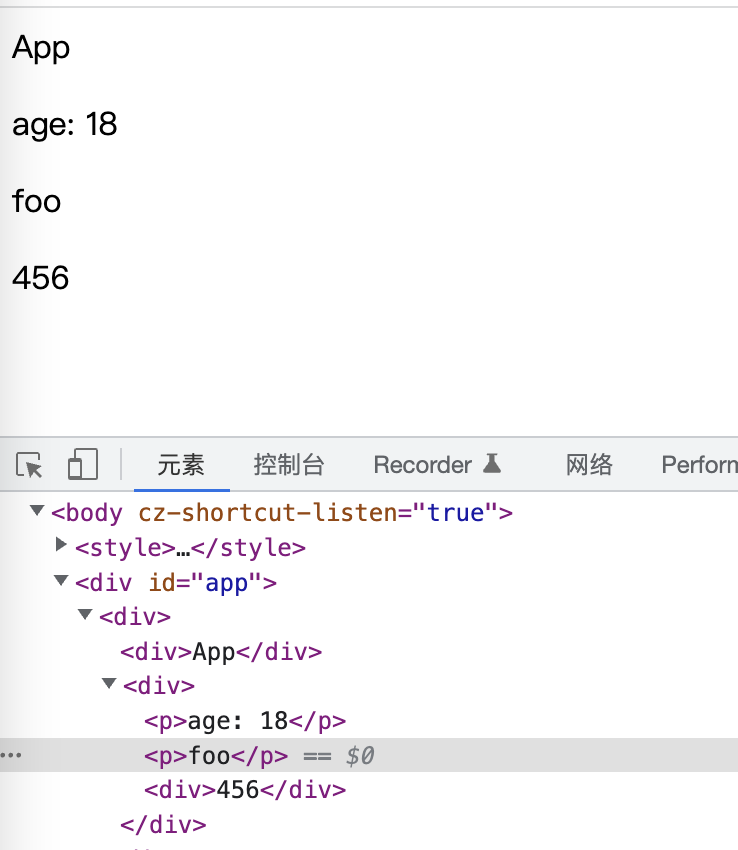
然后我们再实现一下同类型的 Text 元素,Text 元素不依赖 h 函数,直接就可以渲染,其实现原理和 Fragment 元素一样,都是通过处理特殊元素来达到目的。
function patch(vNode: any, container: any) {
  const { type, shapeFlags } = vNode

  switch (type) {
    case Fragment:
      mountChildren(vNode.children, container)
      break

    case Text:
      processText(vNode, container)
      break

    default:
      // console.log(vNode.type);
      if (shapeFlags & ShapeFlags.ELEMENT) {
        //  * 如果是 element 则处理 element,
        // element
        processElement(vNode, container)
      } else if (shapeFlags & ShapeFlags.STATEFUL_COMPONENT) {
        // * 如果是 component 就处理 component
        // component
        processComponent(vNode, container)
      }
  }
}

function processText(vNode: any, container: any) {
  const { children } = vNode

  const textNode = document.createTextNode(children)
  container.appendChild(textNode)
}
然后再写一个创建 TextNode 的方法
export function createTextNode(text: string) {
  return createVNode(Text, {}, text)
}
齐活

getCurrentInstance
getCurrnetInstance用于获取当前组件的实例
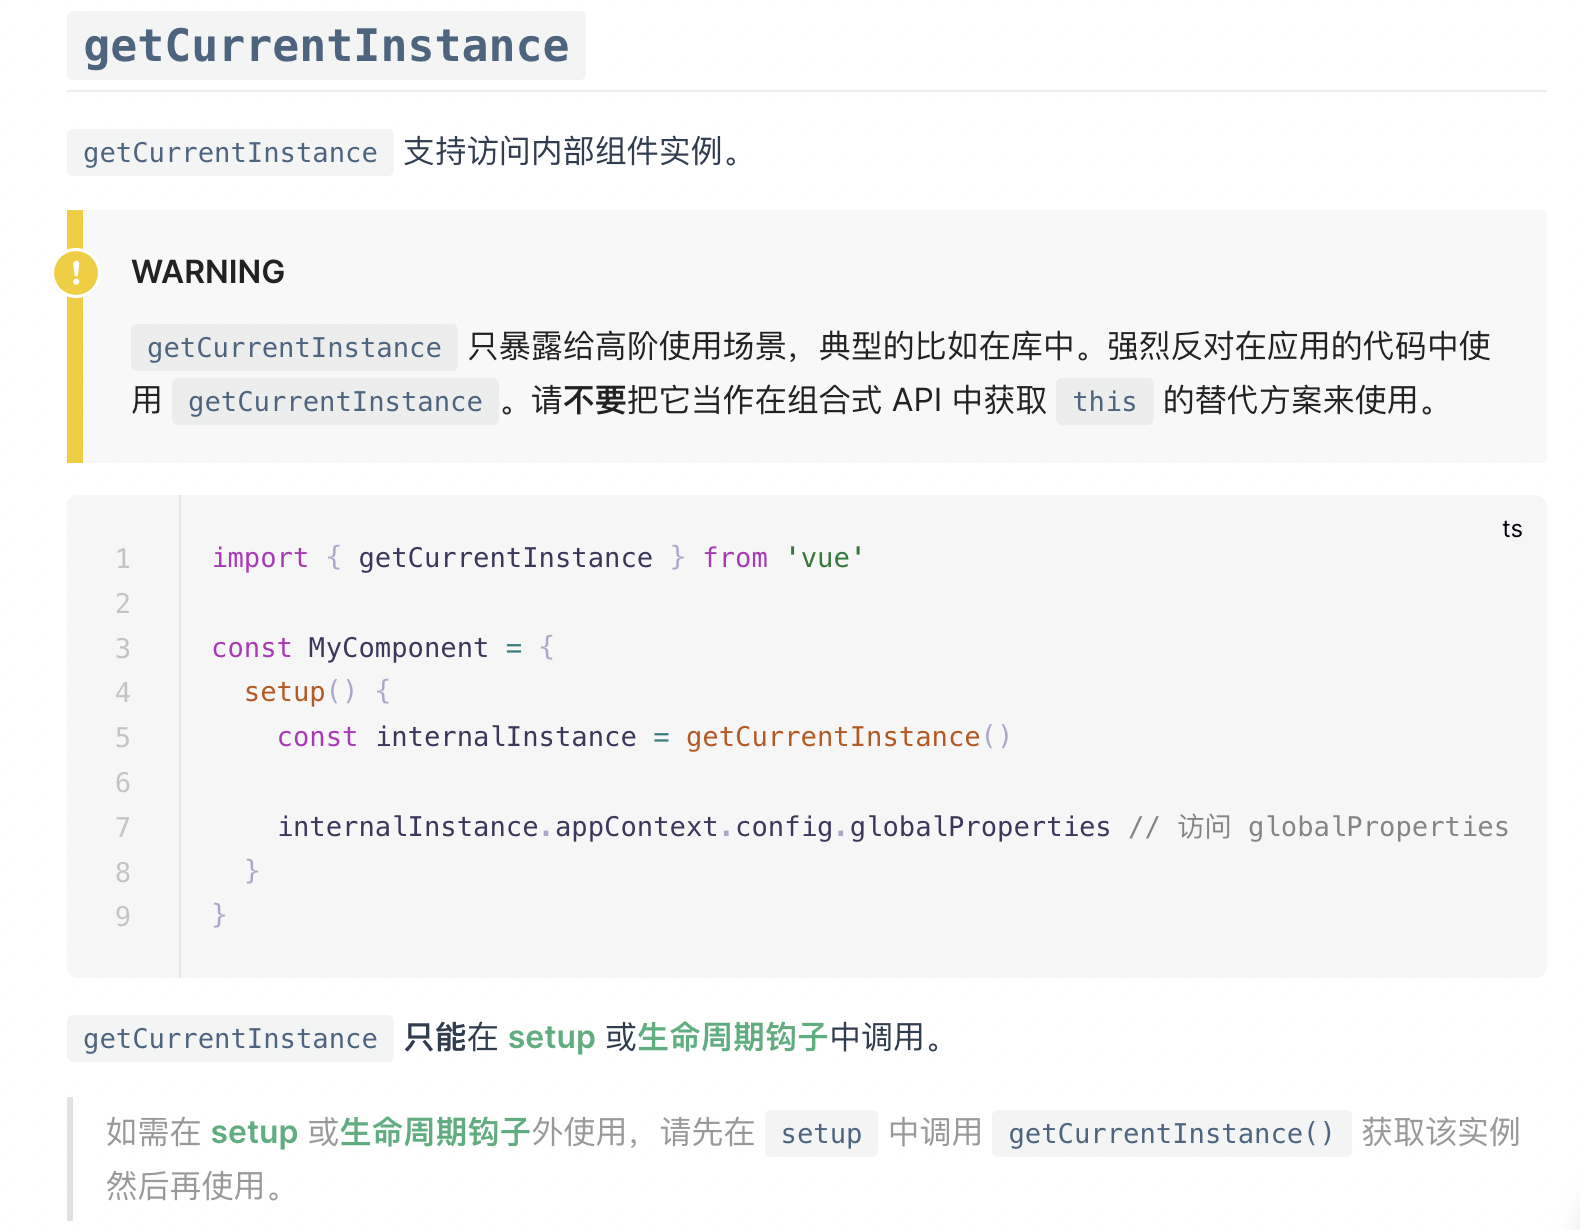
这里文档也给了我们提示,只能在 setup 中调用,说明每个组件的 setup 会影响值,所以我们可以想到用一个全局变量来保存 currentInstance
let currentInstance: any = null
export function getCurrentInstance() {
  return currentInstance
}

function setCurrentInstance(instance: any) {
  currentInstance = instance
}
当调用组件 setup 的时候来修改这个全局变量
function setupStatefulComponent(instance: any) {
  const Component = instance.vNode.type

  instance.proxy = new Proxy({ _: instance }, publicInstanceProxyHandlers)

  const { setup } = Component

  if (setup) {
    setCurrentInstance(instance)
    // function | object
    // function: 组件的 render 函数
    // object: 把 object 注入到上下文
    const setupResult = setup(shallowReadonly(instance.props), {
      emit: instance.emit
    })
    setCurrentInstance(null)

    handleSetupResult(instance, setupResult)
  }
}
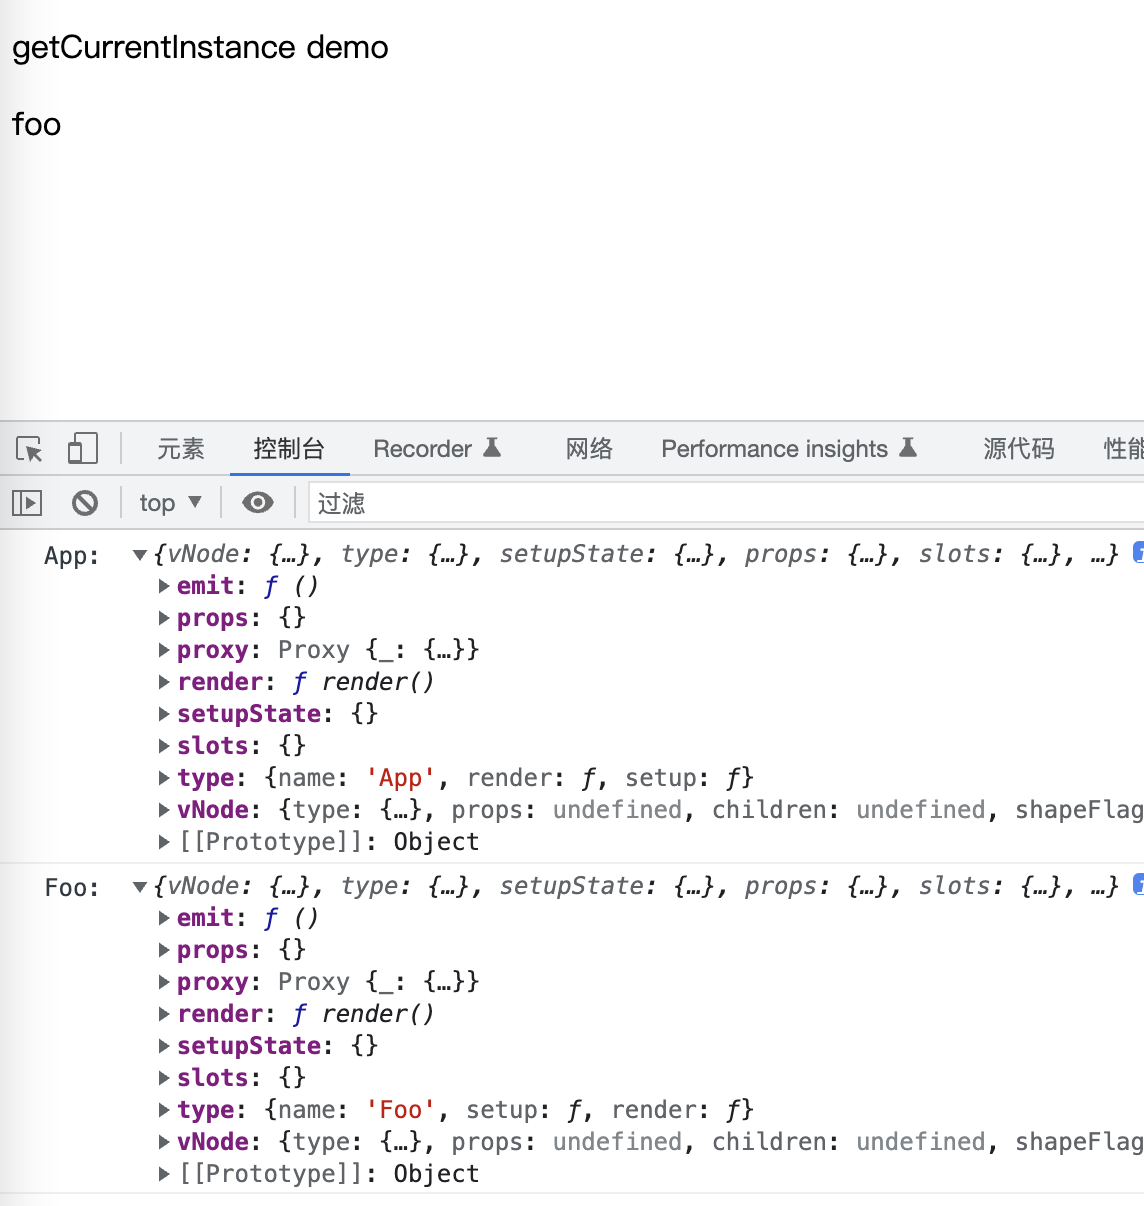
来测试一下
export const App = {
  name: 'App',
  render() {
    return h('div',
      {},
      [
        h('p', {}, 'getCurrentInstance demo'),
        h(Foo)
      ]
    )
  },
  setup() {
    const instance = getCurrentInstance()
    console.log('App: ', instance);
    return {
    }
  }
}

export const Foo = {
  setup() {
    const instance = getCurrentInstance()
    console.log('Foo: ', instance);
    return {}
  },
  name: "Foo",
  render() {
    return h('div', {}, 'foo')
  }
}
完成
provide/inject
provide/inject的作用是跨层级的通信,所有的后代组件都可以通过 inject 来获取到祖先组件的 provide 数据。
你应该知道原型链,原型链的结构和 provide/inject 是很像的,因为 provide 的实现就是基于原型链,父组件将数据挂载到链路上,子组件只能获取其上层的数据。
首先我们先来完成第一个测试用例
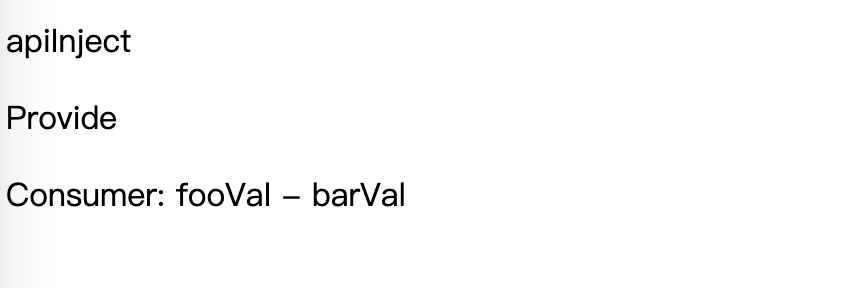
const Provider = {
  name: 'provide',
  setup() {
    provide('foo', 'fooVal')
    provide('bar', 'barVal')
  },
  render() {
    return h('div', {}, [h('p', {}, 'Provide'), h(Consumer)])
  }
}

const Consumer = {
  name: 'consumer',
  setup() {
    const foo = inject('foo')
    const bar = inject('bar')

    return { foo, bar }
  },
  render() {
    return h('div', {}, `Consumer: ${this.foo} - ${this.bar}`)
  }
}

export default {
  name: "App",
  setup() {
    return {}
  },
  render() {
    return h("div", {}, [h("p", {}, "apiInject"), h(Provider)]);
  },
};
App 中包含了 Provider 组件,Provider 通过 provide 添加了数据,Consumer 是 Provider 的子组件,通过 inject 获取了数据进行渲染。
我们上节课实现了 getCurrentIntance 方法,我们可以将 provide 的数据挂载到组件实例上,然后子组件通过获取父组件的形式来读取父组件实例上挂载的 provide 数据。
这样的话,由于 getCurrentInstance 只能在 setup 中使用,就到这里 provide/inject 也只能在 setup 中使用。
创建 apiInject.ts
import { getCurrentInstance } from './component'

export function provide(key: string, value: any) {
  const currentInstance = getCurrentInstance()

  if (currentInstance) {
    const { provides } = currentInstance
    provides[key] = value
  }
}

export function inject(key: string) {
  const currentInstance = getCurrentInstance()

  if (currentInstance) {
    const { parent } = currentInstance
    const parentProvides = currentInstance.parent.provides
    return parentProvides[key]
  }
}
然后在创建组件实例的时候挂载其父组件
export function createComponentInstance(vNode: any, parent: any) {
  console.log(parent)

  const component = {
    vNode,
    type: vNode.type,
    setupState: {},
    props: {},
    slots: {},
    provides: {},
    parent,
    emit: (args: any): any => {}
  }

  component.emit = emit.bind(null, component)

  return component
}
这个改动导致了使用 createComponentInstance 的调用栈中的函数都要做出修改,增加一个 parent 参数,根据报错添加参数即可。
直到这里,这里的 instance 就是子组件的 parent
此时我们的测试用例已经能够正确渲染了
这是我们的测试用例只有一层嵌套,provide 的数据是能跨多层组件传递的,所以我们还需要继续完善
const Provider = {
  name: 'provide',
  setup() {
    provide('foo', 'fooVal')
    provide('bar', 'barVal')
  },
  render() {
    return h('div', {}, [h('p', {}, 'Provide1'), h(ProviderSon)])
  }
}

const ProviderSon = {
  name: 'provide',
  setup() {
    provide('bar', 'barVal222')
    provide('baz', 'bazVal')
    provide('foo', 'newFoo')
    const foo = inject('foo')
    return { foo }
  },
  render() {
    return h('div', {}, [h('p', {}, 'Provide2: ' + this.foo), h(Consumer)])
  }
}

const Consumer = {
  name: 'consumer',
  setup() {
    const foo = inject('foo')
    const bar = inject('bar')
    const baz = inject('baz')

    return { foo, bar, baz }
  },
  render() {
    return h('div', {}, `Consumer: ${this.foo} - ${this.bar} - ${this.baz}`)
  }
}

export default {
  name: "App",
  setup() {
    return {}
  },
  render() {
    return h("div", {}, [h("p", {}, "apiInject"), h(Provider)]);
  },
};
这次我们又增加了一层,此时跨梁层组件已经取不到值了,我们要将父组件的 provides 保存下来
export function createComponentInstance(vNode: any, parent: any) {
  // console.log(parent)

  const component = {
    vNode,
    type: vNode.type,
    setupState: {},
    props: {},
    slots: {},
    provides: parent?.provides || {},
    parent,
    emit: (args: any): any => {}
  }

  component.emit = emit.bind(null, component)

  return component
}
然后在 provide 的时候将父级的 provides 保存到 Instance 的原型链上,但是要注意,这个过程需要控制只执行一次,否则就会层级混乱
export function provide(key: string, value: any) {
  const currentInstance = getCurrentInstance()

  if (currentInstance) {
    let { provides } = currentInstance
    const parentProvides = currentInstance.parent.provides

    // 只能调用一次, 否则会一直嵌套
    if (provides === parentProvides) {
      provides = currentInstance.provides = Object.create(parentProvides)
    }

    provides[key] = value
  }
}
我们通过判断子级的 provides 和父级的 provides 是否相等就可以知道是否执行过挂载原型链的操作。
到这里 provide 已经完成了,inject 其实还有一处可以完善,当 inject 一个不存在的值的时候,可以设置默认值
export function inject(key: string, defaultVal: any) {
  const currentInstance = getCurrentInstance()

  if (currentInstance) {
    const { parent } = currentInstance
    const parentProvides = currentInstance.parent.provides

    if (key in parentProvides) {
      return parentProvides[key]
    } else if (defaultVal) {
      return defaultVal
    }
  }
}
这个默认值可以拓展一下,支持函数,将函数的运行结果返回
if (key in parentProvides) {
  return parentProvides[key]
} else if (defaultVal) {
  if (typeof defaultVal === 'function') {
    return defaultVal()
  }
  return defaultVal
}
自定义渲染器
createRender 是 vue3 提供的允许开发者自定义输出平台的一个方法,我们最常用的就是输出到浏览器也就是 runtime-dom,我们可以自定义输出到 Canvas 等平台中。
这就要从挂载的过程进行分析,我们之前的代码中写死了 dom 的 API
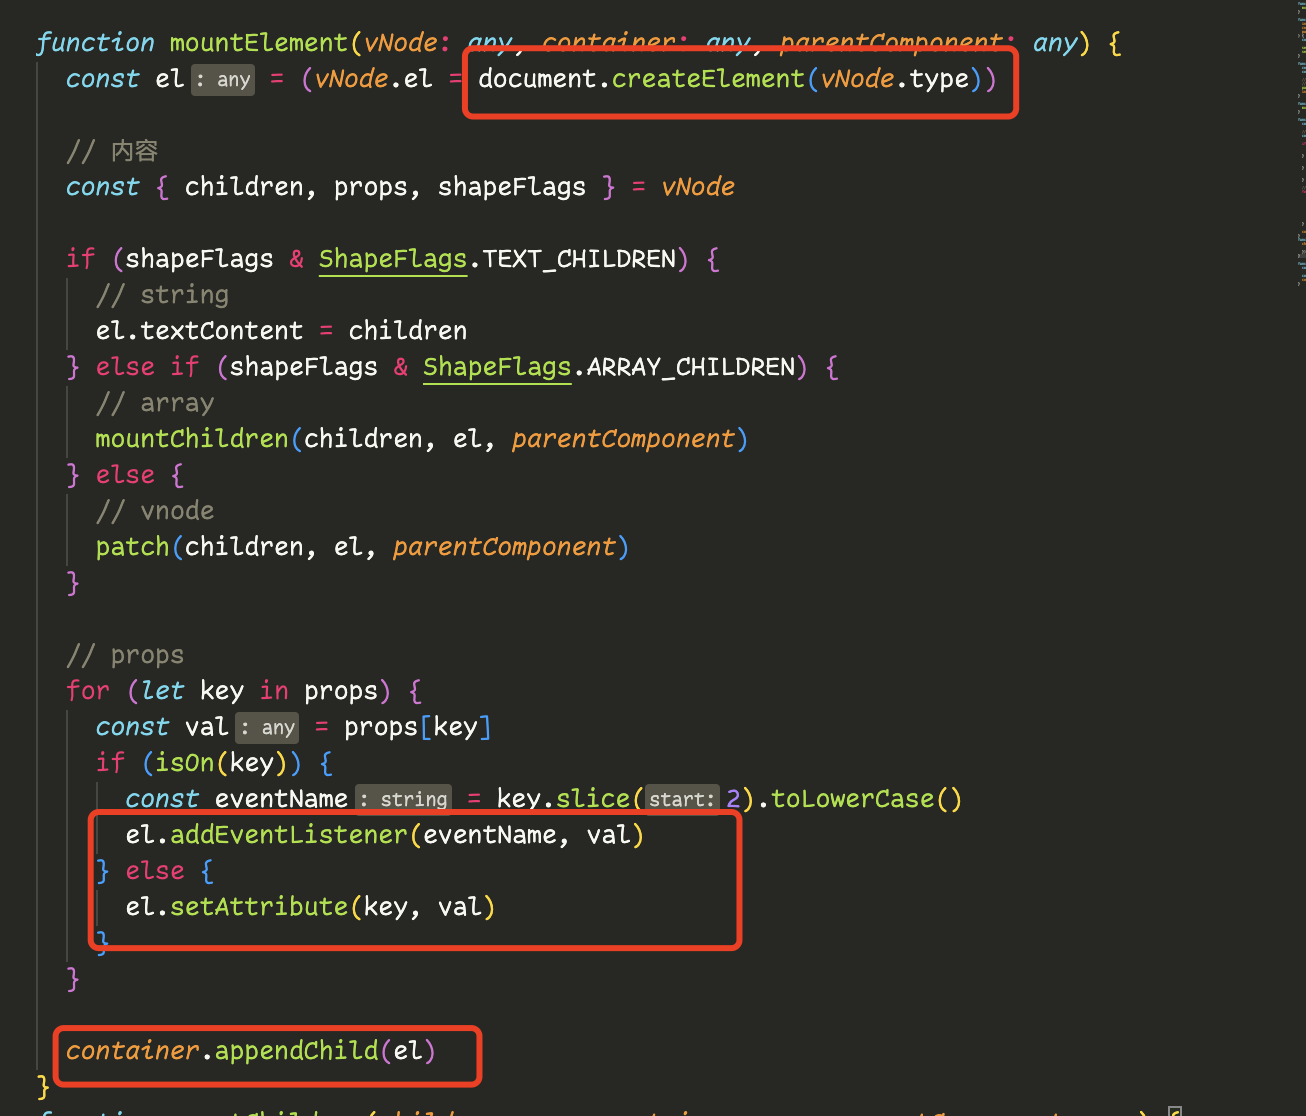
我们需要把这么 API 变成参数,由调用者传入,我们需要把之前的 renderer文件整个包裹在 createRender 内,将这三处 DOM API 改为调用传入的参数
export function createRender(options: any): any {
  const {
    createElement: hostCreateElement,
    patchProps: hostPatchProps,
    insert: hostInsert
  } = options

  // ......

  function mountElement(vNode: any, container: any, parentComponent: any) {
    const el = (vNode.el = hostCreateElement(vNode.type))

    // 内容
    const { children, props, shapeFlags } = vNode

    if (shapeFlags & ShapeFlags.TEXT_CHILDREN) {
      // string
      el.textContent = children
    } else if (shapeFlags & ShapeFlags.ARRAY_CHILDREN) {
      // array
      mountChildren(children, el, parentComponent)
    } else {
      // vnode
      patch(children, el, parentComponent)
    }

    // props
    for (let key in props) {
      const val = props[key]
      // if (isOn(key)) {
      //   const eventName = key.slice(2).toLowerCase()
      //   el.addEventListener(eventName, val)
      // } else {
      //   el.setAttribute(key, val)
      // }
      hostPatchProps(el, key, val)
    }

    // container.appendChild(el)
    hostInsert(el, container)
  }

  // ......

  return {
    createApp: createAppAPI(render)
  }
}
同时 createApp 为了适配新的代码也要包裹一层函数
export function createAppAPI(render: any) {
  return function createApp(rootComponent: any) {
    return {
      mount(rootContainer: string | Element) {
        if (typeof rootContainer === 'string') {
          rootContainer = document.querySelector(rootContainer)
        }
        // 首先转 vNode
        // component => vNode
        // 所有的逻辑都基于 vNode 操作
        const vNode = createVNode(rootComponent)

        render(vNode, rootContainer)
      }
    }
  }
}
这样做的目的是将 render 传递出来,并且最小化改动代码
创建 src/runtime-dom/index.ts
function createElement(type: any) {
  return document.createElement(type)
}

function patchProps(el: any, key: string, val: any) {
  if (isOn(key)) {
    const eventName = key.slice(2).toLowerCase()
    el.addEventListener(eventName, val)
  } else {
    el.setAttribute(key, val)
  }
}

function insert(el: any, parent: any) {
  parent.appendChild(el)
}

const renderer = createRender({
  createElement,
  patchProps,
  insert
})

export function createApp(...args: any) {
  return renderer.createApp(...args)
}
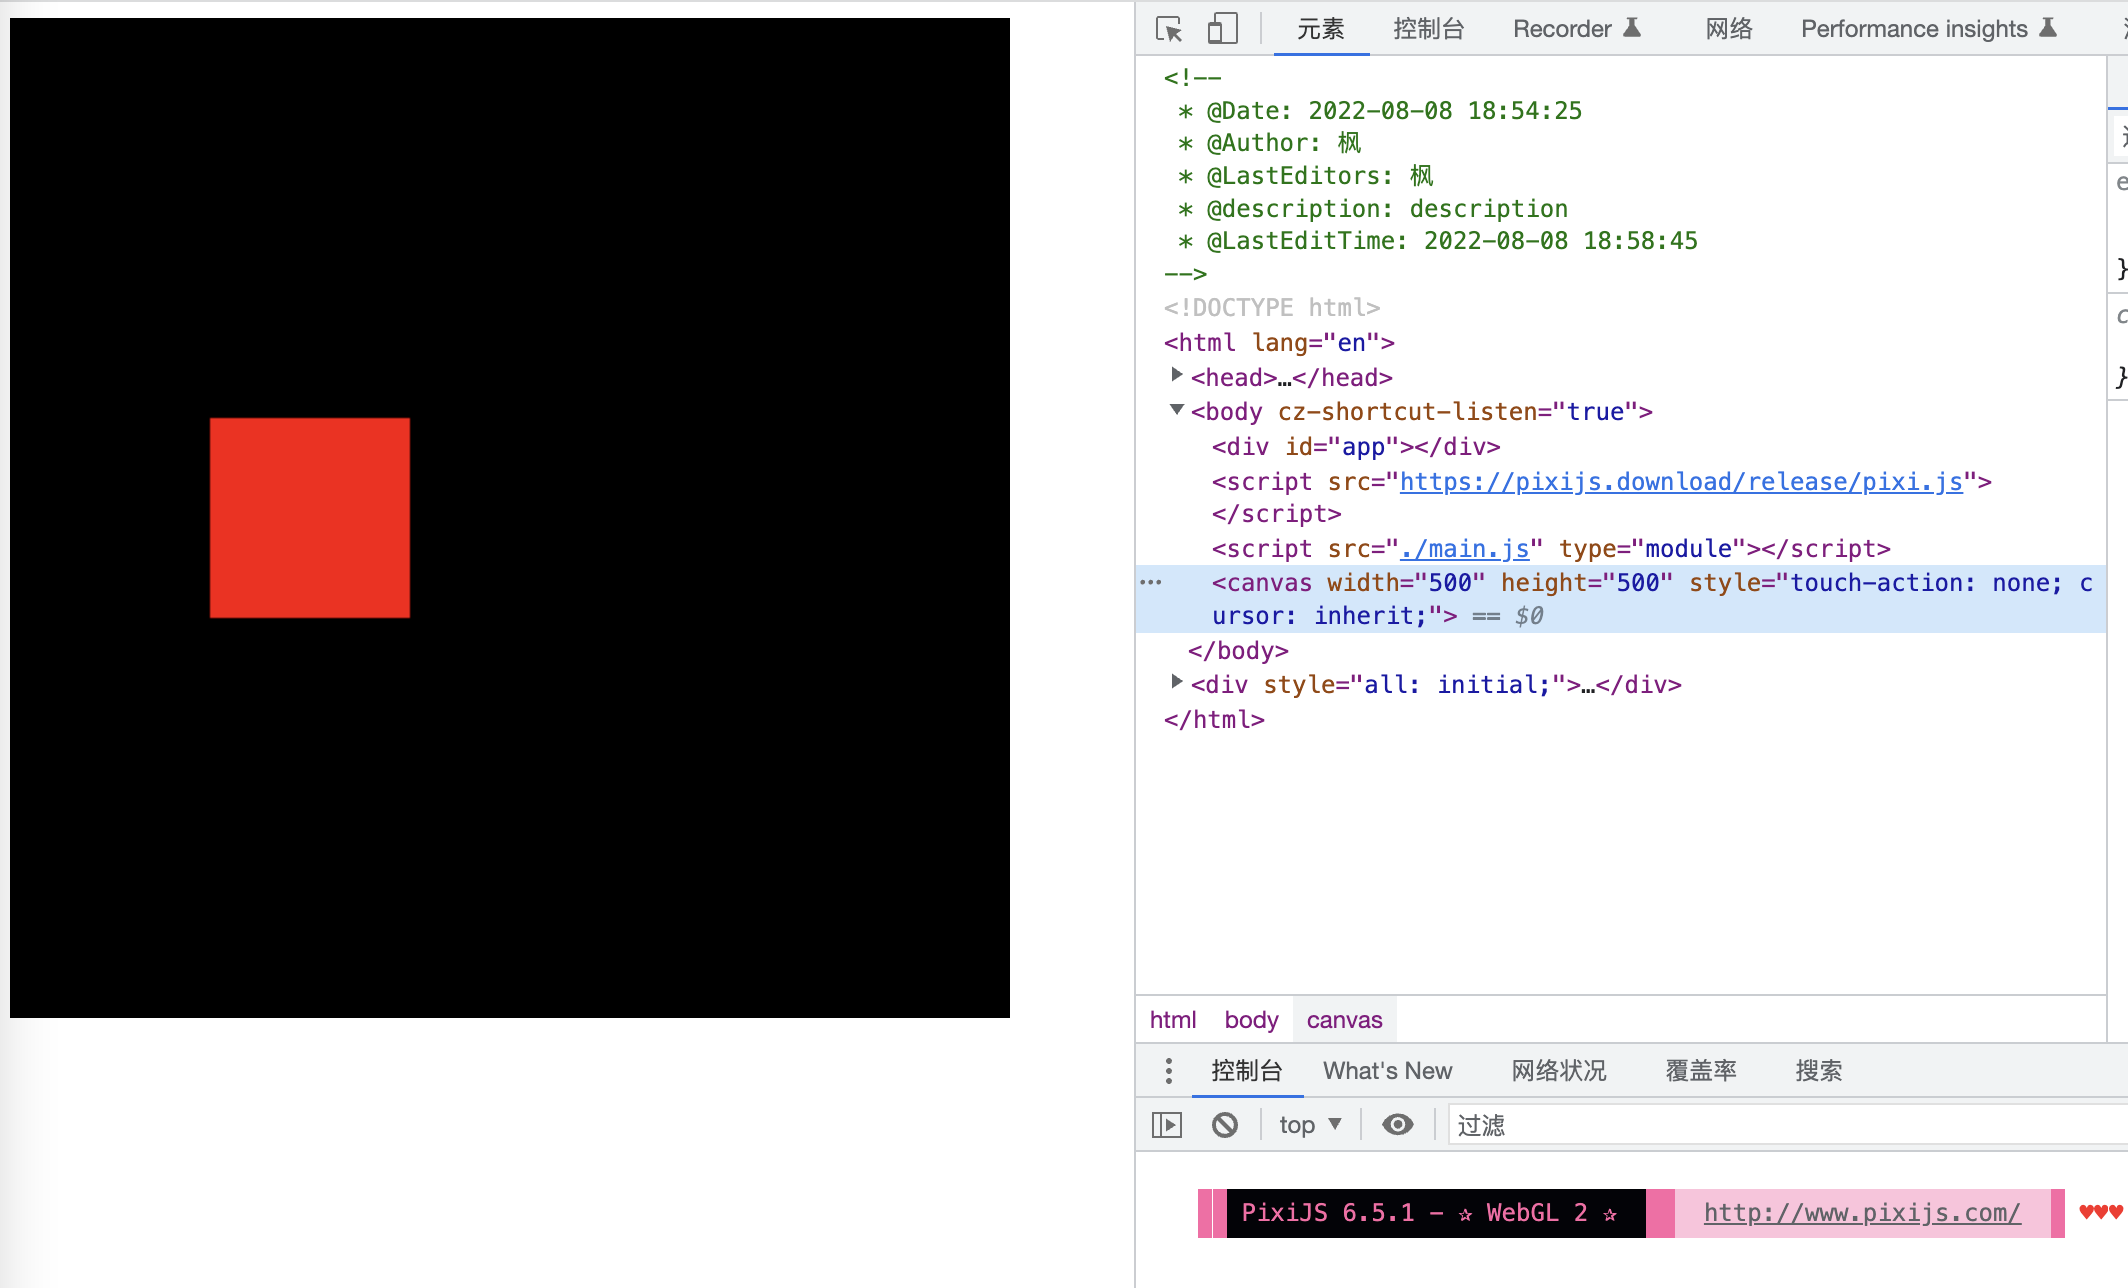
此时我们的调整已经完成,接下来创建测试用例来测试一下我们的代码,我们选用 canvas 来进行测试,使用 pixijs 来绘制 canvas
<!DOCTYPE html>
<html lang="en">

<head>
  <meta charset="UTF-8">
  <meta http-equiv="X-UA-Compatible" content="IE=edge">
  <meta name="viewport" content="width=device-width, initial-scale=1.0">
  <title>Document</title>
</head>

<body>
  <div id="app"></div>
  <script src="https://pixijs.download/release/pixi.js"></script>
  <script src="./main.js" type="module"></script>
</body>

</html>
在 main.js中自定义渲染器,关于 pixijs 的使用方法这里不做讲解,感兴趣的可以自定查看。
const { Application, Graphics } = PIXI

const game = new Application({
  width: 500,
  height: 500,
})

document.body.append(game.view)

const { createApp } = createRender({
  createElement(type) {
    if (type === 'rect') {
      const rect = new Graphics()
      rect.beginFill(0xff0000)
      rect.drawRect(0, 0, 100, 100)
      rect.endFill()

      return rect
    }
  },
  patchProps(el, key, val) {
    el[key] = val
  },
  insert(el, parent) {
    parent.addChild(el)
  }
})

createApp(App).mount(game.stage)
然后在 App 中就按照正常的方式进行编写即可
export const App = {
  setup() {
    return {
      x: 100,
      y: 200
    }
  },
  render() {
    return h('rect', { x: this.x, y: this.y })
  }
}
使用 rollup 构建一下代码,在浏览器打开预览就可以看到效果
更新渲染 element
更新流程
之前我们所有的 example 都是只进行了初始渲染成,并没有更新的情况,这一小节我们将进行更新逻辑的实现。
所谓的更新,就是将组件的 render 函数再执行一遍,只不过这中间可以添加 diff 算法来减少不必要的更新。
我们这一小节的示例将会结合我们之前的响应式 API 进行测试
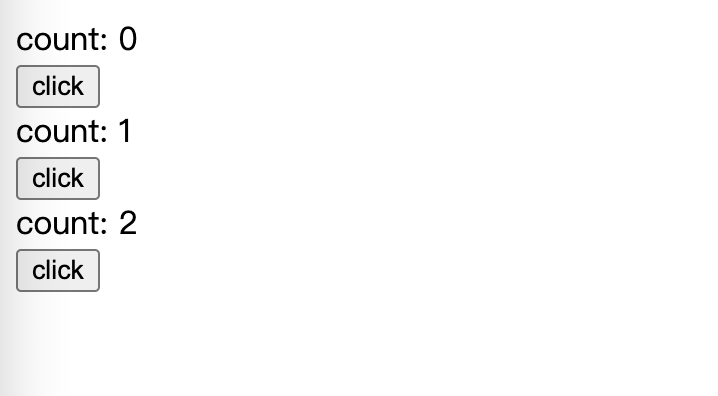
export const App = {
  name: 'App',
  setup() {
    const count = ref(0)
    const onClick = () => {
      count.value++
    }

    return { count, onClick }
  },
  render() {
    return h(
      'div',
      { id: 'root' },
      [
        h('div', {}, 'count: ' + this.count),
        h('button', { onClick: this.onClick }, 'click')
      ]
    )
  }
}
这里第 16 行使用 this.count 来获取了 ref 变量,你可能会有疑问 ref 不是需要通过.value来访问数据吗?因为我们之前实现过一个proxyRefs,这样我们就不用在组件中通过.value去访问了。
我们给之前的挂载 setup 结果的函数添加 proxyRefs
function handleSetupResult(instance: any, setupResult: any) {
  // TODO function
  if (typeof setupResult === 'object') {
    instance.setupState = proxyRefs(setupResult)
  }

  finishComponentSetup(instance)
}
这样我们页面中就可以获取到 count 的实际值了
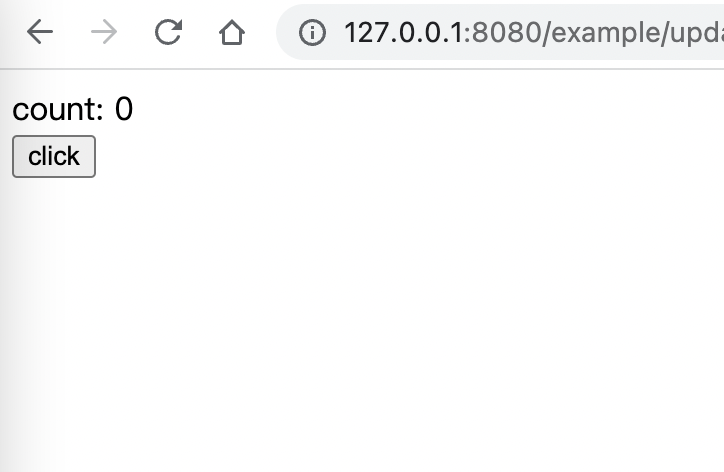
这时仍然只是显示,还不能更新,我们继续往下看。
我们需要让值发生变化时重新渲染,需要借助我们之前实现的响应式,也就是依赖收集和触发,即 effect 函数。
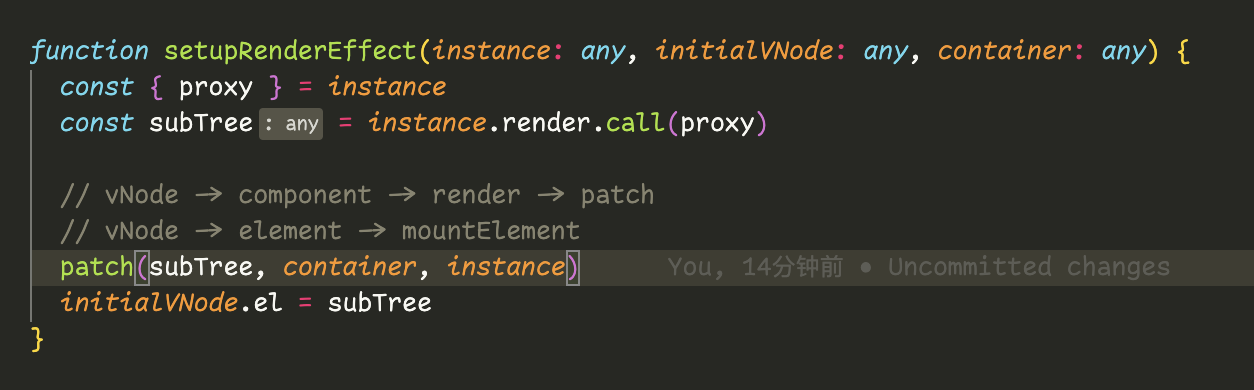
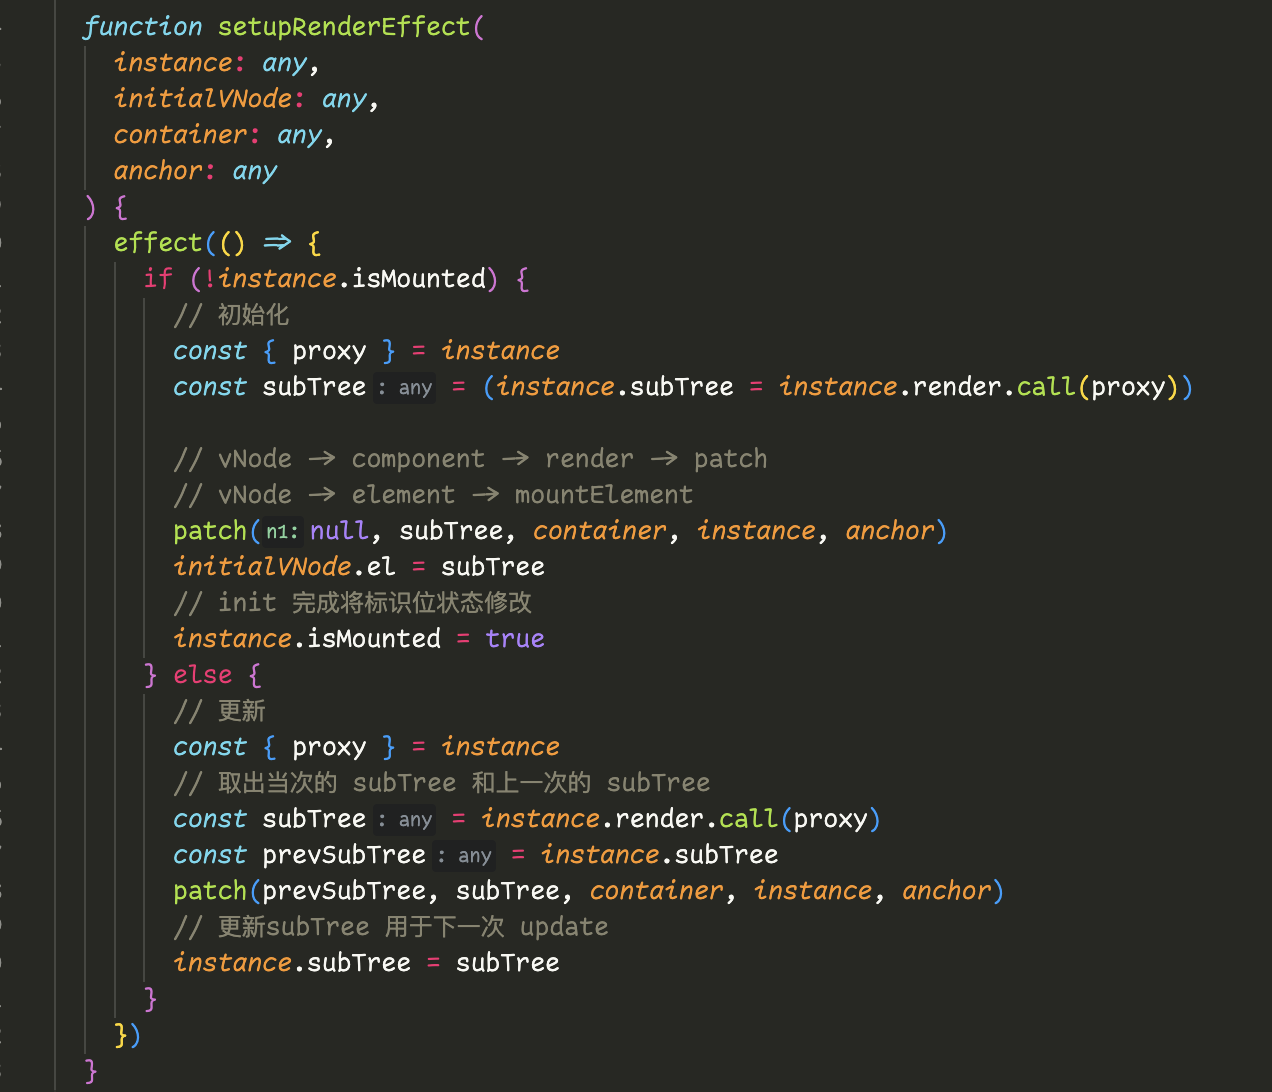
至于在什么时机使用 effect,在调用组件 render 方法的时候。我们之前有一个 setupRenderEffect 函数,这个函数就是负责渲染组件的,我们在此添加 effect 即可。
function setupRenderEffect(instance: any, initialVNode: any, container: any) {
  effect(() => {
    const { proxy } = instance
    const subTree = instance.render.call(proxy)

    // vNode -> component -> render -> patch
    // vNode -> element -> mountElement
    patch(subTree, container, instance)
    initialVNode.el = subTree
  })
}
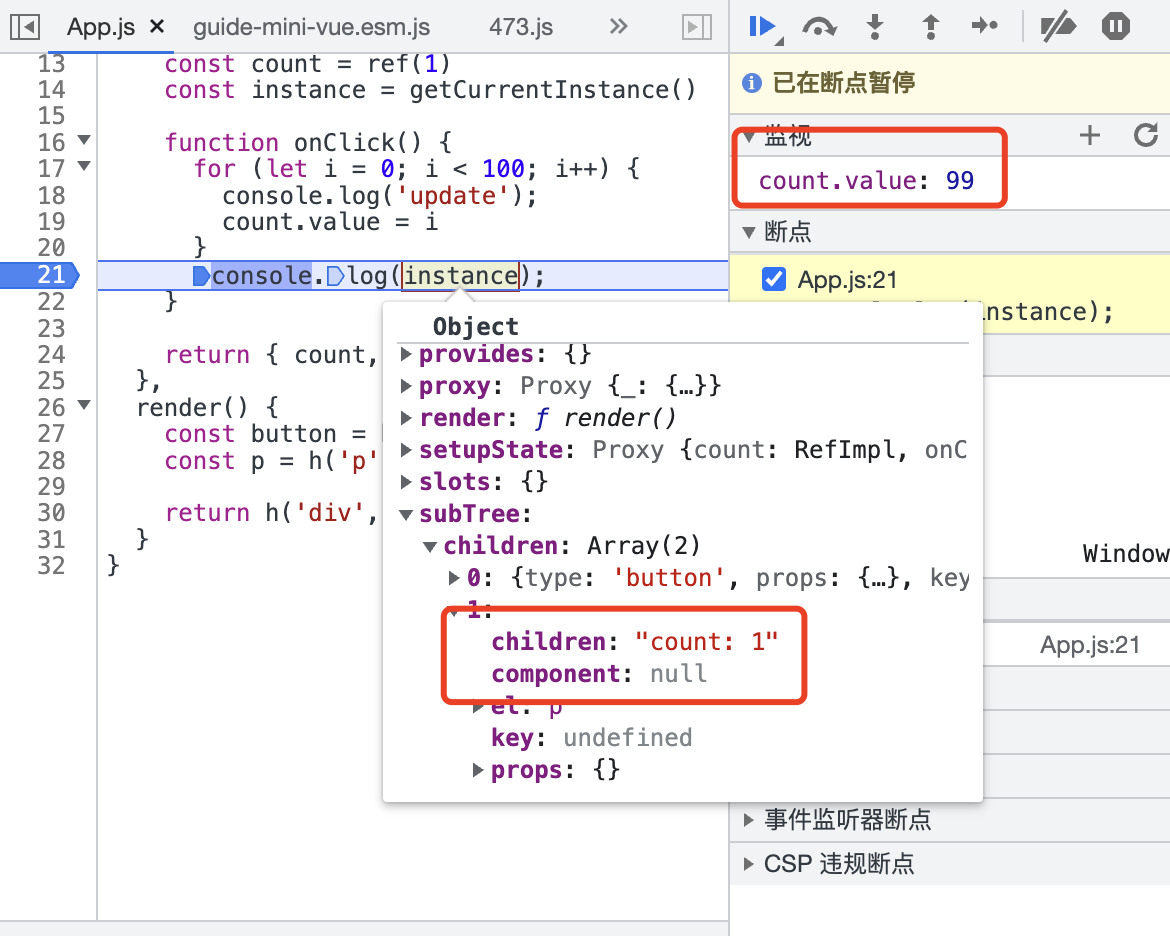
此时打开浏览器,点击按钮就可以看到已经能够更新页面了
但是这样并不是更新,而是将每一次最新的结果追加渲染了一次。所以我们还要继续优化。
我们需要在函数执行时区分时初始化还是更新,以达到精确更新的目的。
按照我们一贯的套路,向 instance 上添加一个标识位用于区分 init 和 update
export function createComponentInstance(vNode: any, parent: any) {

  const component = {
    vNode,
    type: vNode.type,
    setupState: {},
    props: {},
    slots: {},
    provides: parent?.provides || {},
    parent,
    emit: (args: any): any => {},
    isMounted: false
  }

  component.emit = emit.bind(null, component)

  return component
}
然后渲染时通过这个标识来进行 init 和 update 操作(这里需要修改 patch 函数,将原来的 vNode 变为n1, n2两个参数,n1接收之前的 vNode, n2 接收最新的,根据编辑器报错修改相关参数即可,所有的初始化patch参数n1 均传值null,具体改动可以看这条 git 记录)
function setupRenderEffect(instance: any, initialVNode: any, container: any) {
  effect(() => {
    if (!instance.isMounted) {
      // 初始化
      const { proxy } = instance
      const subTree = (instance.subTree = instance.render.call(proxy))

      // vNode -> component -> render -> patch
      // vNode -> element -> mountElement
      patch(null, subTree, container, instance)
      initialVNode.el = subTree
      // init 完成将标识位状态修改
    } else {
      // 更新
      const { proxy } = instance
      // 取出当次的 subTree 和上一次的 subTree
      const subTree = instance.render.call(proxy)
      const prevSubTree = instance.subTree
      patch(prevSubTree, subTree, container, instance)
      // 更新subTree 用于下一次 update
      instance.subTree = subTree
    }
  })
}
在渲染时根据有无n1 来选择挂载还是更新
function processElement(
n1: any,
n2: any,
container: any,
parentComponent: any
) {
if (!n1)
// 首次渲染
mountElement(n2, container, parentComponent)
// update
else patchElement(n1, n2, container)
}
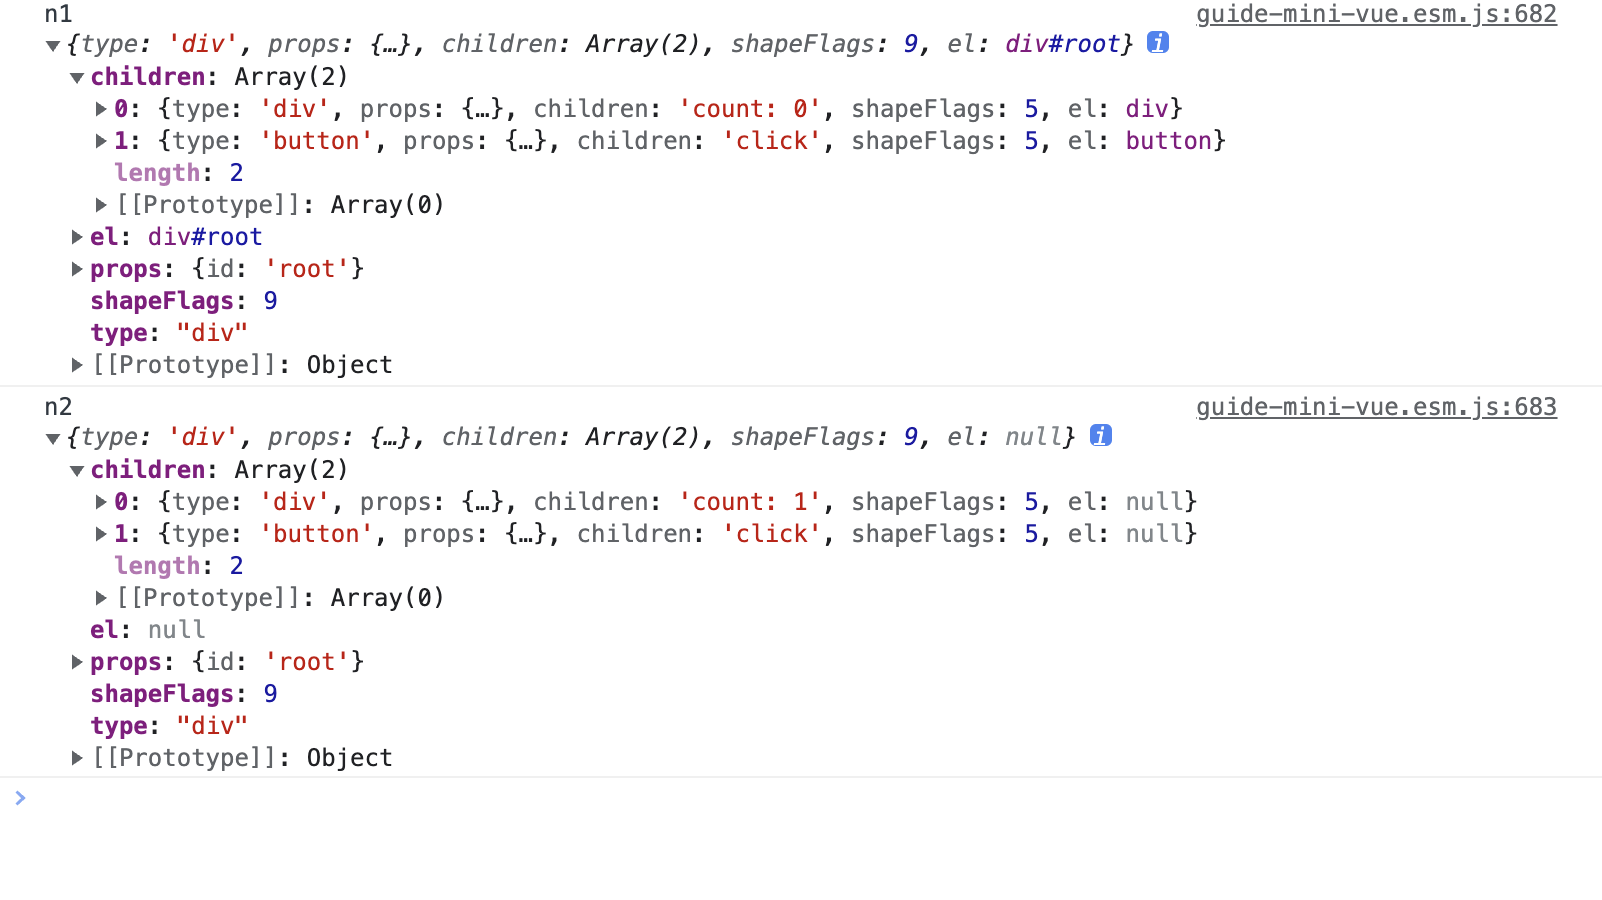
function patchElement(n1: any, n2: any, container: any) {
console.log('n1', n1)
console.log('n2', n2)
}
此时已经可以看到两次的 vNode 了,接下来我们只需要 diff 这两次的 vNode 然后更新即可
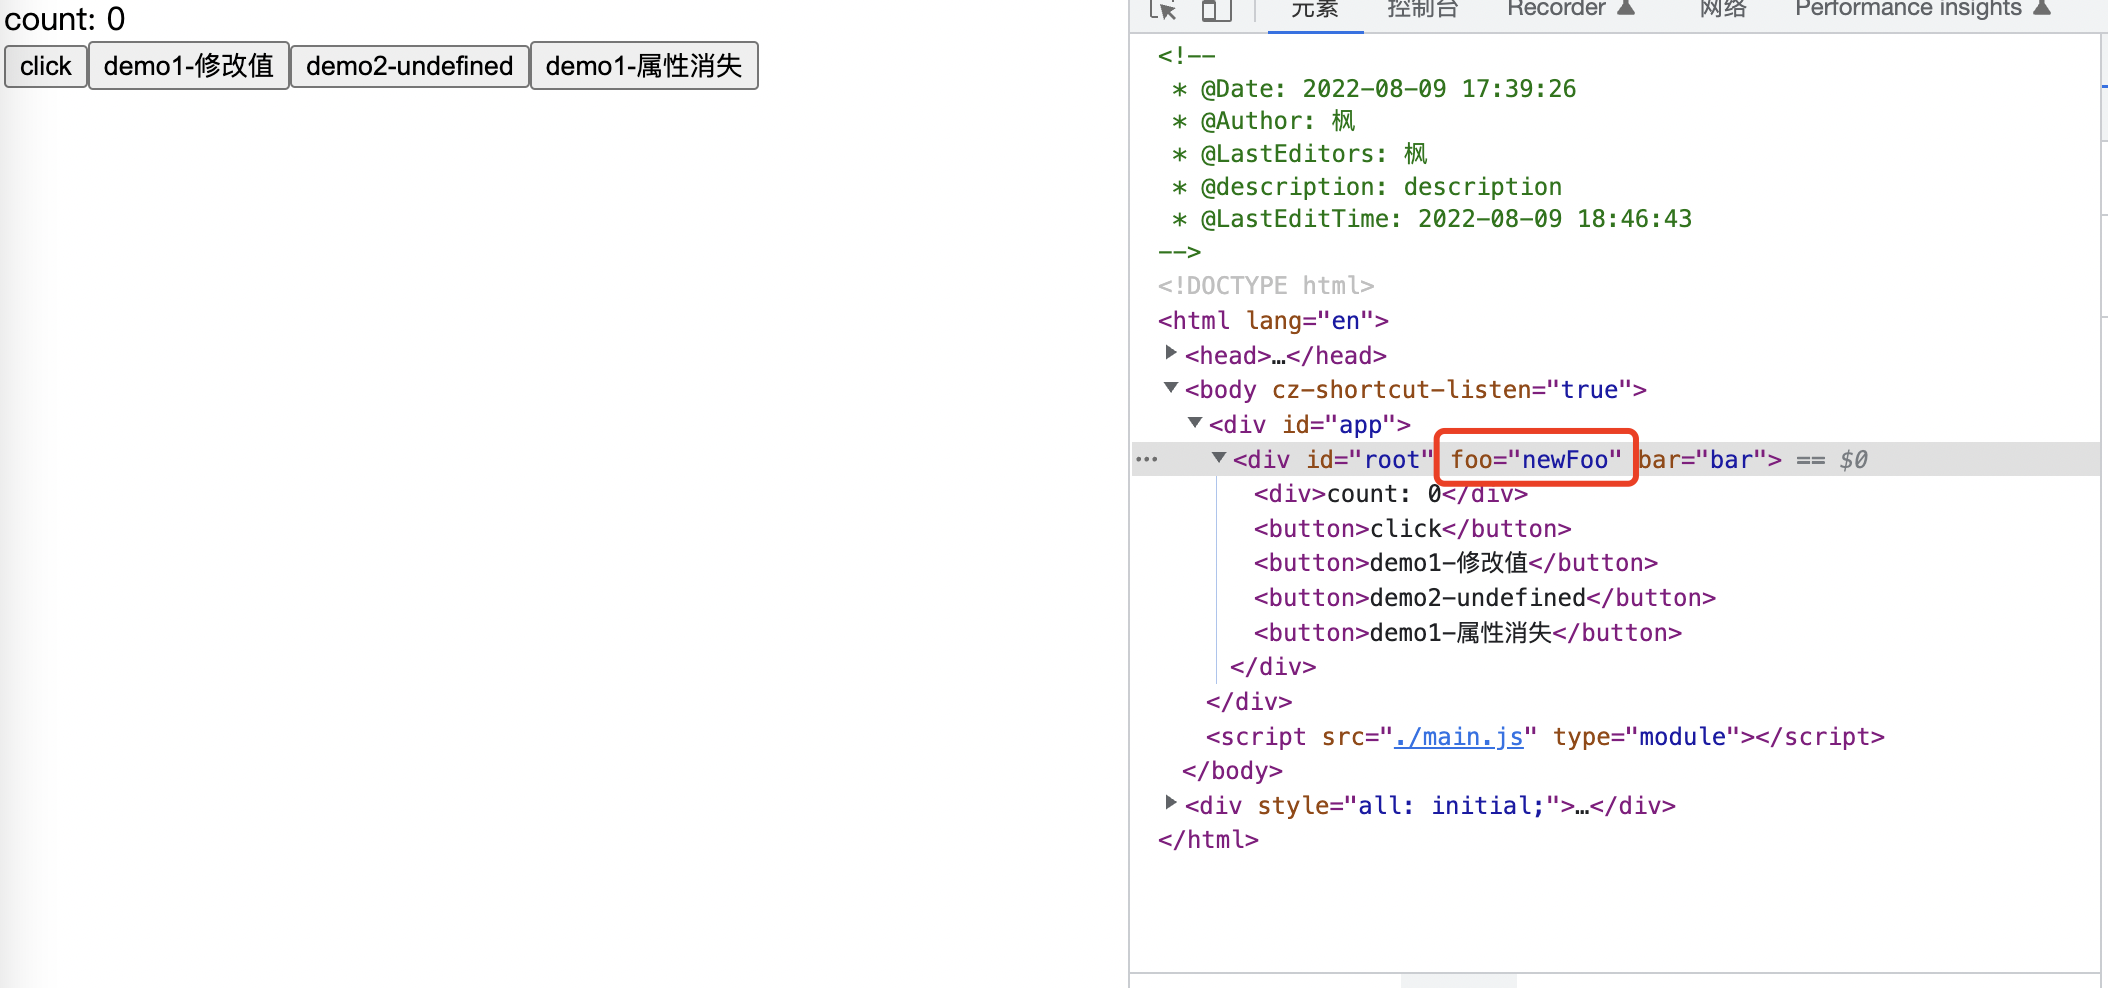
更新 props
props 的更新有三种情况
- 值发生变化:例如bar: ‘bar’ -> bar: ‘newBar’,这时候要进行修改操作
- 值变为空:值变为 undefined 或者 null 时都意味着不再需要,此时进行删除操作
- 属性没有了:当属性消失时,此时对应删除操作
首先来看第一种情况,我们需要在上一小节的 patchElement 中利用 n1 和 n2 来进行比较
function patchElement(n1: any, n2: any, container: any) {
  console.log('n1', n1)
  console.log('n2', n2)

  // 比对 props 差异
  const oldProps = n1.props || {}
  const newProps = n2.props || {}

  const el = (n2.el = n1.el)
  patchProps(el, oldProps, newProps)
}

function patchProps(el: any, oldProps: any, newProps: any) {
  for (const key in newProps) {
    const prevProp = oldProps[key]
    const nextProp = newProps[key]

    if (prevProp !== nextProp) {
      hostPatchProps(el, key, prevProp, nextProp)
    }
  }
}
这里的 hostPatchProps 就是之前在 runtime-dom 中的 patchProps,我们需要拓展一个参数
function patchProps(el: any, key: string, prevValue: any, nextVal: any) {
  if (isOn(key)) {
    const eventName = key.slice(2).toLowerCase()
    el.addEventListener(eventName, nextVal)
  } else {
    el.setAttribute(key, nextVal)
  }
}
此时已经可以实现属性的更新了
然后是值为 undefined 的情况,这里还需要再 runtime-dom 中改动,需要判断 nextVal 的值是否为 undefined 或者null,如果是就执行 removeAttribute,否则执行原来添加的逻辑。
function patchProps(el: any, key: string, prevValue: any, nextVal: any) {
  if (isOn(key)) {
    const eventName = key.slice(2).toLowerCase()
    el.addEventListener(eventName, nextVal)
  } else {
    if (nextVal === undefined || nextVal === null) {
      el.removeAttribute(key)
    } else {
      el.setAttribute(key, nextVal)
    }
  }
}
第三种情况需要判断旧的 props 是否存在在新的props 中
function patchProps(el: any, oldProps: any, newProps: any) {
  // props 是否变化或者是否为 undefined 的情况
  for (const key in newProps) {
    const prevProp = oldProps[key]
    const nextProp = newProps[key]

    if (prevProp !== nextProp) {
      hostPatchProps(el, key, prevProp, nextProp)
    }
  }

  // props 消失的情况
  for (const key in oldProps) {
    if (!(key in newProps)) {
      hostPatchProps(el, key, oldProps[key], null)
    }
  }
}
此时三种情况都已经处理完成了
更新 element children
目前为止我们的 children 支持 text 和 array 两种格式,这就意味着我们要处理四种情况
- array -> text
- text -> text
- text -> array
- array -> array
下面来依次处理这四种情况
继续我们上一小节的 patchElement,添加 patchChildren 函数
function patchElement(n1: any, n2: any, container: any) {
  console.log('n1', n1)
  console.log('n2', n2)

  // 比对 props 差异
  const oldProps = n1.props || EMPTY_OBJ
  const newProps = n2.props || EMPTY_OBJ

  const el = (n2.el = n1.el)
  patchProps(el, oldProps, newProps)

  patchChildren(n1, n2, el)
}
在 patchChildren 中我们要做的就是判断 children 的变化是上述四种情况的哪一种情况,根据不同的情况进行不同的处理
function patchChildren(n1: any, n2: any, container: any) {
  const prevShapeFlags = n1.shapeFlags
  const shapeFlags = n2.shapeFlags

  const c2 = n2.children

  if (shapeFlags & ShapeFlags.TEXT_CHILDREN) {
    if (prevShapeFlags & ShapeFlags.ARRAY_CHILDREN) {
      // array -> text
      // 1 把老的children 清除;
      unmountChildren(n1.children)
      // 2 设置 text
      hostSetElementText(container, c2)
    }
  }
}

function unmountChildren(children: any) {
  for (let i = 0; i < children.length; i++) {
    const el = children[i].el
    // remove
    hostRemove(el)
  }
}
这两个 hostXXX 函数均属于渲染函数,需要从渲染层传入,我们在 runtime-dom 中实现这两个函数
// 移除节点
function remove(child: any) {
  const parent = child.parent
  if (parent) {
    parent.removeChild(child)
  }
}

// 设置文本节点
function setElementText(el: any, text: string) {
  el.textContent = text
}
新建测试用例来进行测试(下面几种情况的测试用例就不贴了,就是将两种类型的元素进行组合)
export default {
  name: 'ArrayToText',
  setup() {
    const isChange = ref(false)
    window.isChange = isChange

    return { isChange }
  },
  render() {
    const self = this

    const prevChildren = [
      h('div', {}, 'A'),
      h('div', {}, 'B'),
    ]
    const nextChildren = 'nextChildren'

    return self.isChange === true ?
      h('div', {}, nextChildren) :
      h('div', {}, prevChildren)
  }
}
这里将 isChange 暴露到 window,可以直接在浏览器控制台修改值来触发更新
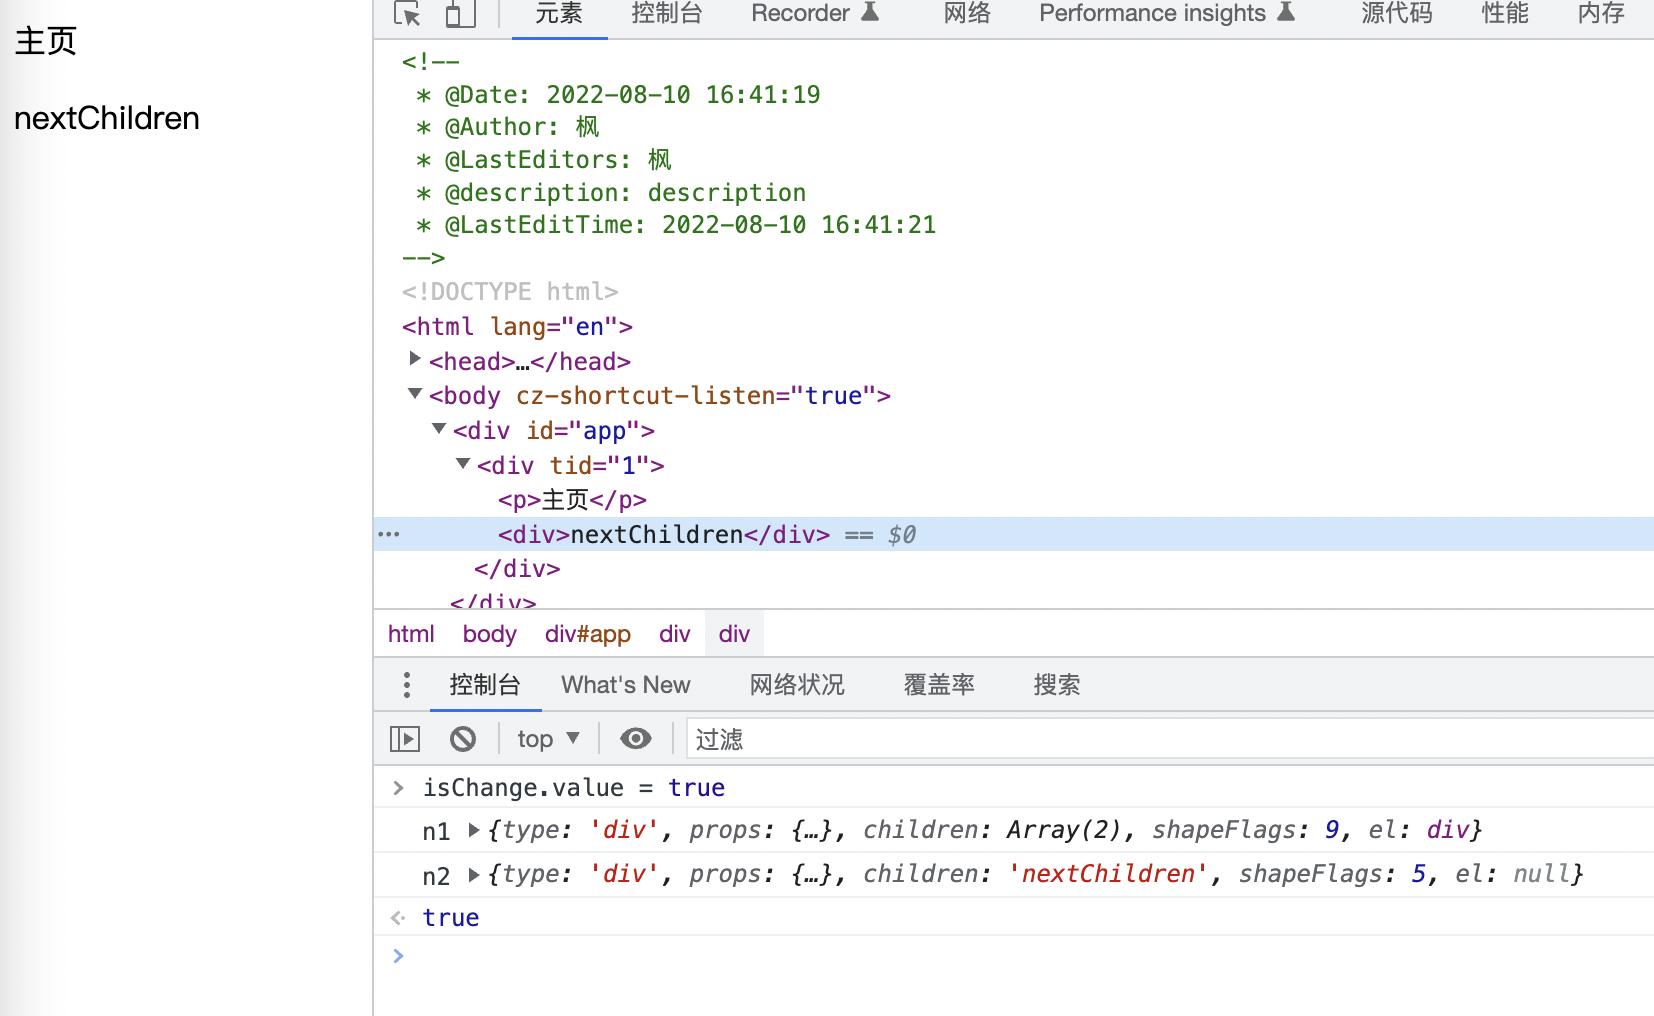
第一种情况已经可以正常更新,接下来我们继续完成第二种,text -> text。
这种情况的处理很简单,只需要比较两次的值是否相同,决定是否更新值即可。
function patchChildren(n1: any, n2: any, container: any) {
  const prevShapeFlags = n1.shapeFlags
  const shapeFlags = n2.shapeFlags

  const c1 = n1.children
  const c2 = n2.children

  if (shapeFlags & ShapeFlags.TEXT_CHILDREN) {
    if (prevShapeFlags & ShapeFlags.ARRAY_CHILDREN) {
      // array -> text
      // 1 把老的children 清除;
      unmountChildren(n1.children)
      // 2 设置 text
      hostSetElementText(container, c2)
    } else {
      if (c1 !== c2) {
        hostSetElementText(container, c2)
      }
    }
  }
}
这里的逻辑可以进行优化,array -> text时,c1 肯定不等于 c2,所以这个if 可以共用
if (shapeFlags & ShapeFlags.TEXT_CHILDREN) {
  if (prevShapeFlags & ShapeFlags.ARRAY_CHILDREN) {
    unmountChildren(n1.children)
  }
  if (c1 !== c2) {
    hostSetElementText(container, c2)
  }
}
改完代码进行测试,之前的功能不受影响。
接下来是第三种情况,text -> array,处理这种情况时,需要将之前的文本内容清空,然后挂载新的 chidren 即可,挂载 children 的函数我们之前已经写过了
function patchChildren(
    n1: any,
    n2: any,
    container: any,
    parentComponent: any
  ) {
    const prevShapeFlags = n1.shapeFlags
    const shapeFlags = n2.shapeFlags

    const c1 = n1.children
    const c2 = n2.children

    if (shapeFlags & ShapeFlags.TEXT_CHILDREN) {
      // 原值是 text 类型
      if (prevShapeFlags & ShapeFlags.ARRAY_CHILDREN) {
        // array -> text
        // 1 把老的children 清除;
        unmountChildren(n1.children)
        // 当 array -> text 时, c1 一定不等于 c2,所以可以省略
        // // 2 设置 text
        // hostSetElementText(container, c2)
      }
      // else {
      if (c1 !== c2) {
        hostSetElementText(container, c2)
      }
      // }
    } else {
      // 原值是 array
      if (prevShapeFlags & ShapeFlags.TEXT_CHILDREN) {
        // 清空文本
        hostSetElementText(container, '')
        // mount children
        mountChildren(c2, container, parentComponent)
      }
    }
  }
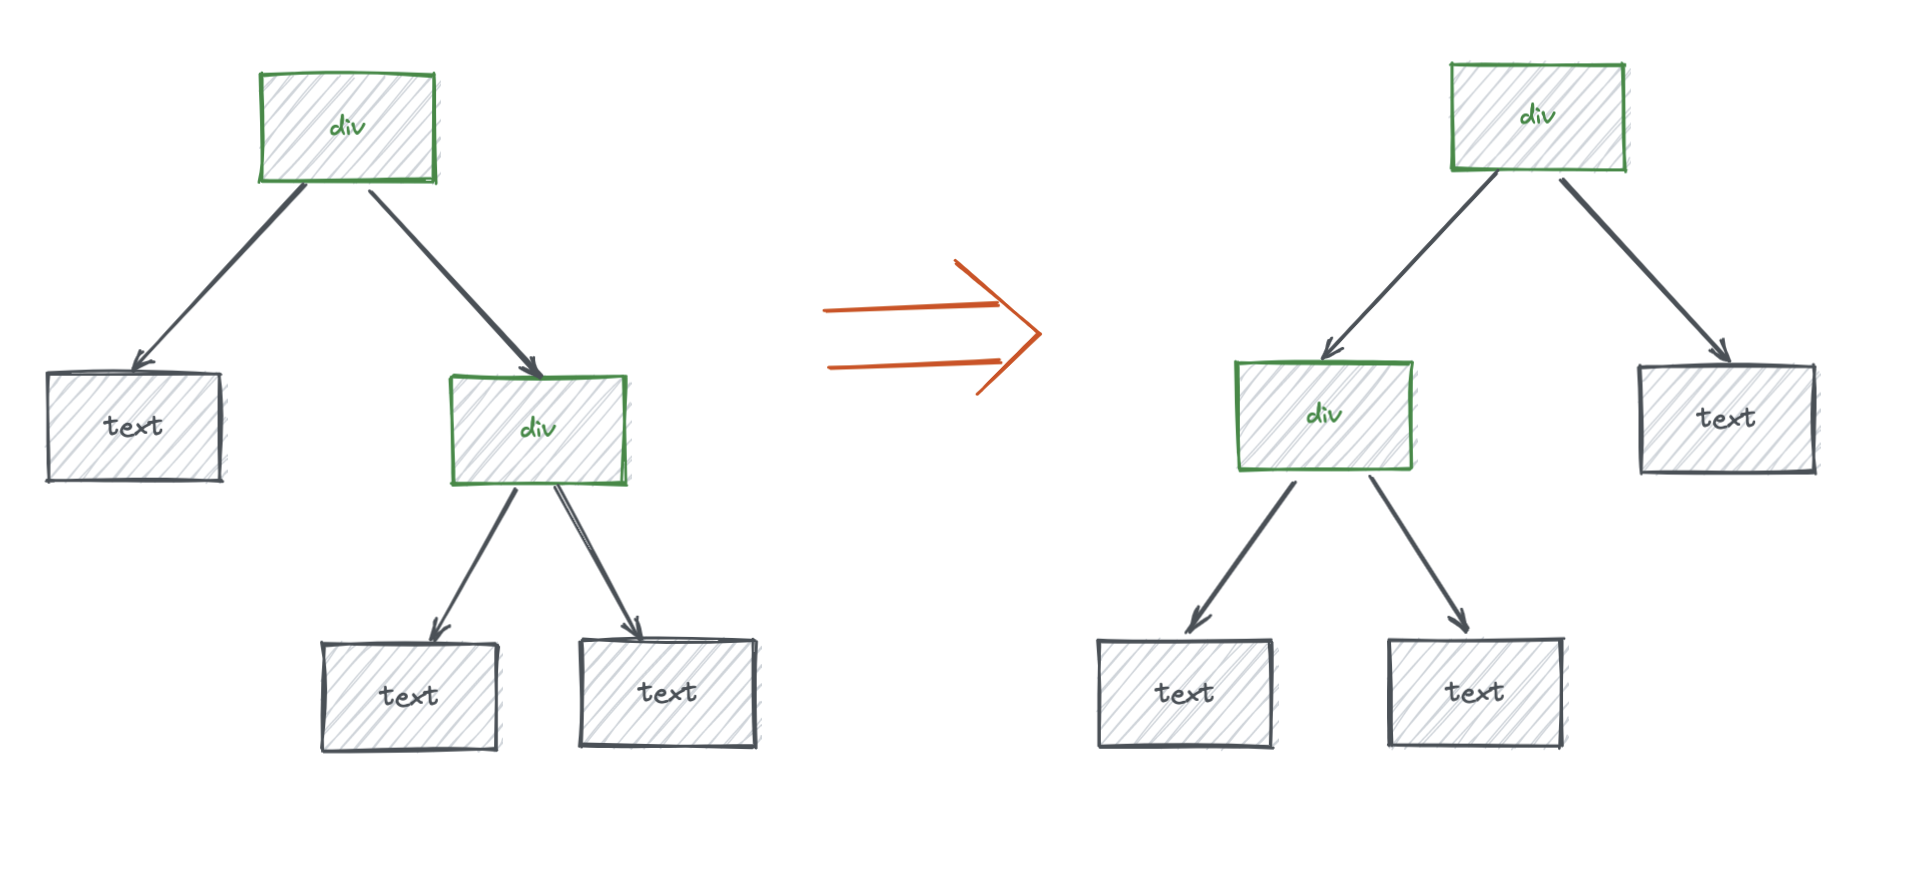
最后一种 arry -> array 的情况,这也是最复杂的一种情况,由于数组项不确定,我们如果全数替换的话可能会非常浪费性能,所以我们此种情况下需要进行优化。
vue 独创了一种双端 diff 的算法,从两边开始对比元素,可以大大提升效率,双端 diff 到底干了些什么呢?
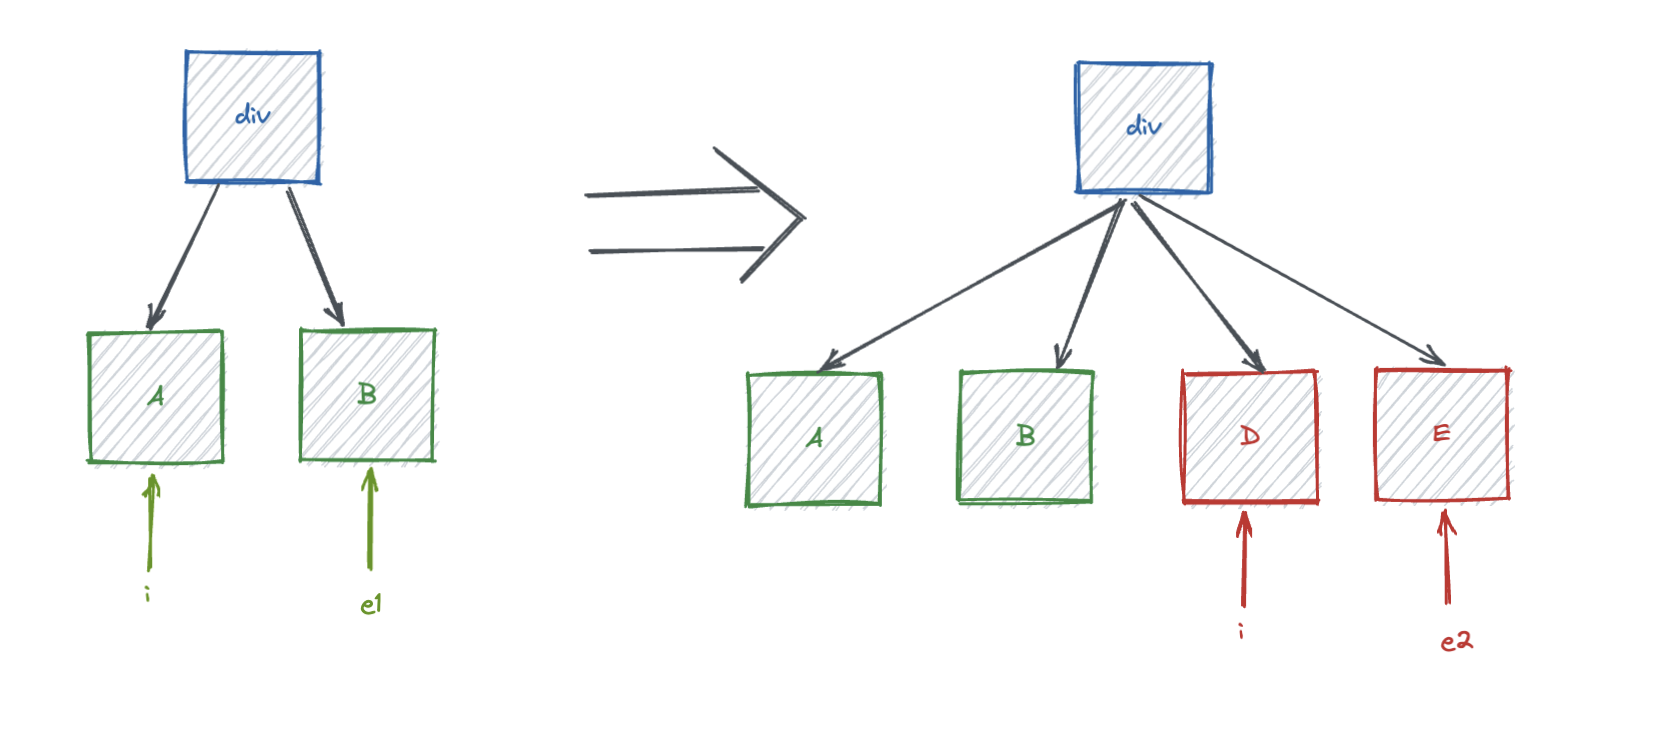
我们使用三个指针来标记元素进行 diff,分别是
i:头部指针
e1:老节点列表尾部指针
e2:新结点列表尾部指针
i 从 0 开始向右移动,比较相同下标的 c1 子元素和 c2 子元素,如果发现两个节点不是同一个则停止,否则继续向右遍历,知道走完 c1 所有的子元素。
// 左侧对比
while (i <= e1 && i <= e2) {
  // 指针不能超过最短的那个
  const n1 = c1[i],
        n2 = c2[i]

  if (isSameVNodeType(n1, n2)) {
    // 如果两个节点是同一个节点, patch 两个节点(props等可能发生变化)
    patch(n1, n2, container, parentComponent, parentAnchor)
  } else {
    break
  }

  i++
}
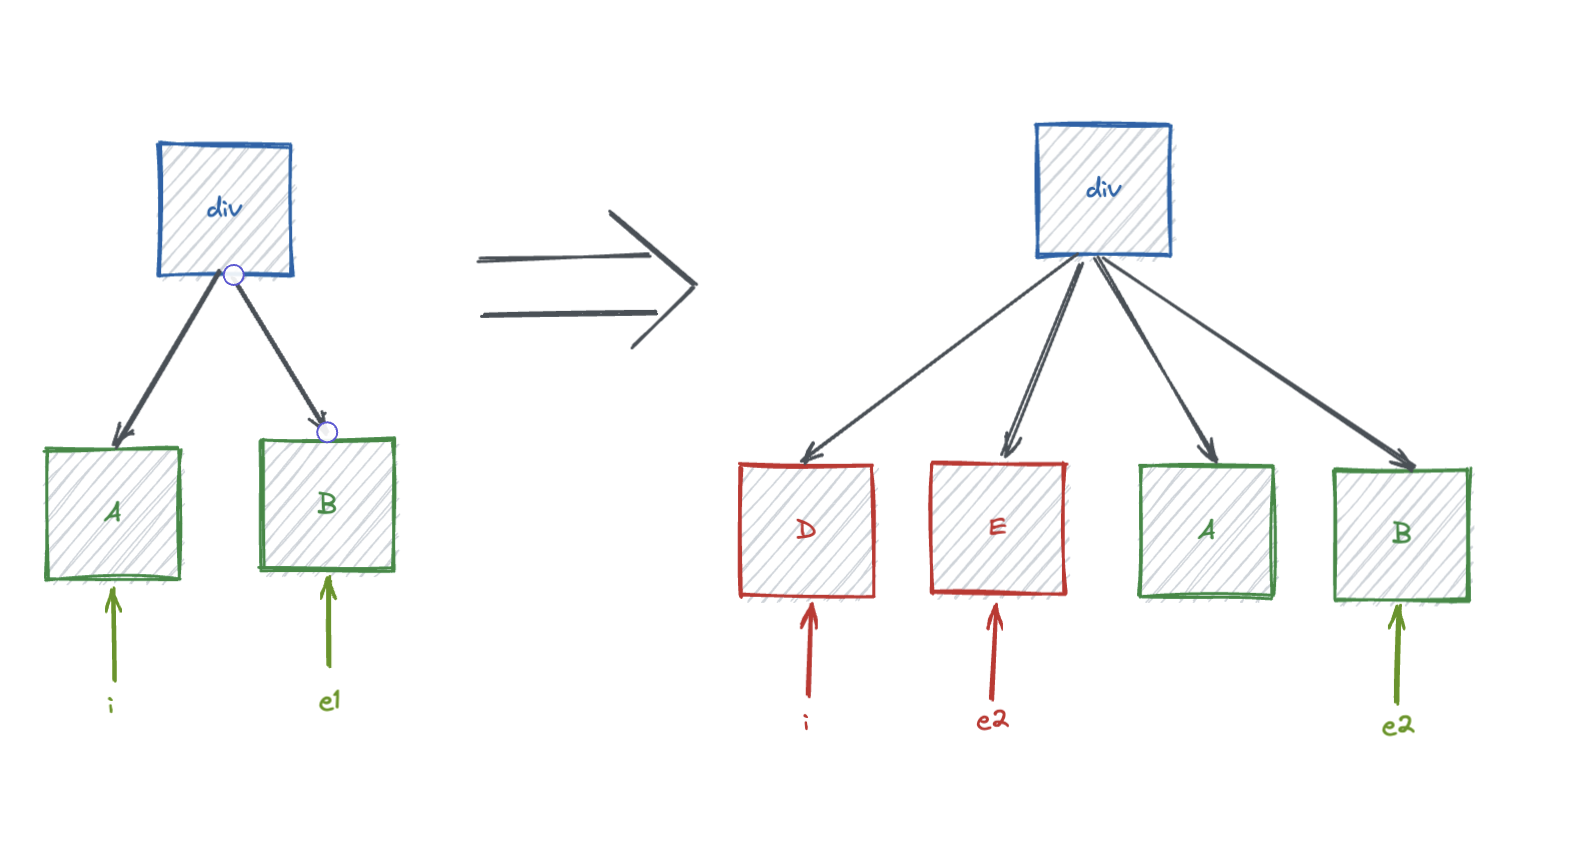
e1 和 e2 同时向左移动,发现节点不同时停止,否则继续向左遍历,直到走完c1 所有元素
// 右侧对比
while (i <= e1 && i <= e2) {
  const n1 = c1[e1],
        n2 = c2[e2]

  if (isSameVNodeType(n1, n2)) {
    patch(n1, n2, container, parentComponent, parentAnchor)
  } else {
    break
  }

  e1--
  e2--
}
i 指针始终标记在老节点列表上,如果遍历完老节点(i 移动到终点时)仍然未小于等于 e2,此时右侧出现新增节点;如果 i 第一次对比就发现不是同一个元素,但是右侧对比走完了 c1,这说明在左侧出现了新增节点。
这两种情况都体现为 i > e1 && i <= e2,将 i——e2 的元素进行新增即可完成更新。
if (i > e1) {
  // 老节点全部存在, e1 小于 i
  if (i <= e2) {
    const nextPos = e2 + 1
    const anchor = nextPos < l2 ? c2[nextPos].el : null
    while (i <= e2) {
      patch(null, c2[i], container, parentComponent, anchor)
      i++
    }
  }
}
如果 c2 的子元素已经全部遍历完,但是 c1 还有元素,说明这次的变动是删除了一些元素,我们需要从页面上移除部分 DOM.
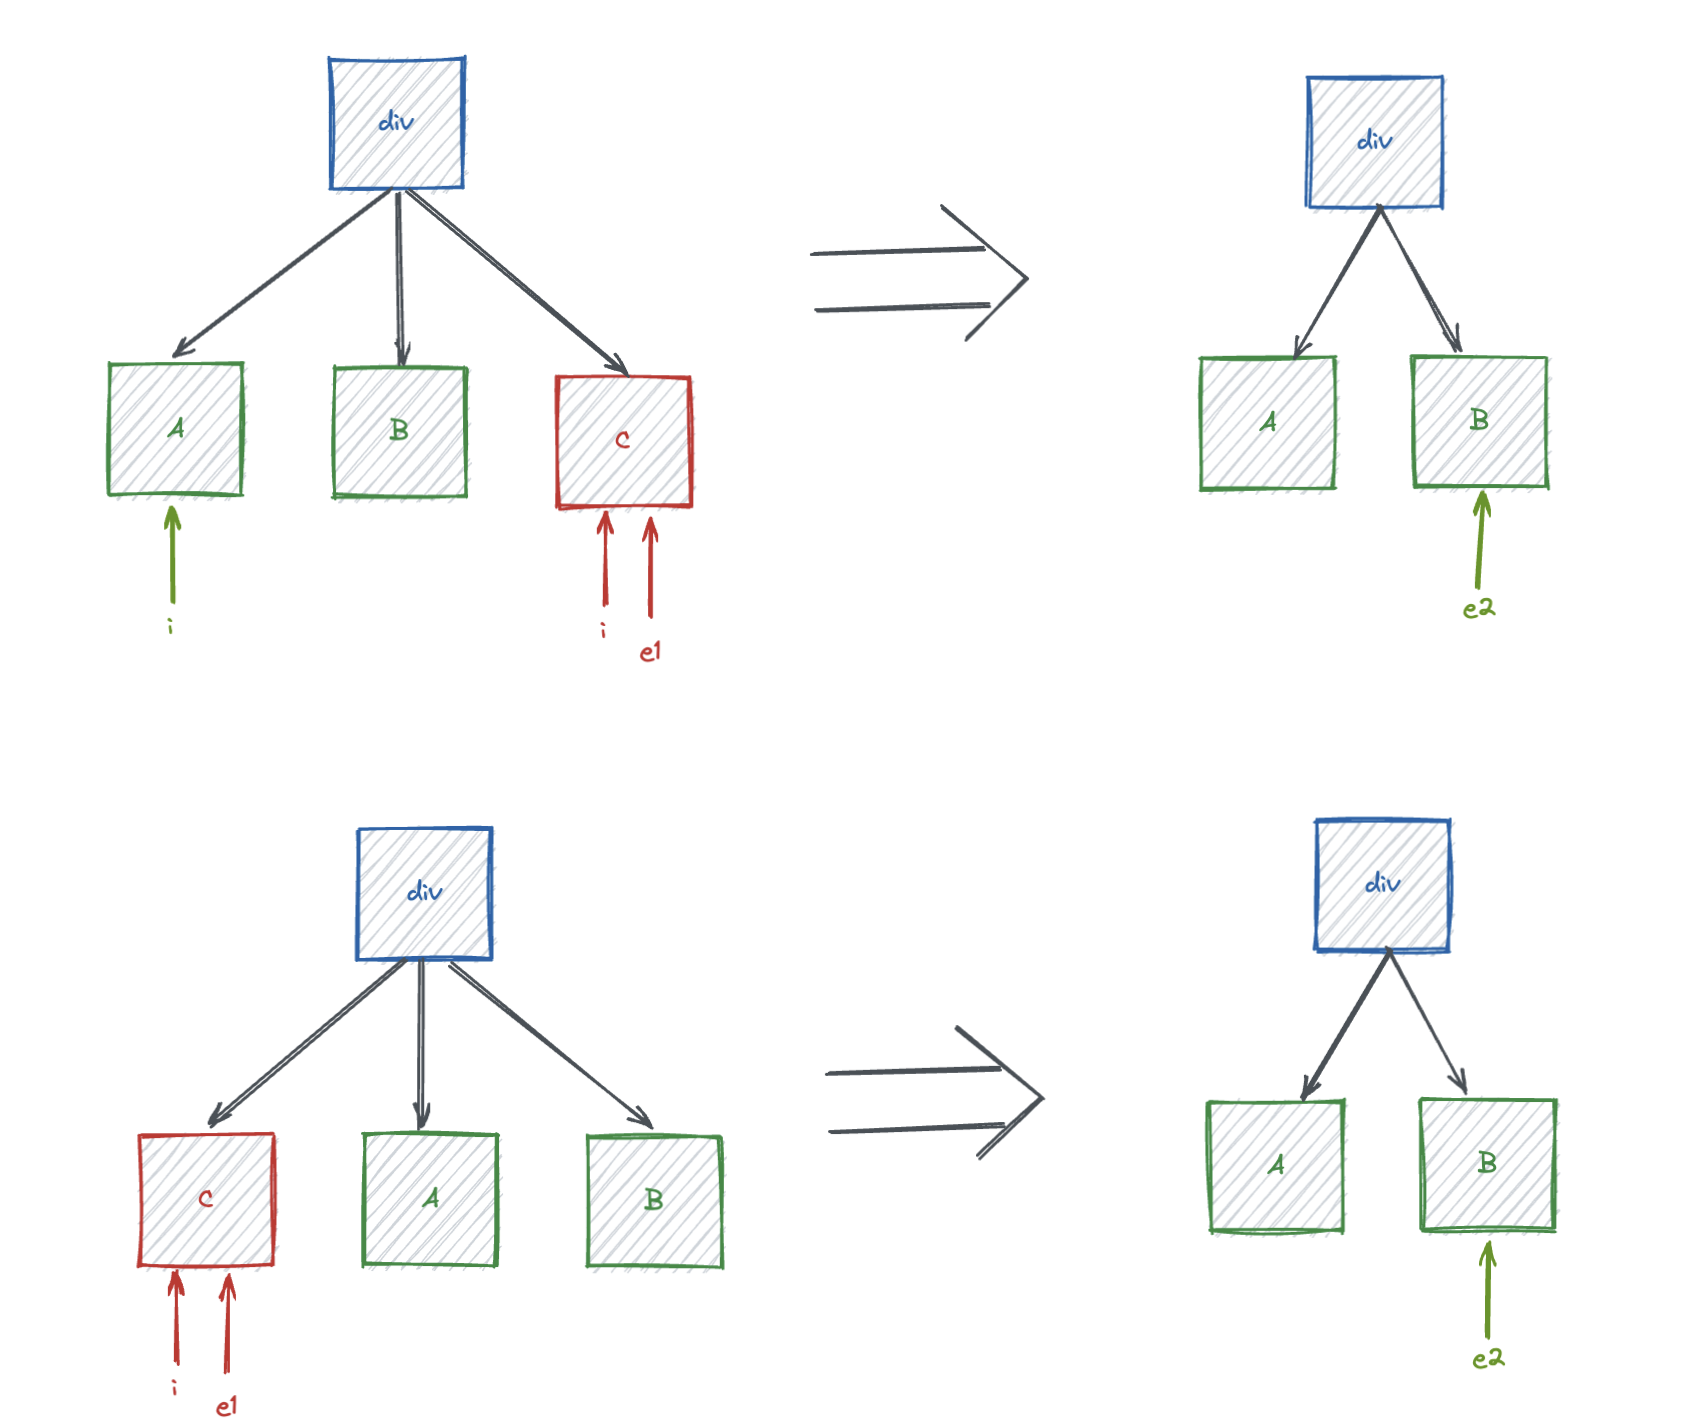
此时只需要将 i——e1 之间的元素全部移除即可。
if (i > e2) {
  // 老的比新的多, 删除
  while (i <= e1) {
    hostRemove(c1[i].el)
    i++
  }
}
前面这些都属于比较简单的情况,最复杂的是中间部分的变动,中间部分的变动存在三种情况
- 新增元素
- 删除元素
- 移动元素
经过前面的两次 while 循环,此时我们可以确定内部变动的范围,还需要判断元素是否存在在老节点中,如果存在则要继续使用。
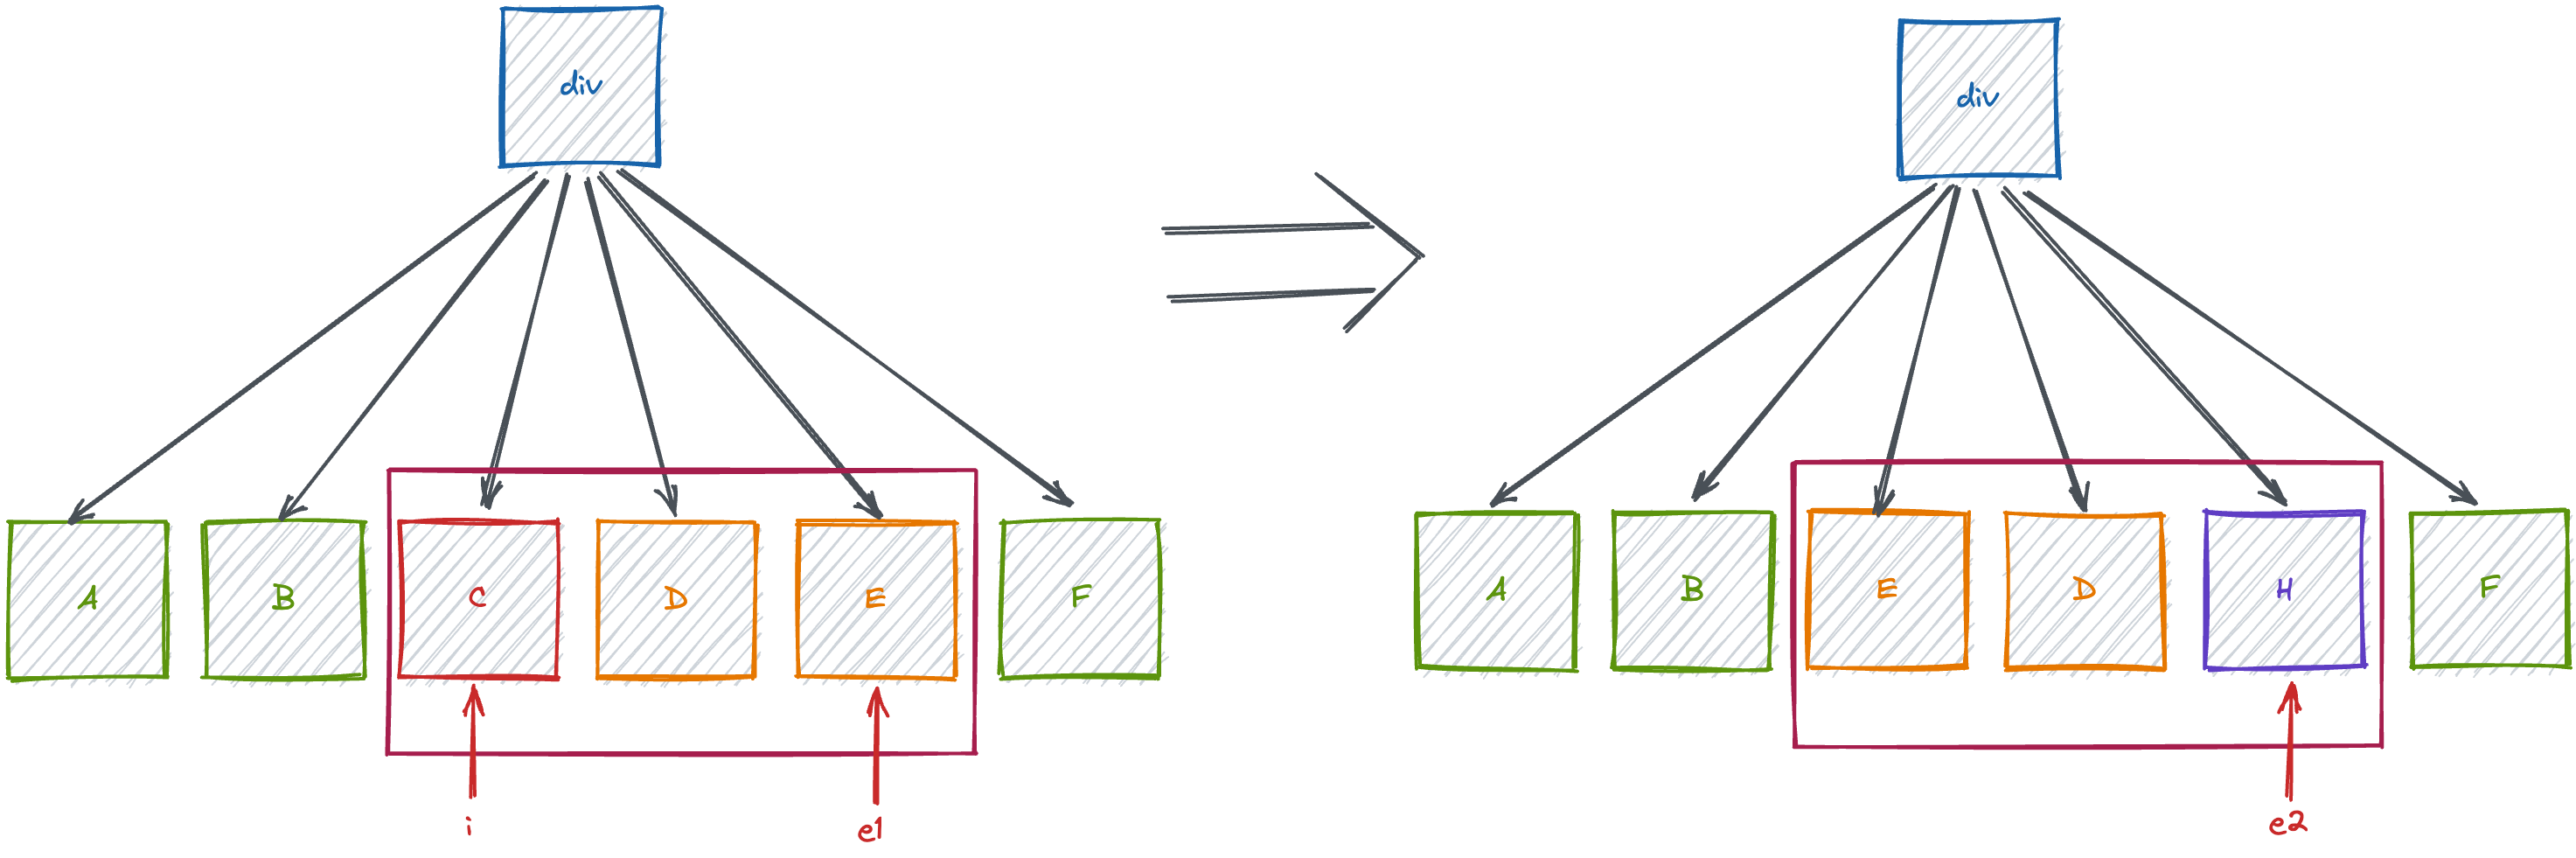
在查找老节点中的元素是否继续存在的时候有两种方案,一种是使用节点 key 建立 map,取值是直接从 map 里面取值;另一种方法就是循环对比每一个节点,寻找相同的节点。
显然第一种方法是优于第二种方法的,因为他的时间复杂度(get 取值的时候)是 O(1),循环的话需要 O(n)。
我们在已经知道变化范围的情况下,我们通过 i—e2 这一段数据建立 map,从 i 开始继续向后比对,直到 e1 位置停止。如果在 c2 中找不到的元素说明该元素应该删除,如果找到了就调整元素的索引。
// 中间对比
const toBePatched = e2 - i + 1
let patched = 0

const keyToNewIndexMap = new Map()
const newIndexToOldIndex = Array.from({ length: toBePatched }, _ => 0)

for (let j = i; j <= e2; j++) {
  const nextChild = c2[j]
  keyToNewIndexMap.set(nextChild.key, j)
}

for (let k = i; k <= e1; k++) {
  const prevChild = c1[k]
  let newIndex: number

  if (patched >= toBePatched) {
    // 如果新元素的所有元素都已经找到后续元素可以直接删除
    hostRemove(prevChild.el)
    continue
  }

  // null | undefined
  if (prevChild.key != null) {
    // 如果有 key 就使用 key
    newIndex = keyToNewIndexMap.get(prevChild.key)
  } else {
    // 没有 key 使用循环方案
    for (let l = i; l < e2; l++) {
      if (isSameVNodeType(prevChild, c2[l])) {
        // 找到相同的节点记录新的 index, 跳出
        newIndex = l
        break
      }
    }
  }

  // 如果没有 newIndex 说明节点不存在了, 删除
  if (newIndex === undefined) {
    hostRemove(prevChild.el)
  } else {
    newIndexToOldIndex[newIndex - i] = k + 1 // 减去前面比较过的部分
    // 如果找到了节点就进行比对
    patch(prevChild, c2[newIndex], container, parentComponent, null)
    patched++
  }
}

// 获取最长递增子序列
const increasingNewIndexSequence = getSequence(newIndexToOldIndex)
let j = increasingNewIndexSequence.length - 1

for (let p = toBePatched - 1; p >= 0; p--) {
  const nextIndex = p + i
  const nextChild = c2[nextIndex]
  const anchor = nextIndex + 1 < l2 ? c2[nextIndex + 1].el : null

  if (newIndexToOldIndex[p] === 0) {
    // 新增元素
    patch(null, nextChild, container, parentComponent, anchor)
  } else if (j < 0 || p !== increasingNewIndexSequence[j]) {
    console.log('移动')

    hostInsert(nextChild.el, container, anchor)
  } else {
    j--
  }
}
这里我们做了一点优化,当 c2 中变动的部分都已经找到之后,不在继续 patch,而是直接移除c1 中的后续元素。
newIndexToOldIndex用于映射新结点在老节点中的位置,初始值全部赋值为 0,如果找到老节点存在的节点,就将索引赋值。这里赋值的时候进行加一,一方面可以和 0 进行区分,另一方面可以利用后置节点 insertBefore。
这里通过算法获取了最长递增子序列,因为递增序列的 DOM不需要进行移动,完全可以通过移动其他元素来完成新 DOM 的构建。例如[1,3,2,0],只要通过将 3 对应的老节点移动到 1 和 2 中间即可完成移动,0 对应的元素为新增元素。
// 查找最长递增子序列
function getSequence(arr: number[]): number[] {
  const p = arr.slice()
  const result = [0]
  let i, j, u, v, c
  const len = arr.length
  for (i = 0; i < len; i++) {
    const arrI = arr[i]
    if (arrI !== 0) {
      j = result[result.length - 1]
      if (arr[j] < arrI) {
        p[i] = j
        result.push(i)
        continue
      }
      u = 0
      v = result.length - 1
      while (u < v) {
        c = (u + v) >> 1
        if (arr[result[c]] < arrI) {
          u = c + 1
        } else {
          v = c
        }
      }
      if (arrI < arr[result[u]]) {
        if (u > 0) {
          p[i] = result[u - 1]
        }
        result[u] = i
      }
    }
  }
  u = result.length
  v = result[u - 1]
  while (u-- > 0) {
    result[u] = v
    v = p[v]
  }
  return result
}
具体算法这里就不做介绍了,更多的内容可以查看这篇文章
组件更新
上一节我们完成了 element 元素的更新,这一小节我们来完成组件的更新。
首先编写一个测试用例
export default {
  name: "App",
  setup() {
    const msg = ref("123");
    window.msg = msg

    const changeChildProps = () => {
      msg.value = "456";
    };

    const count = ref(1)

    const changeCount = () => {
      count.value++
    }

    return { msg, changeChildProps, count, changeCount };
  },

  render() {
    return h("div", {}, [
      h("div", {}, "你好"),
      h(
        "button",
        {
          onClick: this.changeChildProps,
        },
        "change child props"
      ),
      h(Child, {
        msg: this.msg,
      }),
      h('div', {}, 'count: ' + this.count),
      h('button', { onClick: this.changeCount }, 'count++')
    ]);
  },
};

export default {
  name: "Child",
  setup(props, { emit }) { },
  render(proxy) {
    return h("div", {}, [h("div", {}, "child" + this.$props.msg)]);
  },
};
此时页面渲染为一个文本元素,然后一个 button,点击 button 是会更新 msg 的值;再往下是一个 count 文本元素和一个 button,点击这个 button 会累加 count.value。
此时点击页面上的按钮会发生如下现象(红色标注为对应点击的按钮)
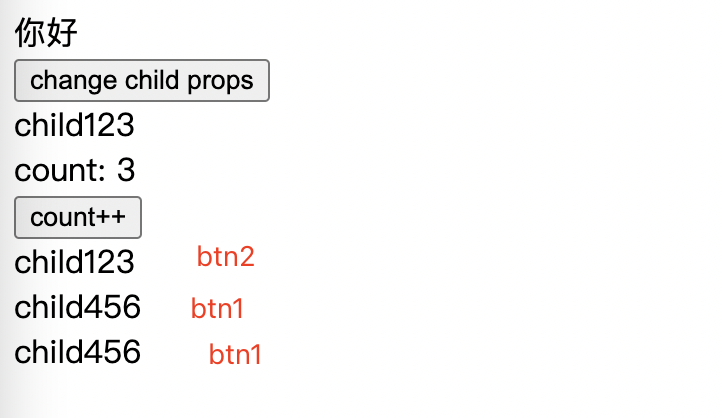
这显然是不合理的,这是组件在更新时没有更新逻辑,重新创建了一个。并且页面上其他元素更新与组件无关时,组件也进行了创建,我们需要判断更新的执行时机,当页面上其他元素发生变化时,不去执行组件更新的逻辑。

这里我们和处理 element 时一样,需要判断是否存在旧节点,如果不存在创建,如果存在则执行更新。
至于如何更新,在对比元素时我们是将新老元素进行对比,在更新组件时我们调用组件的 render 函数即可获得最新的元素,将新元素和老元素进行对比即可。
调用 render 的逻辑如下
tips:effect 函数有一个返回值,是一个runner 函数,调用 runner 的时候会重新执行 effect 的参数。
我们可以利用 effect 的这个机制来完成 render 的调用
function setupRenderEffect(
instance: any,
initialVNode: any,
container: any,
anchor: any
) {
instance.update = effect(() => {
if (!instance.isMounted) {
// 初始化
const { proxy } = instance
const subTree = (instance.subTree = instance.render.call(proxy))
// vNode -> component -> render -> patch
// vNode -> element -> mountElement
patch(null, subTree, container, instance, anchor)
initialVNode.el = subTree
// init 完成将标识位状态修改
instance.isMounted = true
} else {
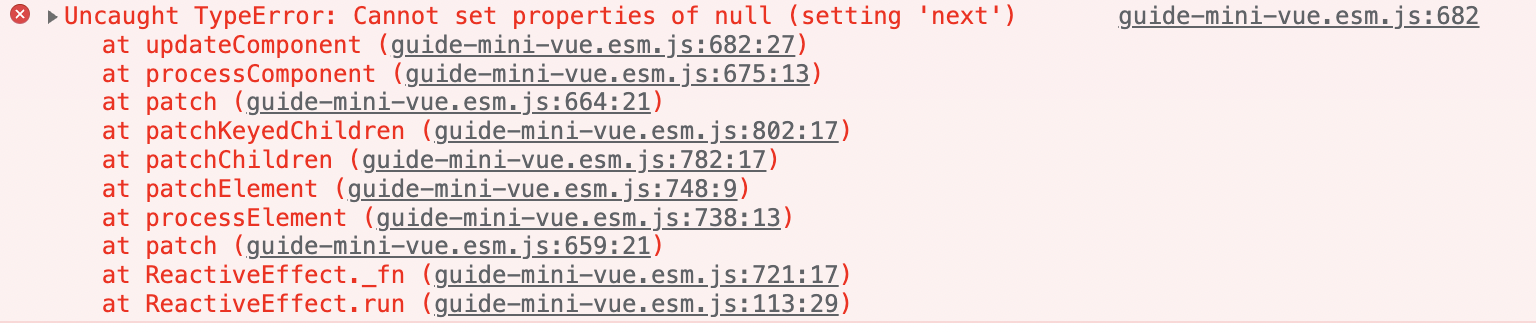
const { next, vNode } = instance
if (next) {
next.el = vNode.el
updateComponentPreRender(instance, next)
}
// 更新
const { proxy } = instance
// 取出当次的 subTree 和上一次的 subTree
const subTree = instance.render.call(proxy)
const prevSubTree = instance.subTree
patch(prevSubTree, subTree, container, instance, anchor)
// 更新subTree 用于下一次 update
instance.subTree = subTree
}
})
}
function updateComponentPreRender(instance: any, nextVNode: any) {
instance.vNode = nextVNode
instance.next = null
instance.props = nextVNode.props
}
将 runner 保存到组件实例的 update 属性,当组件更新时进行调用。这里添加 next 属性在组件实例上,用于更新时获取最新的 vNode。
function processComponent(
n1: any,
 n2: any,
 container: any,
 parentComponent: any,
 anchor: any
) {
  if (!n1) {
    mountComponent(n2, container, parentComponent, anchor)
  } else {
    updateComponent(n1, n2)
  }
}

function updateComponent(n1: any, n2: any) {
  const instance = (n2.component = n1.component)

  instance.next = n2

  instance.update()
}

function mountComponent(
initialVNode: any,
 container: any,
 parentComponent: any,
 anchor: any
) {
  const instance = (initialVNode.component = createComponentInstance(
    initialVNode,
    parentComponent
  ))

  setupComponent(instance)
  setupRenderEffect(instance, initialVNode, container, anchor)
}
在初始化组件的时候讲组件实例保存到 vNode 上,在更新时就可以通过 vNode 来获取组件实例。
此时组件的更新已经完成,但是此时页面上某一处元素更新还是会触发所有的组件更新,接下来解决这个问题。
我们可以通过比对组件的 props是否改变来决定是否进行组件更新,因为只有 props 变化才能在组件外部控制组件更新。
function updateComponent(n1: any, n2: any) {
  // 获取组件实例
  const instance = (n2.component = n1.component)
  if (shouldUpdateComponent(n1, n2)) {
    instance.next = n2

    // 执行 effect runner
    instance.update()
  } else {
    // 组件不更新也要保存状态, 否则下次更新将会丢失
    n2.el = n1.el
    n2.vNode = n2
  }
}


export function shouldUpdateComponent(prevNode: any, nextNode: any) {
  const { props: prevProps } = prevNode
  const { props: nextProps } = nextNode

  for (const key in nextProps) {
    if (nextProps[key] !== prevProps[key]) {
      return true
    }
  }

  return false
}
这里一定要注意,即便组件不更新,也要把el 和 vNode 重新赋值,否则组建更新时会丢失数据。
nextTick
我们前面已经完成了组件更新元素更新的性能优化,但其实还存在一种情况,在极短的时间内同一元素发生了多次渲染,这里其实可以只渲染最后一次结果,节省出中间没有意义的渲染。
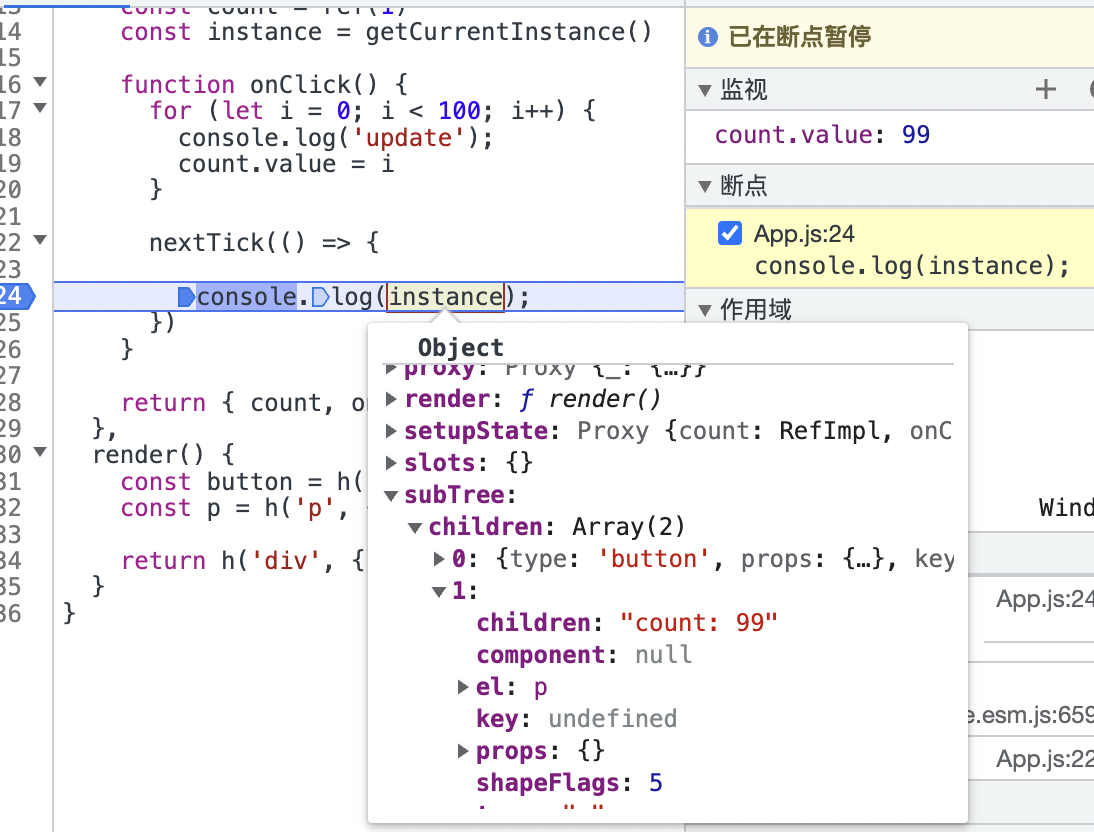
我们先来做一个测试
export default {
  name: 'App',
  setup() {
    const count = ref(1)

    function onClick() {
      for (let i = 0; i < 100; i++) {
        console.log('update');
        count.value = i
      }
    }

    return { count, onClick }
  },
  render() {
    const button = h('button', { onClick: this.onClick }, 'count++')
    const p = h('p', {}, 'count: ' + this.count)

    return h('div', {}, [button, p])
  }
}
这个组件在点击 button 之后在 for循环中执行了多次复制逻辑,按照我们之前的代码每一次赋值都会触发组建更新。

其中前 98 次的更新毫无用处,但是它浪费了计算资源,所以我们就这个问题来进行优化。
这里我们可以借助 effect 的 scheduler 来完成这个过程,当 effect 传入 scheduler 的时候,组件更新时会执行 scheduler,我们可以在 scheduler 中判断更新函数的调用时机。
function setupRenderEffect(
instance: any,
 initialVNode: any,
 container: any,
 anchor: any
) {
  instance.update = effect(
    () => {
      // ......
    },
    {
      scheduler() {
        console.log('update-scheduler')
        queueJobs(instance.update)
      }
    }
  )
}

const queue: any[] = []

let isFlushPending = false

export function queueJobs(job: any) {
  if (!queue.includes(job)) {
    queue.push(job)
  }

  queueFlush()
}

function queueFlush() {
  if (isFlushPending) return
  isFlushPending = true

  Promise.resolve().then(() => {
    isFlushPending = false
    let job: Function

    while ((job = queue.shift())) {
      job && job()
    }
  })
}
此时机已经可以只进行一次更新了,因为我们将更新的任务推到异步队列中,当同步任务执行完之后开始执行异步任务。
但是此时还有一个问题,如果在同步代码中执行获取组件实例等操作,是获取不到最新的组件状态的。
这就需要使用我们这一节的主题,nextTick。nextTick 将会在视图更新完成之后执行回调。
function queueFlush() {
  if (isFlushPending) return
  isFlushPending = true

  nextTick(flushJobs)
}

function flushJobs() {
  isFlushPending = false
  let job: Function

  while ((job = queue.shift())) {
    job && job()
  }
}

export function nextTick<T>(fn: () => T) {
  return fn ? Promise.resolve().then(fn) : Promise.resolve()
}
此时我们可以在组件中通过 nextTick 执行回调来获取最新的组件状态,也可已通过 await 来获取,如下
此时已经可以正确获取最新的状态了