编译模块
我们之前的组件都是基于 h 函数手动编写的,可读性非常差,比恩写起来也很不方便,我们日常开发都是使用的 sfc,vue 在编译时会自动将这些组件编译成 h 函数。
其编译的大致流程如下

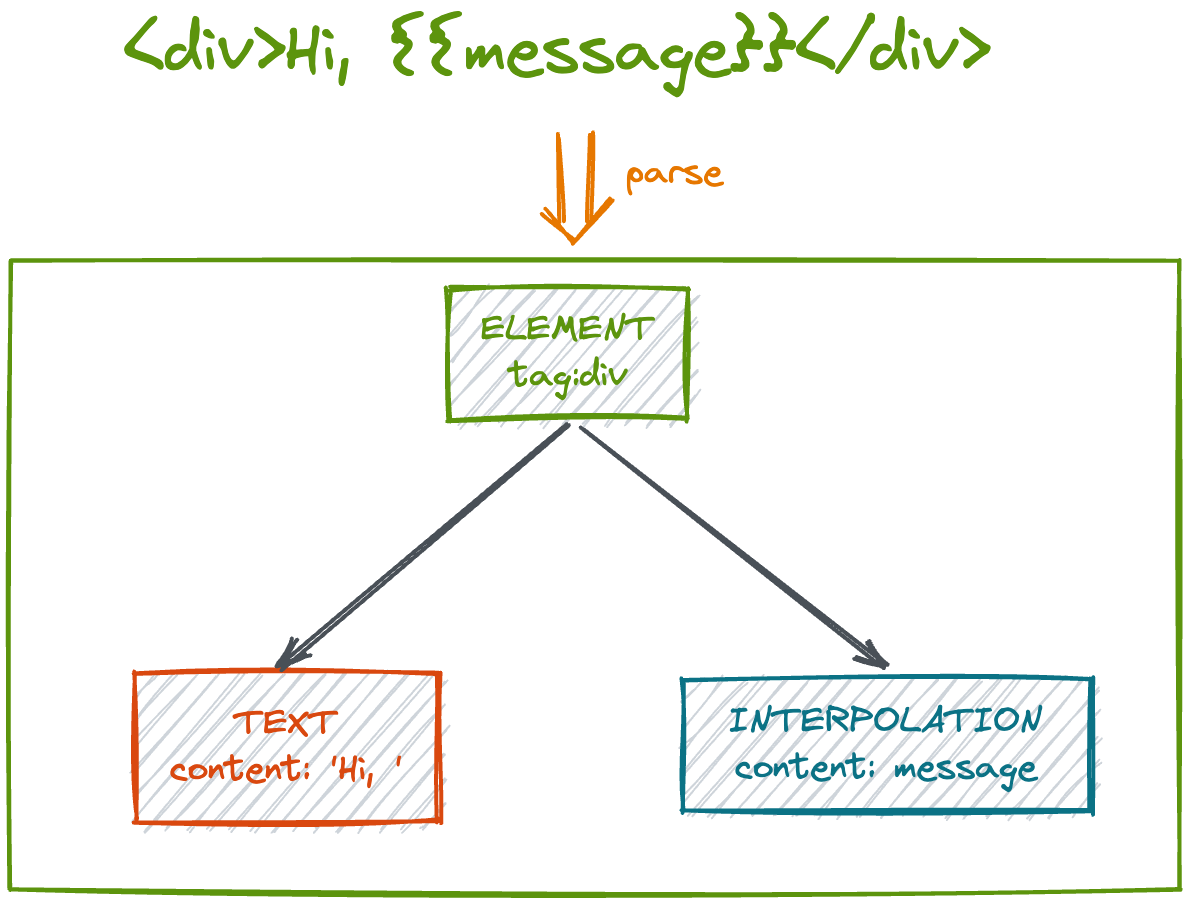
我们书写的模板是一些字符串,经过 parse 解析之后变成 ast,经过 transform 进行增删改对函数进行增强,最后在 codegen 生成渲染函数。
插值表达式
在 Vue 中我们在模板中插入数据的方式是使用双大括号包裹变量进行渲染,所以我们通过处理字符串,检测到差值表达式的时候进行相应的处理
编写如下测试用例
describe('parse', () => {
  describe('interpolation', () => {
    test('simple interpolation', () => {
      const ast = baseParse('{{ message }}')

      expect(ast.children[0]).toStrictEqual({
        type: NodeTypes.INTERPOLATION,
        content: {
          type: NodeTypes.SIMPLE_EXPRESSION,
          content: 'message'
        }
      })
    })
  })
})

// 枚举
export const enum NodeTypes {
  INTERPOLATION = 'interpolation',
  SIMPLE_EXPRESSION = 'simple_expression'
}
我们希望将插值表达式的字符串解析出变量名来,我们可以在解析函数中匹配差值表达式,然后取出中间的变量名。

export function baseParse(content: string) {
  const context = createParseContext(content)

  return createRoot(parseChildren(context))
}

function parseChildren(context: ContextType) {
  const nodes = []

  let node
  if (context.source.startsWith('{{')) {
    node = parseInterpolation(context)
  }

  nodes.push(node)

  return nodes
}

function parseInterpolation(context: ContextType) {
  const openDelimiter = '{{'
  const closeDelimiter = '}}'

  const closeIndex = context.source.indexOf(
    closeDelimiter,
    openDelimiter.length
  ) // 闭合标识的索引
  advanceBy(context, openDelimiter.length) // 去除起始表示

  const rawContextLength = closeIndex - openDelimiter.length // 变量名长度
  const rawContent = context.source.slice(0, rawContextLength) // 取出变量名
  const content = rawContent.trim()

  advanceBy(context, rawContextLength + closeDelimiter.length) // 去掉整个插值表达式

  return {
    type: NodeTypes.INTERPOLATION,
    content: {
      type: NodeTypes.SIMPLE_EXPRESSION,
      content
    }
  }
}

// 推进
function advanceBy(context: ContextType, length: number) {
  context.source = context.source.slice(length)
}

function createRoot(children: any) {
  return { children }
}

function createParseContext(content: string): ContextType {
  return {
    source: content
  }
}
经过这样不断地解析销毁 template,我们就能得到 ast 了
解析 element
首先编写元素解析的测试用例
describe('element', () => {
  it('simple element div', () => {
    const ast = baseParse('<div></div>')

    expect(ast.children[0]).toStrictEqual({
      type: NodeTypes.ELEMENT,
      tag: 'div'
    })
  })
})
在解析 element 的时候需要通过左键括号加字母来识别元素,然后通过正则来获取元素的 tag 等信息。
function parseElement(context: ContextType) {
  // 解析 tag
  const element = parseTag(context, TagType.TAG_START)
  parseTag(context, TagType.TAG_END)

  return element
}

function parseTag(context: ContextType, type: TagType) {
  // 匹配标签
  // /<(\w+)[^>]*>(.*?<\/\1>)?/
  const match = /^<(\/?[a-z]*)/i.exec(context.source)
  const tag = match[1]

  // 删除解析完的代码
  advanceBy(context, match[0].length)
  advanceBy(context, 1)

  if (type === TagType.TAG_END) {
    return
  }
  return {
    type: NodeTypes.ELEMENT,
    tag
  }
}
解析 text
仍然是从单测入手
describe('text', () => {
  it('simple text', () => {
    const ast = baseParse('some text')

    expect(ast.children[0]).toStrictEqual({
      type: NodeTypes.TEXT,
      content: 'some text'
    })
  })
})
当前两种匹配不到时,就应该命中 text 的解析了
function parseChildren(context: ContextType) {
const nodes = []
let node
const s = context.source
if (s.startsWith('{{')) {
node = parseInterpolation(context)
} else if (s[0] === '<') {
if (/[a-z]/i.test(s[1])) {
node = parseElement(context)
}
}
if (!node) {
// 如果不是插值和 element
node = parseText(context)
}
nodes.push(node)
return nodes
}
function parseText(context: ContextType) {
const content = parseTextData(context, context.source.length)
return {
type: NodeTypes.TEXT,
content
}
}
function parseTextData(context: ContextType, length: number) {
// 获取 content
const content = context.source.slice(0, length)
// 推进
advanceBy(context, content.length)
return content
}
```
### 复杂类型的解析
之前的三个解析都是基于某一种类型的简单解析,真正的开发是不可能那么简单的,所以这一小节我们来联合上边的三种类型进行解析。
按照之前的解析结果完成测试用例
```typescript
test('next element', () => {
const ast = baseParse('Hi
{{ message }}</div>')
expect(ast.children[0]).toStrictEqual({
type: NodeTypes.ELEMENT,
tag: 'div',
// tagType: ElementTypes.ELEMENT,
children: [
{
type: NodeTypes.ELEMENT,
tag: 'p',
children: [
{
type: NodeTypes.TEXT,
content: 'Hi'
}
]
},
{
type: NodeTypes.INTERPOLATION,
content: {
type: NodeTypes.SIMPLE_EXPRESSION,
content: 'message'
}
}
]
})
})
解析的关键在于需要递归解析最外层元素的子元素,当解析完 parent 之后,父元素起始标签已经移除,直接继续解析 context 即可
function parseElement(context: ContextType) {
// 解析 tag
const element: any = parseTag(context, TagType.TAG_START)
element.children = parseChildren(context)
return element
}
其次,我们上一小节解析文本的时候是整段截取,在混合模板中这显然是不合理的,我们需要判断字符串中是否出现差值表达式或者标签
function parseText(context: ContextType) {
let endTokens = ['<', '{{']
let endIndex = context.source.length
for (let i = 0; i < endTokens.length; i++) {
const index = context.source.indexOf(endTokens[i])
if (index !== -1 && endIndex > index) {
endIndex = index
}
}
const content = parseTextData(context, endIndex)
return {
type: NodeTypes.TEXT,
content
}
}
function parseTextData(context: ContextType, length: number) {
// 获取 content
const content = context.source.slice(0, length)
// 推进
advanceBy(context, content.length)
return content
}
```
> 这里其实存在问题,当文本内容中存在`<`的话会出问题,例如 ‘1 < 2’ 这样的文本
此外,还需要循环解析children,不然的话只解析完一个类型就会停止
```typescript
function parseChildren(context: ContextType) {
const nodes = []
while (!isEnd(context)) {
let node
const s = context.source
if (s.startsWith('{{')) {
node = parseInterpolation(context)
} else if (s[0] === '<') {
if (/[a-z]/i.test(s[1])) {
node = parseElement(context)
}
}
if (!node) {
// 如果不是插值和 element
node = parseText(context)
}
nodes.push(node)
}
return nodes
}
function isEnd(context: ContextType) {
// 遇到结束标签
const s = context.source
if (s.startsWith('= 0; i--) {
const tag = ancestors[i].tag
if (startsWithEndTagOpen(s, tag)) {
return true
}
}
}
// source 没有值
return !s
}
```
> 这里也存在问题:单闭合标签暂时无法解析
在解决这个问题的同时还存在一个问题,如果模板中出现一个未闭合的标签,我们需要抛出错误,不能继续解析后面的内容
```typescript
function parseElement(context: ContextType, ancestors: any[]) {
// 解析 tag
const element: any = parseTag(context, TagType.TAG_START)
// 标签栈
ancestors.push(element)
element.children = parseChildren(context, ancestors)
ancestors.pop()
if (startsWithEndTagOpen(context.source, element.tag)) {
parseTag(context, TagType.TAG_END)
} else {
throw new Error(`缺少闭合标签:${element.tag}`)
}
return element
}
```
此时我们已经可以完成复杂的模板解析,当然这只是基础班的,很多 edge case 并没有考虑进去,为了保留清晰地主线逻辑。
### transform
transform 需要做的事情就是对 parse 处理的得到的 ast 进行增删改操作。
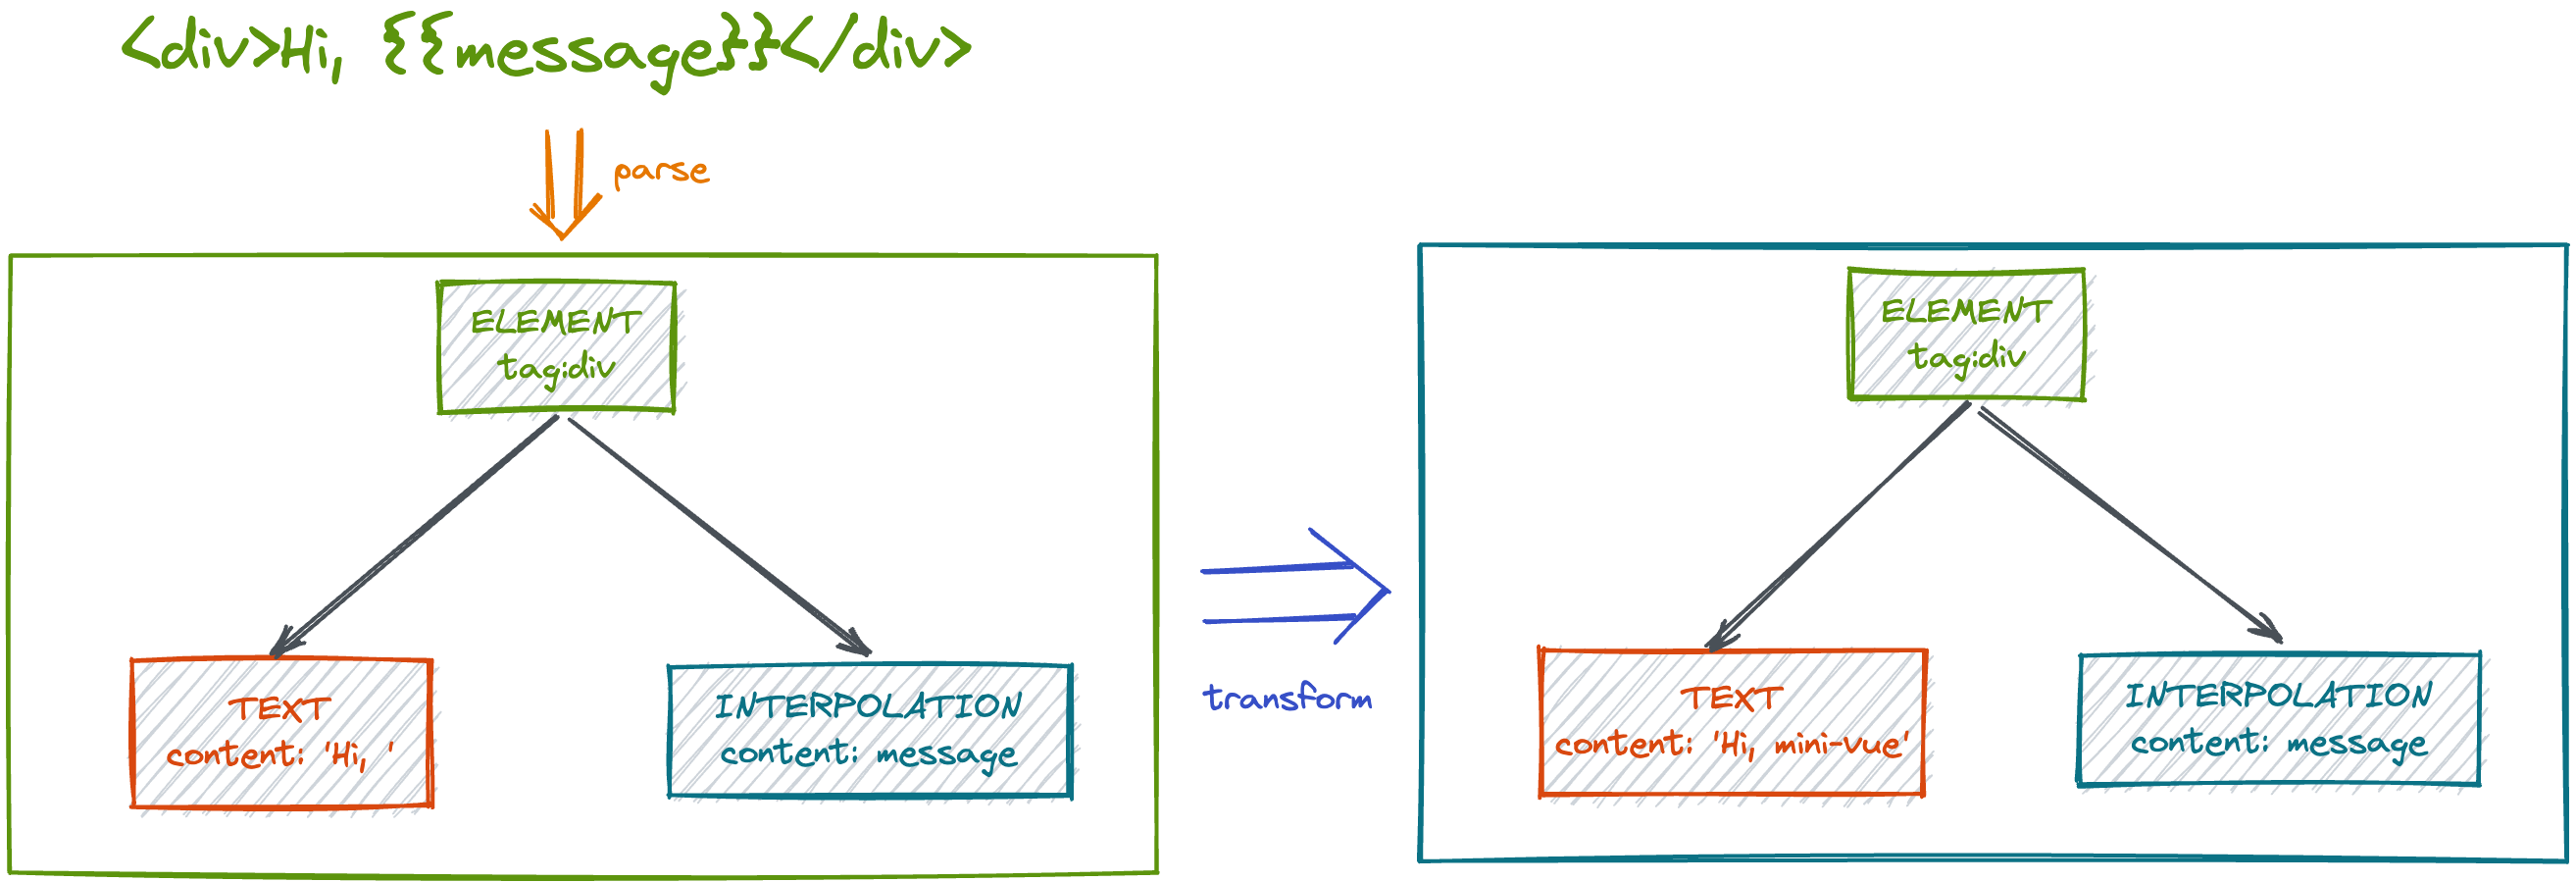
我们可以按照自己的需求随意地对 ast 进行改动,例如我们需要在每一段文本的后面加上 mini-vue
```typescript
it('happy path', () => {
const ast = baseParse('Hi, {{message}}</div>')
const nextText = ast.children[0].children[0]
expect(nextText.content).toBe('Hi, mini-vue')
})
我们可以直接判断每个 ast 节点的类型,如果是文本类型就直接添加
export function transform(root: any) {
// 遍历--深度优先
traverseNode(root, context)
}
function traverseNode(node: any) {
if (node.type === NodeTypes.TEXT) {
node.content += 'mini-vue'
}
const children = node.children
if (children) {
// 递归遍历
for (let i = 0; i < children.length; i++) {
const node = children[i]
traverseNode(node, context)
}
}
}
这样我们就完成了对于文本节点的修改,虽然已经通过测试,但是这样的写法很僵硬,拓展性不够,如果有其他需求的话需要直接改源码,这里应该按照需要进行改动。
所以,我们可以把 transform 的逻辑通过配置的形式传入,这样会更加灵活
it('happy path', () => {
const ast = baseParse('<div>Hi, {{message}}</div>')
const plugin = (node: any) => {
if (node.type === NodeTypes.TEXT) {
node.content += 'mini-vue'
}
}
transform(ast, {
nodeTransforms: [plugin]
})
const nextText = ast.children[0].children[0]
expect(nextText.content).toBe('Hi, mini-vue')
})
此时我们的transform 应该讲修改内容的逻辑改为外部传入
export function transform(root: any, options: any) {
const context = createTransformContext(root, options)
// 遍历--深度优先
traverseNode(root, context)
}
function traverseNode(node: any, context: any) {
const nodeTransforms = context.nodeTransforms
for (let i = 0; i < nodeTransforms.length; i++) {
const transform = nodeTransforms[i]
transform(node)
}
traverseChildren(node, context)
}
function traverseChildren(node: any, context: any) {
const children = node.children
if (children) {
// 递归遍历
for (let i = 0; i < children.length; i++) {
const node = children[i]
traverseNode(node, context)
}
}
}
function createTransformContext(root: any, options: any) {
const context = {
root,
nodeTransforms: options.nodeTransforms || []
}
return context
}
当然这只是展示了修改ast 的方法,具体的逻辑并不止这些,这里不再一一列举。
生成代码
在 transform 增强代码之后,就可以生成执行代码了,利用增强后的 ast 按照既定的逻辑进行代码生成。

这里我们可以参考一下在线的模版解析工具
利用解析工具生成代码
export function render(_ctx, _cache, $props, $setup, $data, $options) {
return "hi"
}
我们可以根据代码制作测试用例
describe('codegen', () => {
it('string', () => {
const ast = baseParse('hi')
transform(ast)
const { code } = generate(ast)
expect(code).toMatchSnapshot()
})
})
我们可以先将工具生成的代码在 generate 函数中直接返回,以此来保存快照。
export function codegen(ast) {
return `export function render(_ctx, _cache) {
return 'hi'
}`
}
保存好的快照会自动生成文件,只有第一次执行测试会成快照文件,后续的测试都会跟这个文件进行比较,如果要更新快照需要在测试命令中添加-u参数。

字符串是最简单的一种形式,我们只需要将文本内容取出来返回即可
export function generate(ast: any) {
const context = createCodegenContext()
const { push } = context
push('export ')
const functionName = 'render'
const args = ['_ctx', '_cache']
const signature = args.join(', ')
push(`function ${functionName}(${signature}) {`)
push(`return `)
genNode(ast.codegenNode, context)
push('}')
return { code: context.code }
}
function genNode(node: any, context: any) {
const { push } = context
push(`'${node.content}'`)
}
function createCodegenContext() {
const context = {
code: '',
push(source: string) {
context.code += source
}
}
return context
}
最终的效果就是拼接出来一个函数的字符串。
生成插值代码
仍然借助上一小节的在线工具,我们可以看到差值表达式生成的代码和文本代码的区别是这边需要返回一个函数,和上一小节一样的方法先试用结果生成快照。
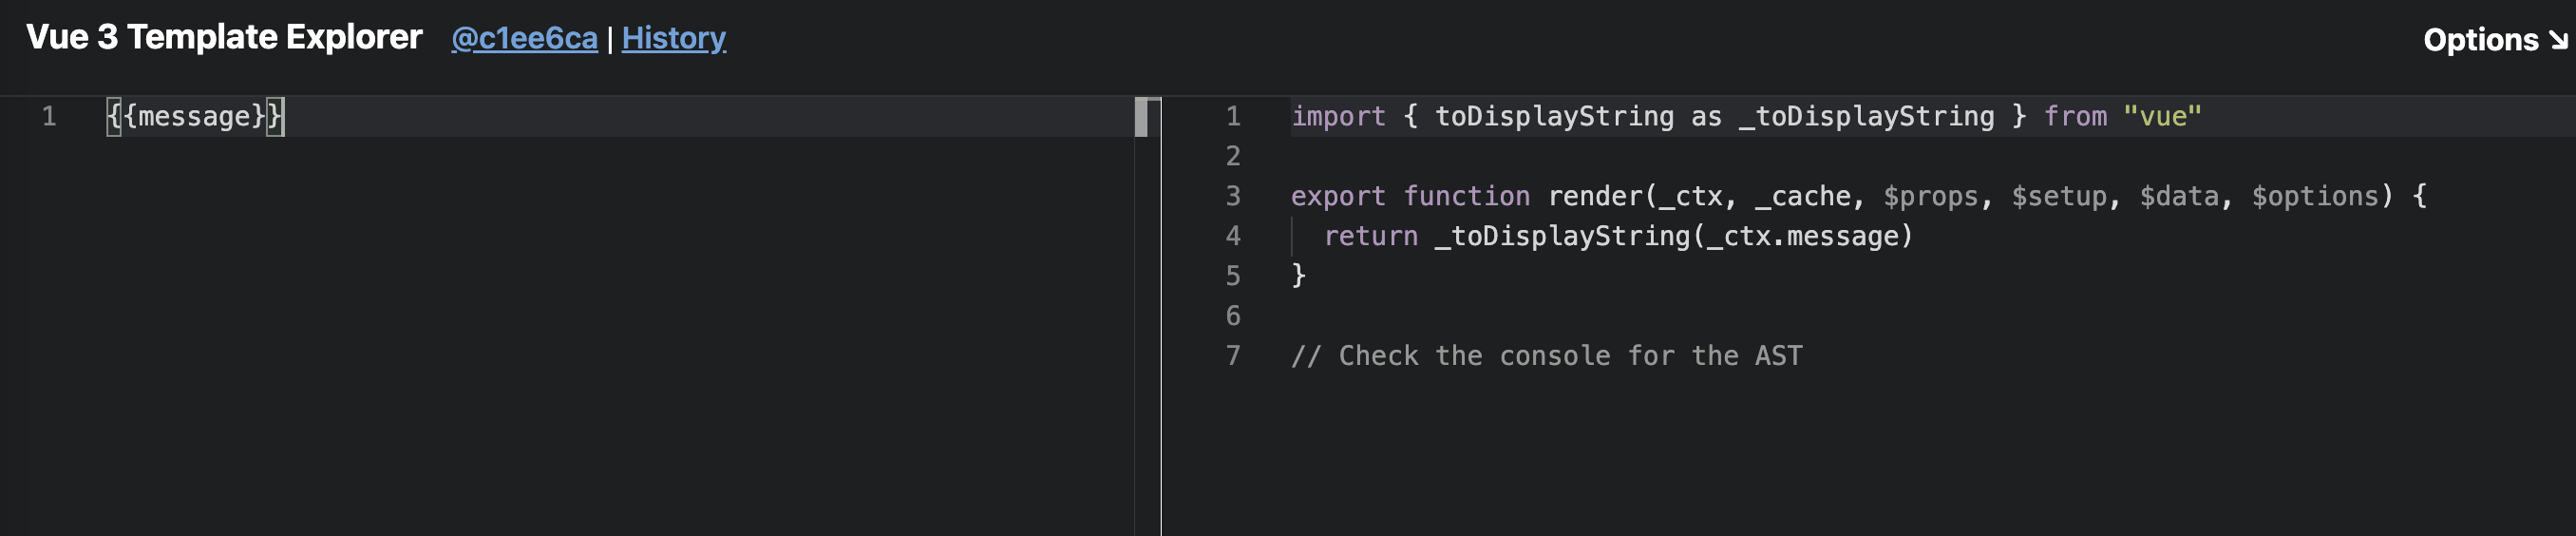
这个_toDisplayString的作用就是渲染文本,除了这里还需要从 Vue 引入方法,这里是不确定的,需要在 transform 中根据节点类型动态引入。
function traverseNode(node: any, context: any) {
const nodeTransforms = context.nodeTransforms
for (let i = 0; i < nodeTransforms.length; i++) {
const transform = nodeTransforms[i]
transform(node)
}
switch (node.type) {
case NodeTypes.INTERPOLATION:
context.helper('toDisplayString')
break
default:
break
}
traverseChildren(node, context)
}
function createTransformContext(root: any, options: any) {
const context = {
root,
nodeTransforms: options.nodeTransforms || [],
helpers: new Map(),
helper(key: string) {
context.helpers.set(key, 1)
}
}
return context
}
在生成代码的最前面进行 import 语句的生成。
function genFunctionPreamble(ast: any, context: any) {
const VueBinging = 'vue'
const aliasHelpers = (s: string) => `${s} as _${s}`
context.push(
`import { ${ast.helpers
.map(aliasHelpers)
.join(', ')} } from "${VueBinging}"\n`
)
}
然后是生成toDisplayString 函数,这里我们只道,后面会有很多种类型,所以我们直接使用 switch 进行判断
function genNode(context: any, node: any) {
switch (node.type) {
case NodeTypes.TEXT:
genText(context, node)
break
case NodeTypes.INTERPOLATION:
genInterpolation(context, node)
break
case NodeTypes.SIMPLE_EXPRESSION:
genExpression(context, node)
break
default:
break
}
}
我们根据不同节点的类型来生成不同的代码
function genExpression(context: any, node: any) {
const { push } = context
push(`_ctx.${node.content}`)
}
function genInterpolation(context: any, node: any) {
const { push } = context
push('_toDisplayString(')
genNode(context, node.content)
push(')')
}
function genText(context: any, node: any) {
const { push } = context
push(`'${node.content}'`)
}
因为差值表达式里面是可以进行逻辑运算的,所以我们将其进行提取,简单表达式直接返回变量 getter,genExpression中的_ctx并不能在这里写死需要在 transform 中进行处理。
export function transformExpression(node: any) {
if (node.type === NodeTypes.INTERPOLATION) {
const rawContent = node.content.content
node.content.content = '_ctx.' + rawContent
}
}
这个函数在调用 transform 的时候传入
it('interpolation', () => {
const ast = baseParse('{{message}}')
transform(ast, {
nodeTransforms: [transformExpression]
})
const { code } = generate(ast)
expect(code).toMatchSnapshot()
})
此时插值表达式的 codegen 已经完成了
多种类型的 ast 节点代码生成见 git 记录
使用 template 进行组件渲染
测试用例(index.html 和 main.js 和之前的一样)
export default {
name: 'App',
template: '<div>hi, {{message}}</div>',
setup() {
const message = window.message = ref('mini-vue')
return { message }
}
}
创建 compile.ts,把联合类型模板的测试用例的代码贴进去就可以了
export function baseCompile(template: string) {
const ast: any = baseParse(template)
transform(ast, {
nodeTransforms: [transformExpression, transformElement, transformText]
})
return generate(ast)
}
我们需要将编译函数添加到 component 中,以便在解析组的时候获取 render
let compiler: Function
export function registerRuntimeCompiler(_compiler: any) {
compiler = _compiler
}
function finishComponentSetup(instance: any) {
const Component = instance.type
if (compiler && !Component.render) {
if (Component.template) {
Component.render = compiler(Component.template)
}
}
if (Component.render) {
instance.render = Component.render
}
}
如果组件有 render 函数,优先使用 render,否则检查是否存在 template,将 template 进行编译。
编译函数我们在 vue 的入口文件中传入编译函数
function compileToFunction(template: string) {
const { code } = baseCompile(template)
const render = new Function('Vue', code)(runtimeDom)
return render
}
registerRuntimeCompiler(compileToFunction)
这里我们使用构造函数的形式创建一个函数,然后将 Vue 实例传入即可得到返回的 render 函数
此时还缺少 toDisplayString 和 createElementNode
export function toDisplayString(value: any) {
return String(value)
}
createElementNode 就是我们之前的createNode ,可以重命名导出一下,此时运行 html 就可以看到效果
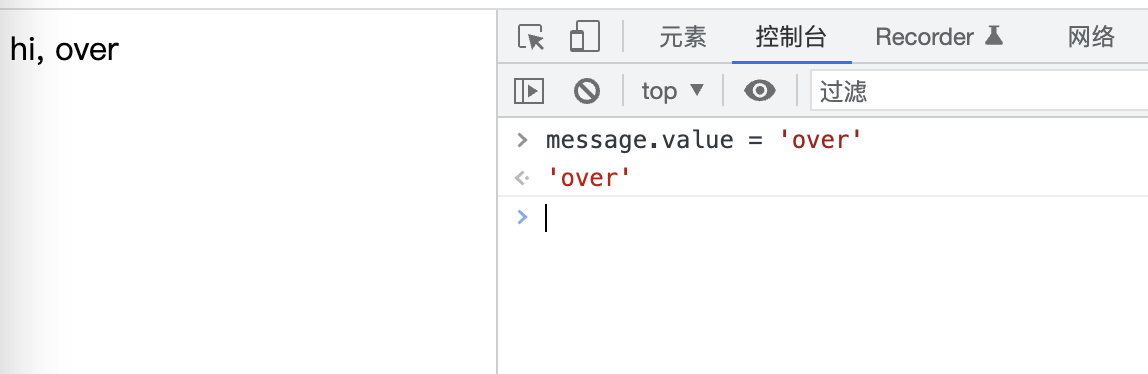
更新逻辑也没问题。
到这里 mini-vue 就基本完成了,后续有时间会逐步完善 edge-case
赏


前端小白