复习
在开始今天的主题之前带你回忆一下大学第一节 C 语言的内容,计算机中只存在 0 和 1 两个东西,我们看到的所有内容都是基于这两个元素进行组合的。
你还记得原码、反码、补码都是什么吗?

原码
源码即数据的二进制体现,例如十进制的 5 转为二进制就是 101,计算方法是不停地除二取余,从低位到高位,直到商为 0。
这样计算是无法表示负数的,所以在表示二进制的时候一般是固定位数的,第一位是符号位(1 负 0 正),后面的是数据位,当数据超出范围后会截断,这就是精度丢失的原因。(无符号类型不存在符号位)
所以5的在 8 位有符号整形中的原码表示应该是00000101。
反码
因为原码的形式无法进行负数的运算(不信?看下面)
10000101 - 00000001 = 10000100
翻译成人话就是:-5 - 1 = -4,这显然是不合理的
所以反码出现了,反码规定所有的正数不变,负数数据位取反(除了第一位),例如-5的反码形式为11111010,此时再进行刚才的计算
11111010 - 00000001 = 11111001
翻译成人话就是:-5 - 1 = -6 (计算结果是反码形式,需要还原到原码,然后再复原 10 进制)
注意: 0 属于正数
补码
虽然现在使用反码的形式可以进行负数的计算了,但是正负数之间的计算还是存在问题
11111010 + 00001000 = 00000010
即 -5 + 8 = 2
这显然是不合理的,所以出现了补码的形式,正数不变,负数在反码的基础上加一,
-5 的原码是10000101,反码是11111010,补码为11111011,此时再进行刚才的计算
11111011 + 00001000 = 0000011
-5 + 8 = 3,正确
所以在计算机中数据都以补码的形式存在。
“开炫”
先来看两张图(字丑凑活看 QAQ),画的时候没留好空,只能分成两张
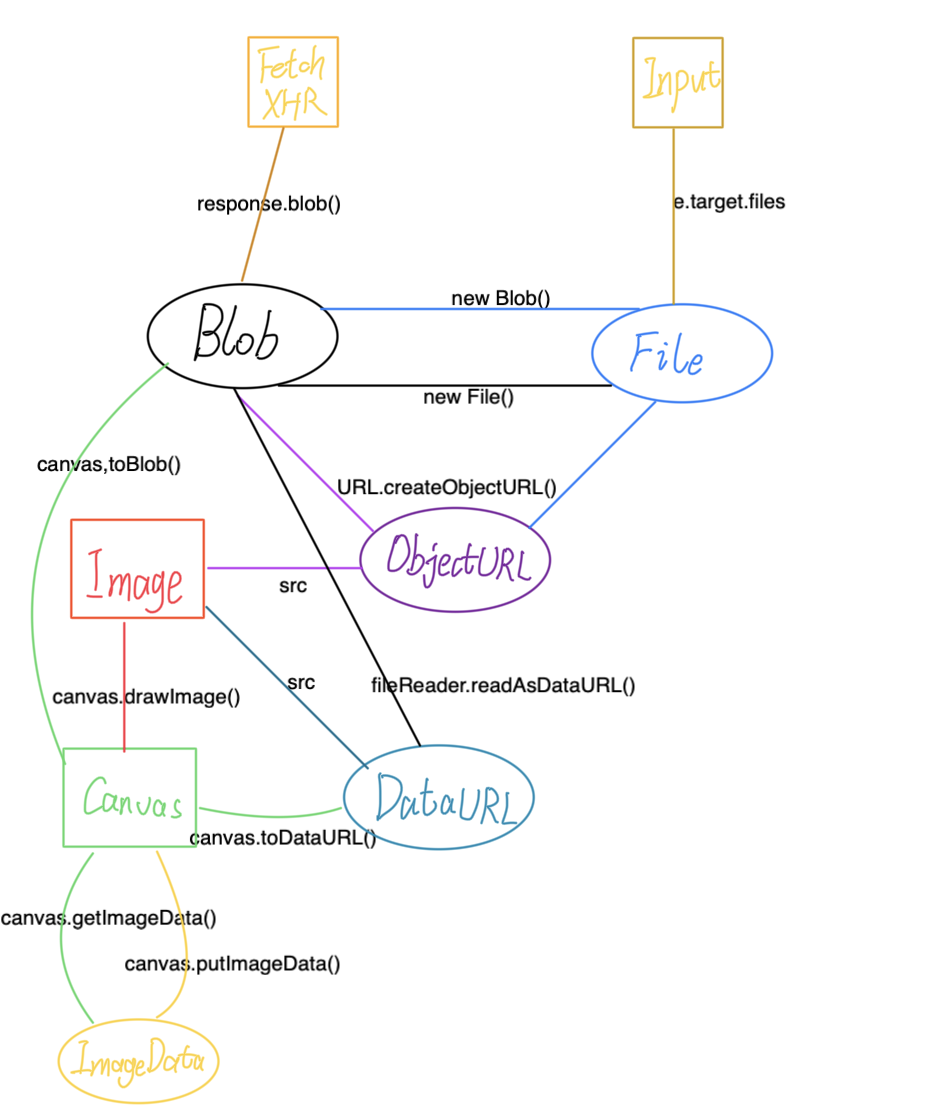
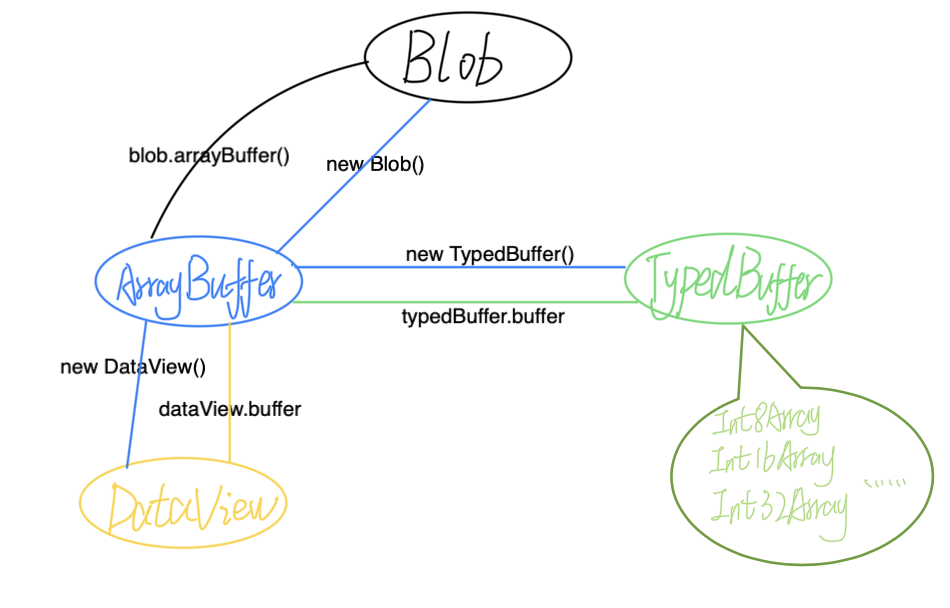
图中列出了和二进制相关的一些对象,他们之间的转换关系都已经标出来了,下面的内容将基于这两张图进行展开。
上面的各个对象可以分为四类(我自己分的,方便记忆):url 类(DataURL, ObjectURL)、图片类(ImageData)、buffer 类(ArrayBuffer,DataView,TypedArray)、文件类(File, Blob)。
Blob 和 File
Blob(二进制大对象)是一种表示二进制数据的对象类型,它可以存储任意类型的数据,包括文本、图像、音频、视频、PDF等文件格式。Blob通常被用于将二进制数据转换为URL,以便下载、上传或分享给其他用户。
Blob 的实例长下面这样
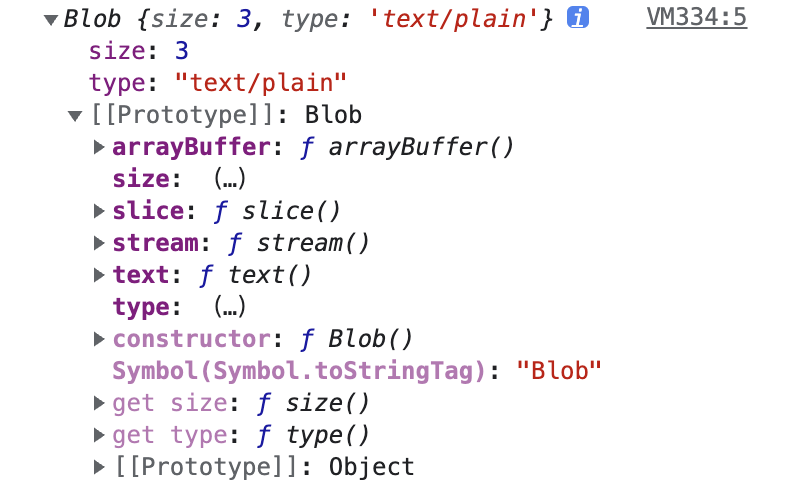
- type:类型;
- size:体积,单位是字节;
- arrayBuffer():将内容转为 ArrayBuffer 类型,返回一个 Promise;
- text():将内容转为文本,返回一个 Promise;
- stream():将内容转为流(在处理音视频等大文件时可以通过流的形式进行加载,避免一次性加载文件导致的性能问题);
- slice([start[, end[, type]]]):类似于数组的 slice,用于二进制文件的切割,常用于分片上传,切割后文件的类型默认为原始 blob 的类型。
File 是 Blob 的一个派生类,所以 File 拥有 Blob 的所有属性和方法,在此之外额外添加了以下属性:
- lastModified:最后一次编辑的时间戳;
- lastModifiedDate:最后一次编辑的 Date;
- name:文件名;
- webkitRelativePath:(仅在 webkit 内核浏览器中存在)文件相对于选择文件时所在路径的相对路径。
这两个类型之间可以互相通过构造函数进行转换。
const blob = new Blob(['abc'], { type: 'text/plain' });
const file = new File([blob], 'from');
const blob1 = new Blob([file]);

console.log(blob, file, blob1)
从上面的代码已经基本能看的出两个构造函数的用法,Blob 的构造函数接收两个参数,第一个是一个 array(这个 array 并不是我们常用的数组对象,而是ArrayBuffer, ArrayBufferView, Blob, DOMString(js string) ),第二个参数是一个配置,主要是声明了这个 blob 实例的类型,默认为空字符串;File 的构造函数在第二个参数的位置插入了一个文件名的参数,用于声明 file 实例的 name。
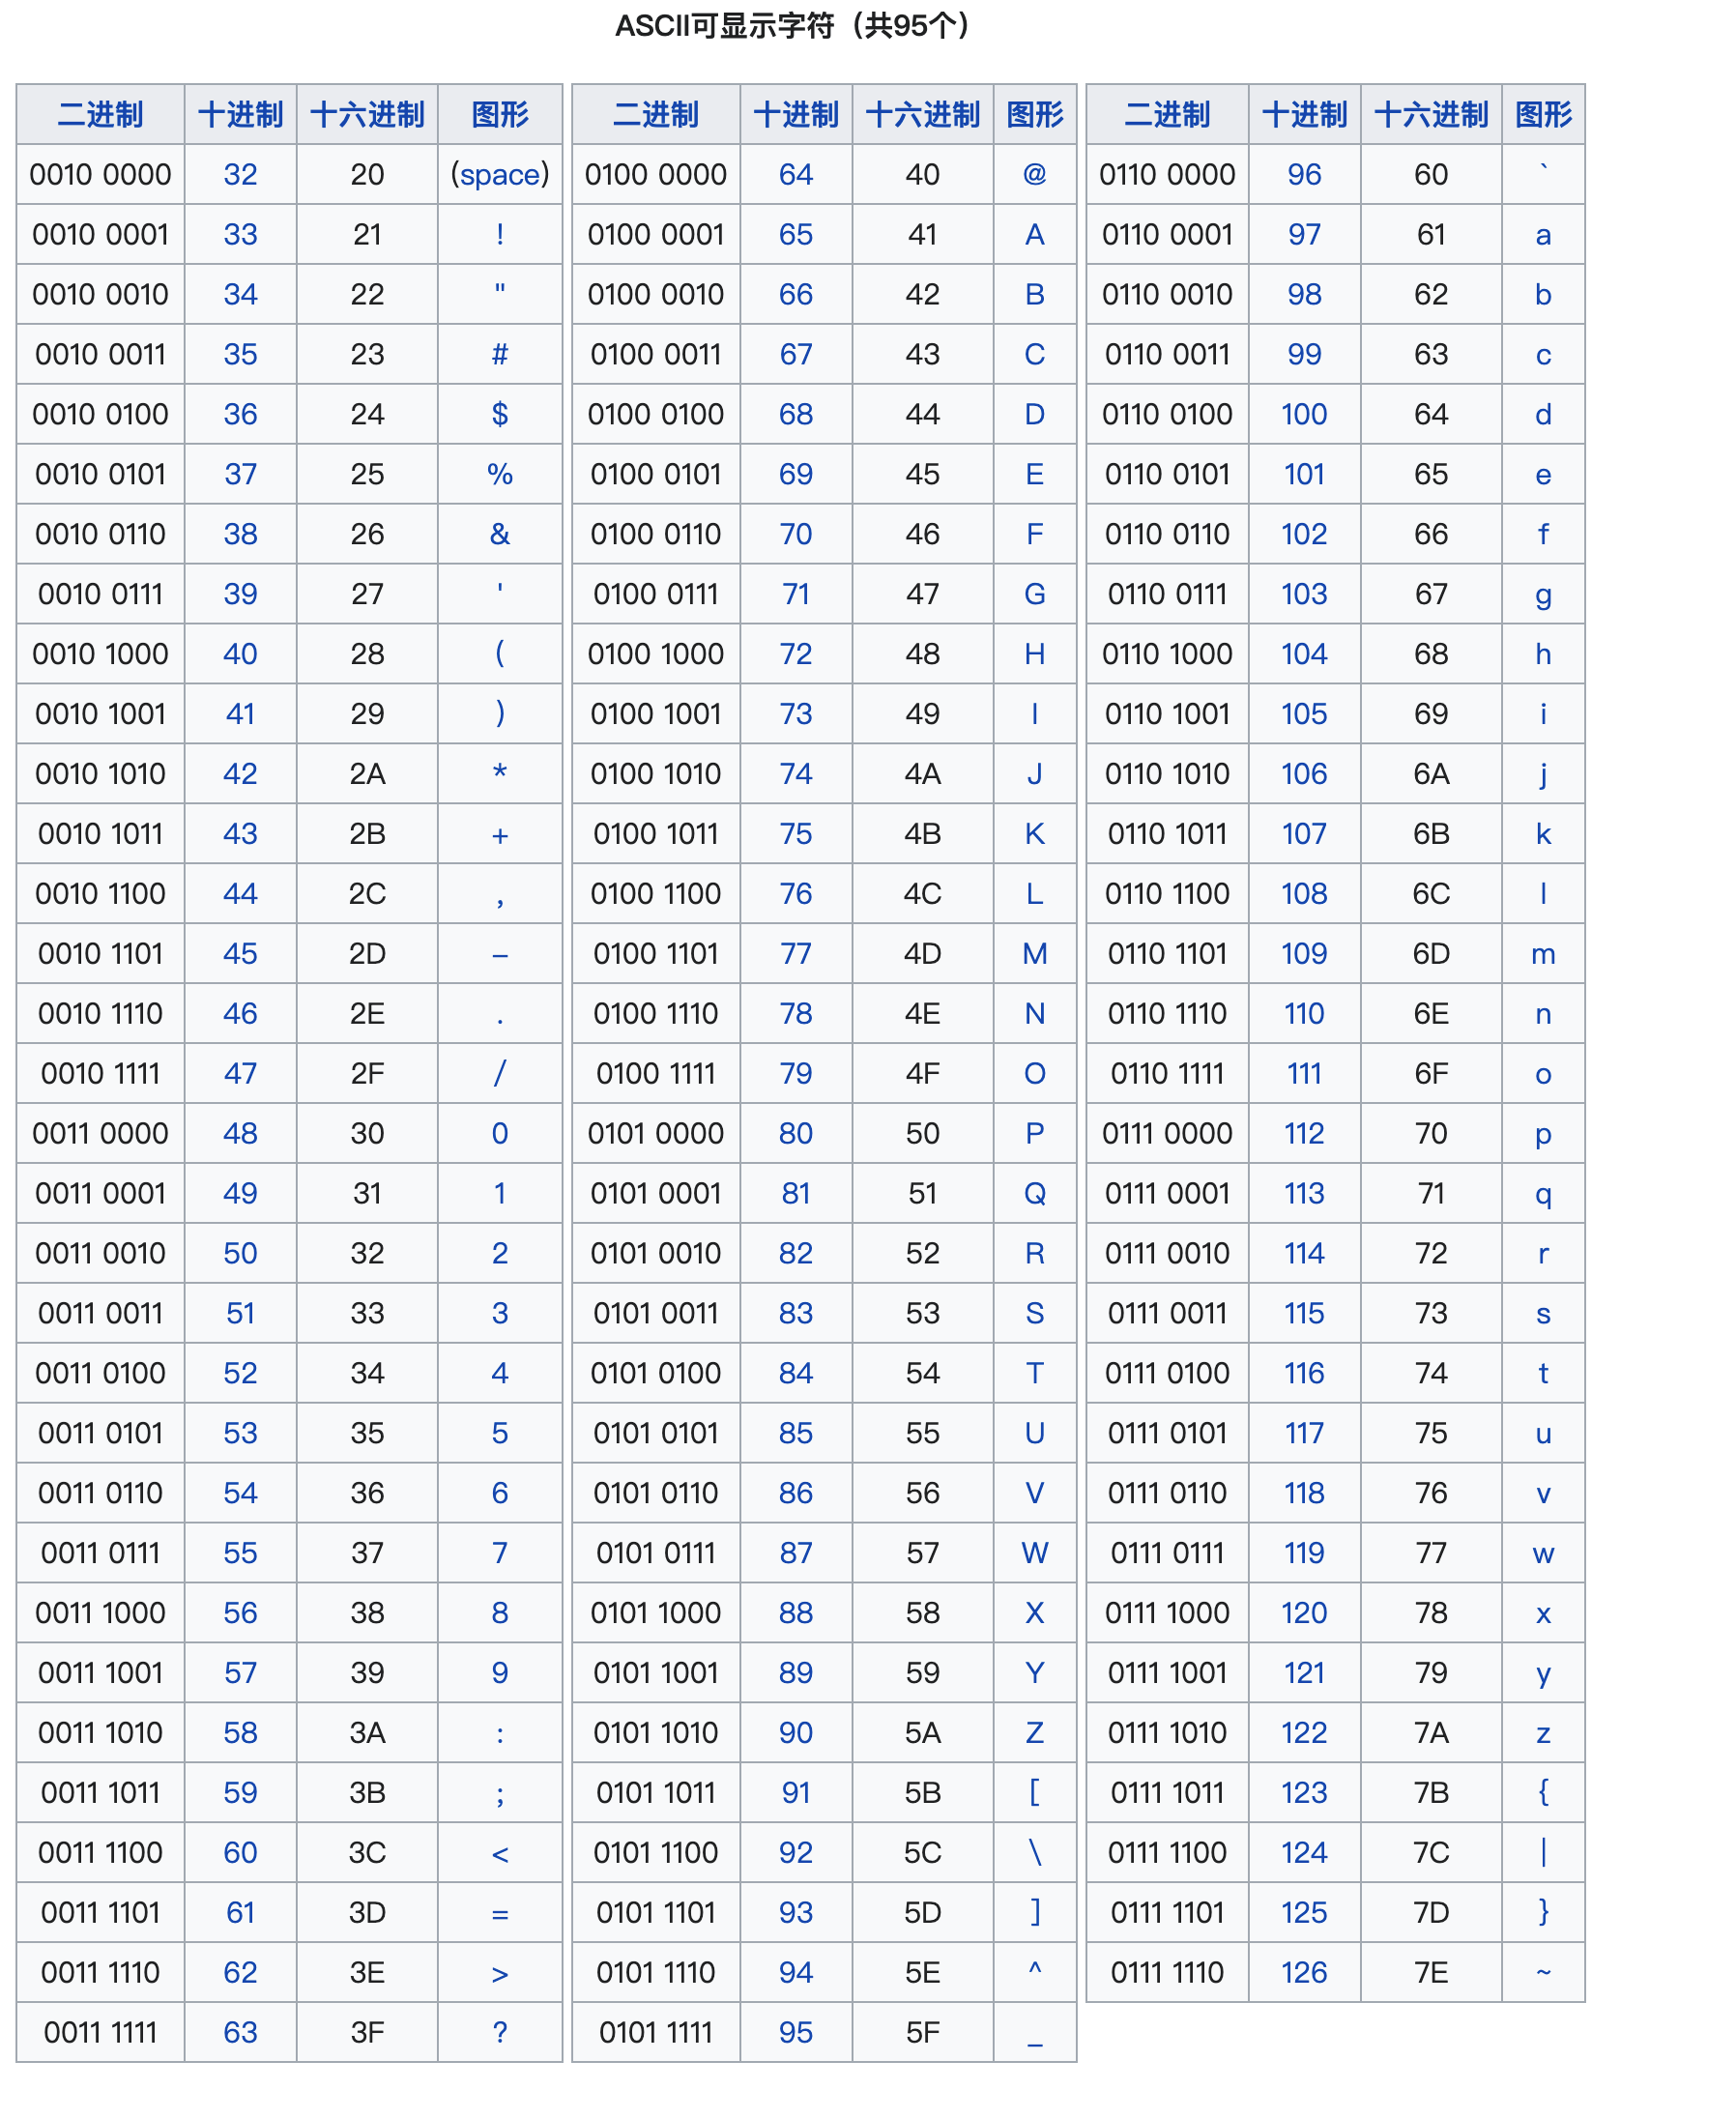
在Blob 构造函数中传入的数据会按照 ASCII 码来进行存储。
但是在使用中一般不会主动使用构造函数来构建这两种实例(注意是一般,不是绝对),更多的数据来源是通过文件选择器(file)和 Fetch/XFR(blob)来获取数据。
/**
 * file input 绑定事件
 * @param {Event} e
 */
function selectFile(e) {
  const file = e.target.files[0]
  console.log(file);
}

/**
 * 从 url 获取文件
 * @param {string} url
 */
async function get(url) {
  const response = await fetch(url);
  const blob = await response.blob();
  console.log(blob)
}
ObjectURL 和 DataURL
- ObjectURL:是一个Blob URL或者File URL,是浏览器为Blob对象或File对象生成的URL字符串,通过URL.createObjectURL()方法生成。它以”blob:”或者”file:”开头,后面跟随着一段唯一标识符,可以表示整个Blob对象或者File对象的内容。ObjectURL通常用于动态生成大文件、音视频、PDF等二进制数据,并提供给浏览器进行下载、缓存等操作。
- DataURL:是一种特殊的URL格式,可以将任意类型的数据编码成ASCII字符串,通过”data:”协议头指定数据类型和编码方式。DataURL的格式类似于
data:[<mediatype>][;base64],<data>,其中mediatype表示数据类型,base64表示是否经过了base64编码,data表示具体的数据内容。DataURL通常用于将小型图片、CSS样式表、JavaScript代码等嵌入到HTML页面中,以减少HTTP请求次数。
二者的区别在于 ObjectURL 是存储在内存中的媒体资源的映射路径,是一种伪协议,相同资源每次生成的 url 不一定是一样的;DataURL 是资源的 base64 序列,会按照固定的算法对二进制进行计算,所以相同资源的 url 是固定的。
/**
 * 通过URL.createObjectURL为 blob/file 创建 ObjectURL
 * @param {Event} e
 */
function file2URL(e) {
  const file = e.target.files[0]
  const url = URL.createObjectURL(file)
  console.log(url)
  // URL.revokeObjectURL(url) // 使用完毕移除资源,防止内存一直被占用
}

/**
 * 通过 FileReader 来进行读取,除了可以读取为 DataURL 还可以读为 text 和 arrayBuffer
 * @param {Event} e
 */
function file2base64(e) {
  const file = e.target.files[0]
  const fileReader = new FileReader()

  fileReader.onload = () => {
    console.log(fileReader.result);
  }
  fileReader.readAsDataURL(file)
}
此外还可以通过 canvas 来获取 DataURL,canvas.toDataURL()。
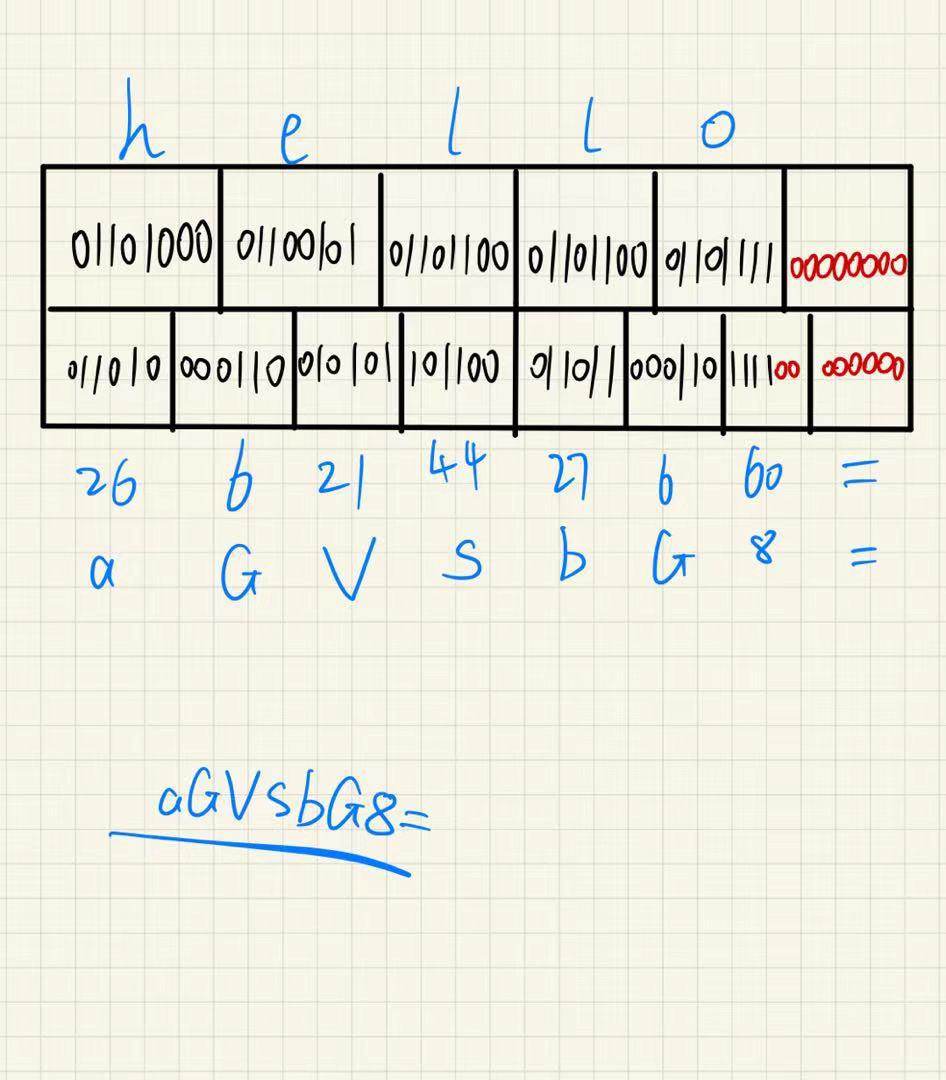
base64 的计算方法如下:
- 将需要编码的二进制数据按照每3个字节(24位)一组进行划分,并填充0以满足长度要求。
- 对每组24位数据进行分割,将其分为4个6位的数据块。
- 将每个6位数据块转换为一个Base64字符。具体转换方法是:将6位二进制数转化为十进制数,然后根据Base64字符表找到对应的字符。
- 如果最后一组不足3个字节,则需要进行补位操作。补位后,如果补了1个字节,则添加1个“=”号,如果补了2个字节,则添加2个“=”号。
可以动手实现一个字符串的 base64 计算函数
/**
 * 字符串转 8 位二进制
 * @param {string} char
 * @returns
 */
function char2binary(char) {
  if (!char) {
    return ''.padStart(8, '0');
  }
  const code = char.charCodeAt(0);
  let binary = code.toString(2);
  if (binary.length < 8) {
    binary = binary.padStart(8, '0');
  }
  return binary;
}

/**
 * 8 位二进制字符串转 6 位
 * @param {string} str
 * @returns {number[]}
 */
function bit8to6(str) {
  if (str.length % 24 !== 0) return;
  const result = [];

  for (let i = 0; i < str.length; i += 6) {
    result.push(str.slice(i, i + 6));
  }

  return result.map(binary => parseInt(binary, 2));
}

/**
 *
 * @param {string} str
 */
function str2base64(str) {
  const base64Chars = 'ABCDEFGHIJKLMNOPQRSTUVWXYZabcdefghijklmnopqrstuvwxyz0123456789+/';
  let binaryArray = str.split('').map(char2binary);
  const count = binaryArray.length % 3 === 0 ? 0 : 3 - binaryArray.length % 3;
  let suffix = ''

  if (count) {
    binaryArray = binaryArray.concat(Array.from({ length: count }).fill(char2binary()));
    suffix = count === 1 ? '=' : '=='
  }

  return bit8to6(binaryArray.join(''))
    .slice(0, -count)
    .map(i => base64Chars[i])
    .join('') + suffix;
}
可以验证一下结果(btoa是浏览器中提供的字符串转 base64 的方法)
btoa('hello') // 'aGVsbG8='
str2base64('hello') // 'aGVsbG8='
附:base64 码表
| 码值 | 字符 | 码值 | 字符 | 码值 | 字符 | 码值 | 字符 |
|---|---|---|---|---|---|---|---|
| 0 | A | 16 | Q | 32 | g | 48 | w |
| 1 | B | 17 | R | 33 | h | 49 | x |
| 2 | C | 18 | S | 34 | i | 50 | y |
| 3 | D | 19 | T | 35 | j | 51 | z |
| 4 | E | 20 | U | 36 | k | 52 | 0 |
| 5 | F | 21 | V | 37 | l | 53 | 1 |
| 6 | G | 22 | W | 38 | m | 54 | 2 |
| 7 | H | 23 | X | 39 | n | 55 | 3 |
| 8 | I | 24 | Y | 40 | o | 56 | 4 |
| 9 | J | 25 | Z | 41 | p | 57 | 5 |
| 10 | K | 26 | a | 42 | q | 58 | 6 |
| 11 | L | 27 | b | 43 | r | 59 | 7 |
| 12 | M | 28 | c | 44 | s | 60 | 8 |
| 13 | N | 29 | d | 45 | t | 61 | 9 |
| 14 | O | 30 | e | 46 | u | 62 | + |
| 15 | P | 31 | f | 47 | v | 63 | / |
ASCII 码表
ImageData
ImageData 表示一张图片的 RGBA 数据,通常用于 canvas 中来做一些滤镜操作,也有自己的构造函数。
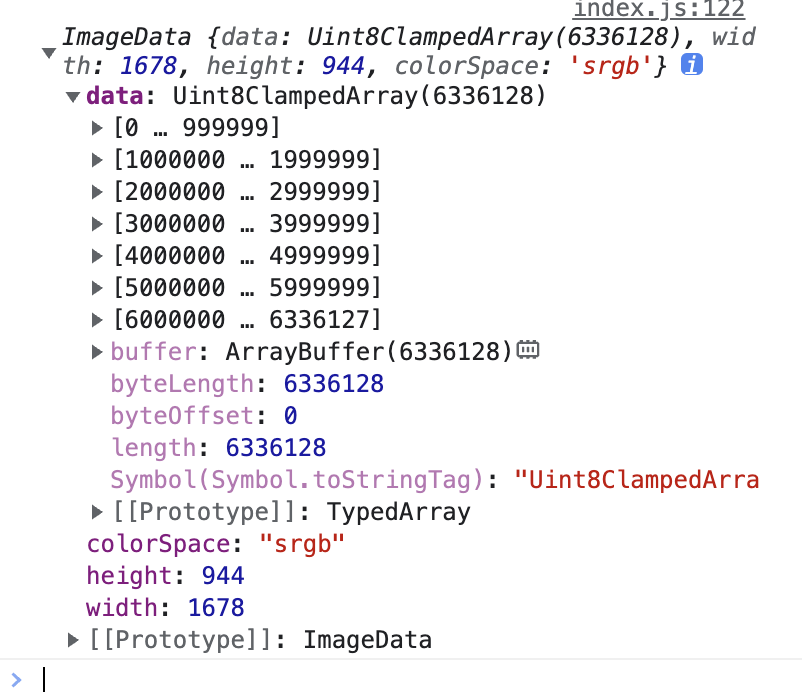
ImageData 的数据长度一定是 4 的倍数,每四位对应一个像素的的 RGBA 数值,取值范围在0-255 之间。
/**
 * 将图像元素转为 ImageData
 * @param {Image} image
 */
function getImageData(image) {
  const canvas = document.createElement('canvas')
  canvas.height = image.height
  canvas.width = image.width
  const context = canvas.getContext('2d')

  context.drawImage(image, 0, 0)
  return context.getImageData(0, 0, image.width, image.height)
}

document.getElementById('file').addEventListener('change', (e) => {
  const file = e.target.files[0]
  const image = new Image()
  image.src = URL.createObjectURL(file)
  image.onload = () => {
    console.log(getImageData(image));
  }
})
以上代码通过 input 选择图片文件,构造了一个 Image 元素,然后通过 canvas 获取了这个图片的 ImageData 数据,最终的结果如下。
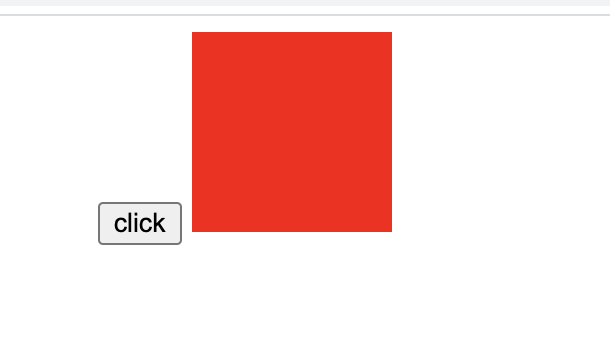
我们也可以使用构造函数来创建一个 IamgeData 对象并将其渲染为图片。
/**
 *  构造一个红色的图片
 * @param {number} width
 * @param {number} height
 */
function createRedImage(width, height) {
  const imageData = new ImageData(width, height);
  const data = imageData.data;

  for (var i = 0; i < data.length; i += 4) {
    imageData.data[i] = 255;
    imageData.data[i + 1] = 0;
    imageData.data[i + 2] = 0;
    imageData.data[i + 3] = 255;
  }

  return imageData
}

/**
 * 将 ImageData 数据转为 URL
 * @param {ImageData} imageData
 */
function imageDataToURL(imageData) {
  const canvas = document.createElement('canvas')
  canvas.height = imageData.height
  canvas.width = imageData.width
  const context = canvas.getContext('2d')

  context.putImageData(imageData, 0, 0)
  return canvas.toDataURL()
}

document.getElementById('btn').addEventListener('click', () => {
  const imageData = createRedImage(100, 100);
  const src = imageDataToURL(imageData);

  const image = new Image();
  image.src = src;

  document.body.appendChild(image)
})
效果如下
ArrayBuffer、TypedArray 和 DataView
ArrayBuffer 是 JavaScript 中的一种特殊数据类型,它表示一个通用的、固定长度的二进制数据缓冲区,以字节为单位,不要直接使用下标修改,需配合 DataView 或者 TypedArray 来编辑内存中的数据。
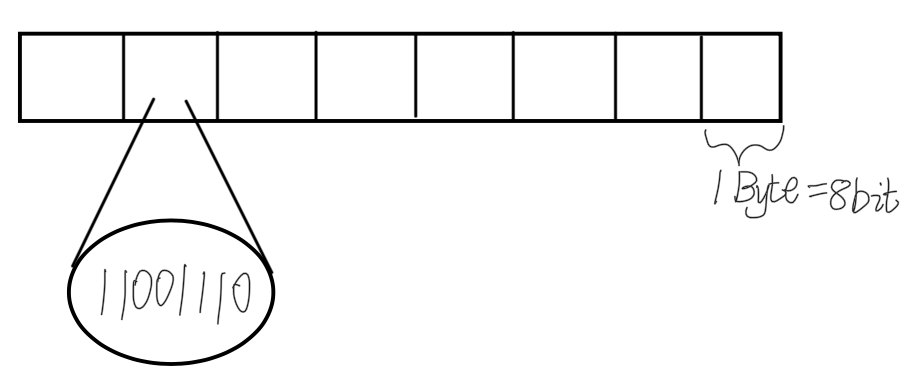
TypedArray 是一种固定类型(长度)对象类型,用于访问和操作 ArrayBuffer 中的二进制数据,TypedArray 是一种统称,其具体实现包括:
- Int8Array:有符号 8 位整型;
- Uint8Array:有符号 8 位整型;
- Int16Array:有符号 16 位整型;
- Uint16Array:无符号 16 位整型;
- Int32Array:有符号 32 位整型;
- Uint32Array:无符号 32 位整型;
- Float32Array:32 位浮点类型;
- Float64Array:64位浮点类型。
在使用操作 ArrayBuffer 时我们可以通过 Blob 的arrayBuffer来获取或者使用构造函数来创建。
const arrayBuffer1 = new ArrayBuffer(16)
const int8 = new Int8Array(arrayBuffer1)
int8.set([-2], 0)
使用 TypedArray 操作 ArrayBuffer 时,使用 set 方法,从 offset 位置设置 value,第一个参数是要设置的 list,第二个参数是偏移量,这个偏移量是相对于当前 TypedArray 的种类决定的,Int8Array 的一个偏移量就是一个字节,Int16Array 的一个偏移量就是两个字节。
DataView 操作起来就更加灵活,可以直接设置不同类型的数据在同一段 ArrayBuffer 中,但是一次只能操作一个偏移量。
const arrayBuffer2 = new ArrayBuffer(16)
const dataView = new DataView(arrayBuffer2)

dataView.setInt32(0, 65535) // (offset, value)
dataView.setInt16(10, 3, true) // (offset, value, endianness)

dataView.getInt32(0) // offset
** 注意: DataView 使用 setInt16 和 setInt32 等设置值时, 偏移量必须为当前类型所占字节的倍数, 例如 setInt16 偏移量必须是 2 的倍数, 因为 16 位整型是两个字节, 偏移量必须保证偏移量是完整的类型单元 **
如果要操作的ArrayBuffer 中,都是相同类型的数据,那么优先推荐使用 TypedArray,如果存在不同类型的数据那么 DataView 可能就是一个更好的选择。
如果多个 TypedArray 或者 DataView 使用了同一段 ArrayBuffer,那么它们在操作时会互相产生影响。
const arrayBuffer = new ArrayBuffer(16)
const int8 = new Int8Array(arrayBuffer)
const int16 = new Int16Array(arrayBuffer)

int8.set([-2], 0)
int8.set([1], 1)
int16.set([123], 1)

console.log(int16); // [510, 123, 0, 0, 0, 0, 0, 0]
原因如下
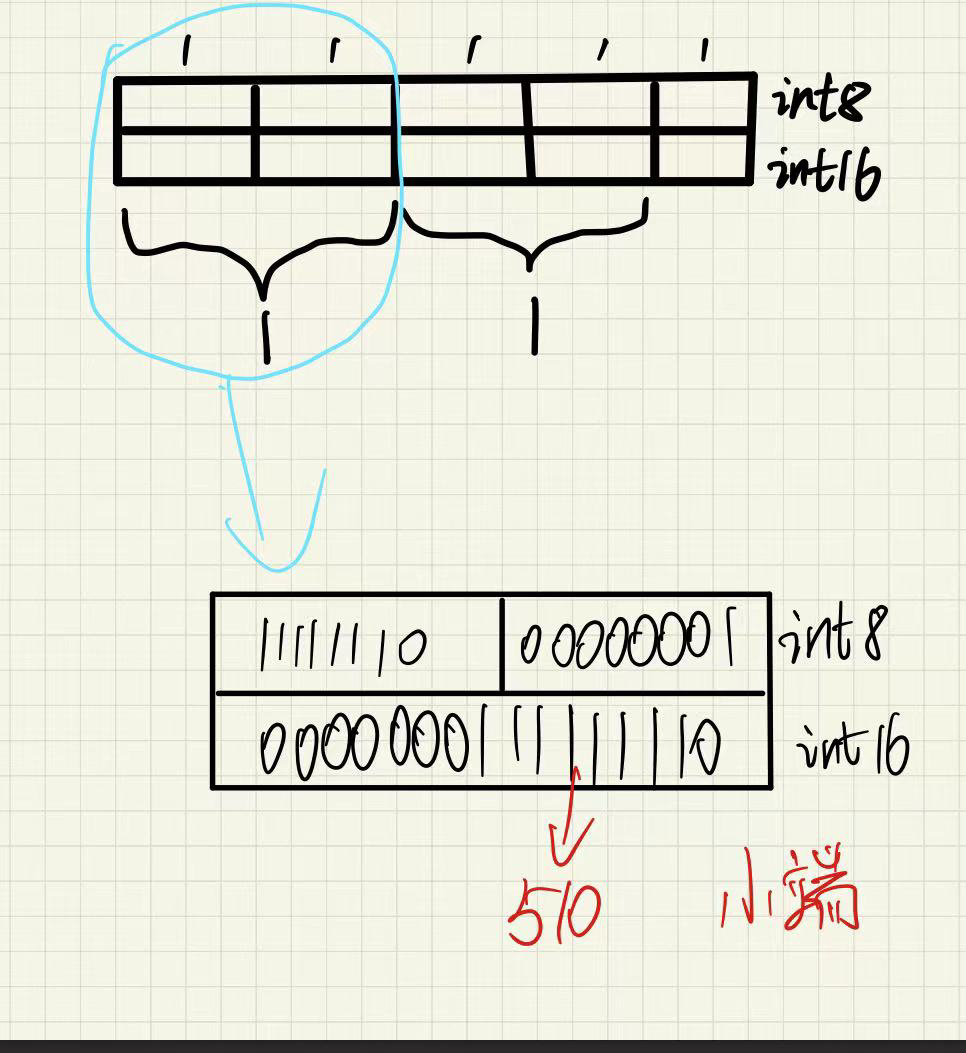
这是在小端机器中的结果,我上面画的顺序是反的,为了方便阅读,将-2 放在了左侧,1 放在了右侧,但真实的情况是 1 应该在-2 的左侧。在 Int16Array 中,每 16 位是一个数据单元,所以 Int8Array 中的两位会合并成一位,最后转为 10 进制之后就是 510。
小端:多字节数据的低位字节存储在起始地址处,高位字节存储在后续地址处。
大端:多字节数据的高位字节存储在起始地址处,低位字节存储在后续地址处。
在Chrome 中有专门查看 ArrayBuffer 的开发者工具,而且可以调整大小端字节序
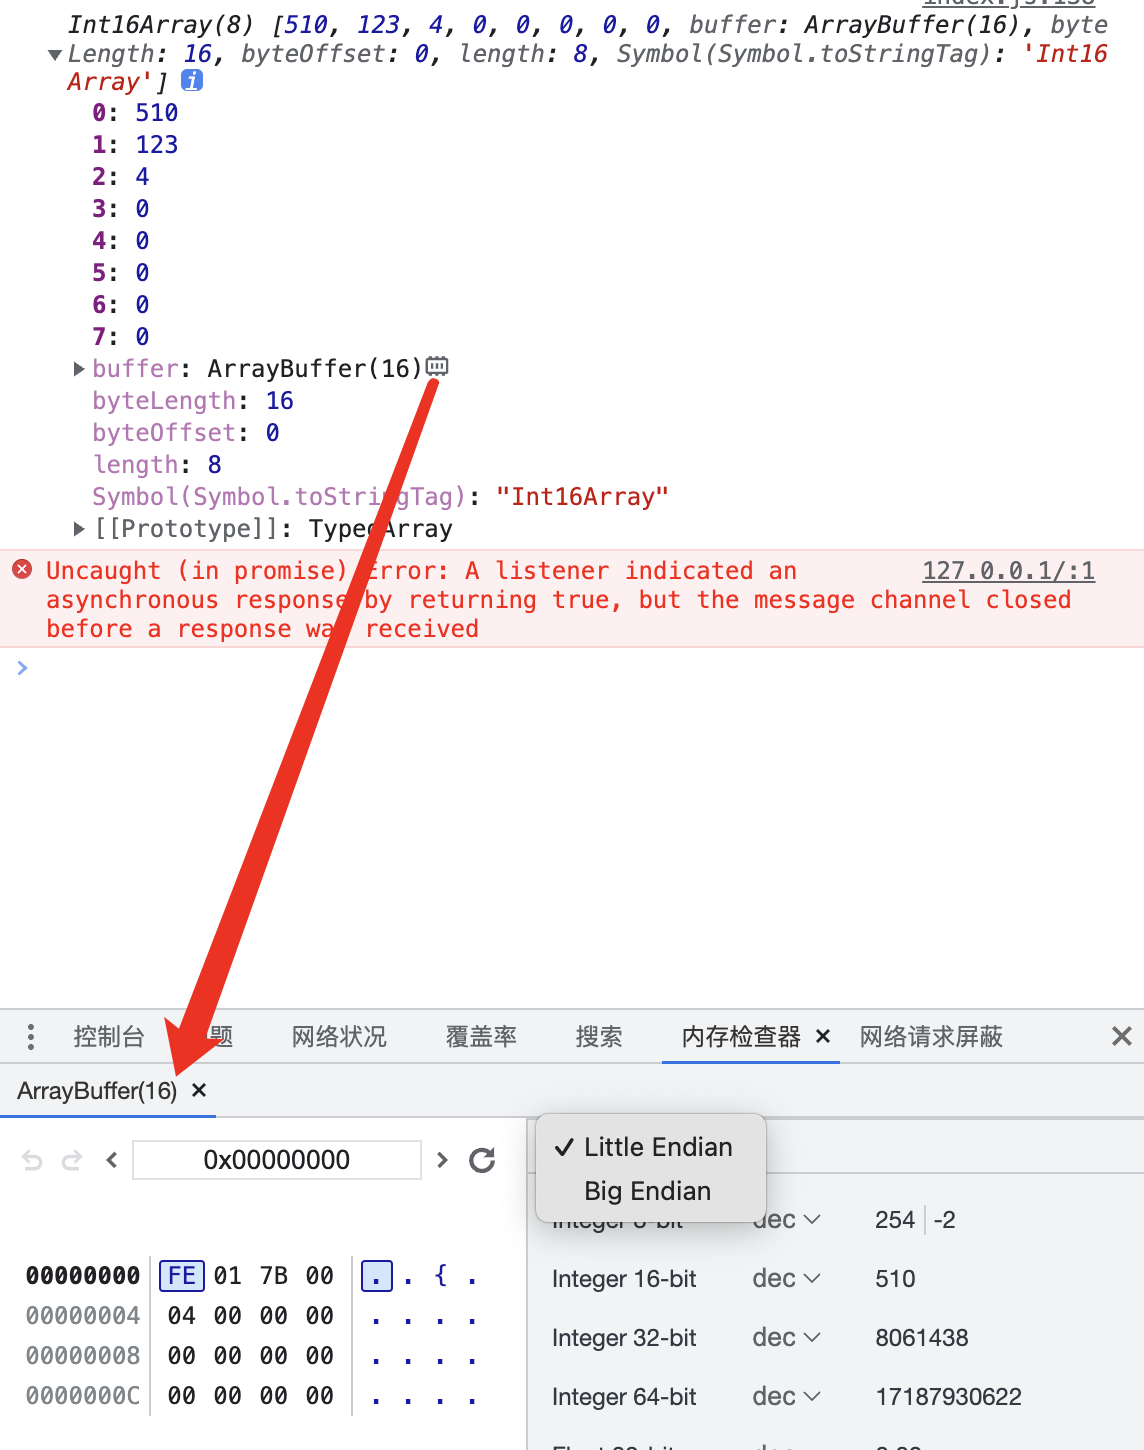
可以通过代码判断当前环境是大端还是小端
const littleEndian = (() => {
  const buffer = new ArrayBuffer(2);
  new DataView(buffer).setInt16(0, 256, true);
  // Int16Array 使用平台的字节序。
  return new Int16Array(buffer)[0] === 256;
})();
console.log(littleEndian);


