
像v-model、v-if……这些都是Vue内置的指令,Vue还开放了自定义指令的能力,自定义指令也是一种代码复用的手段。
语法
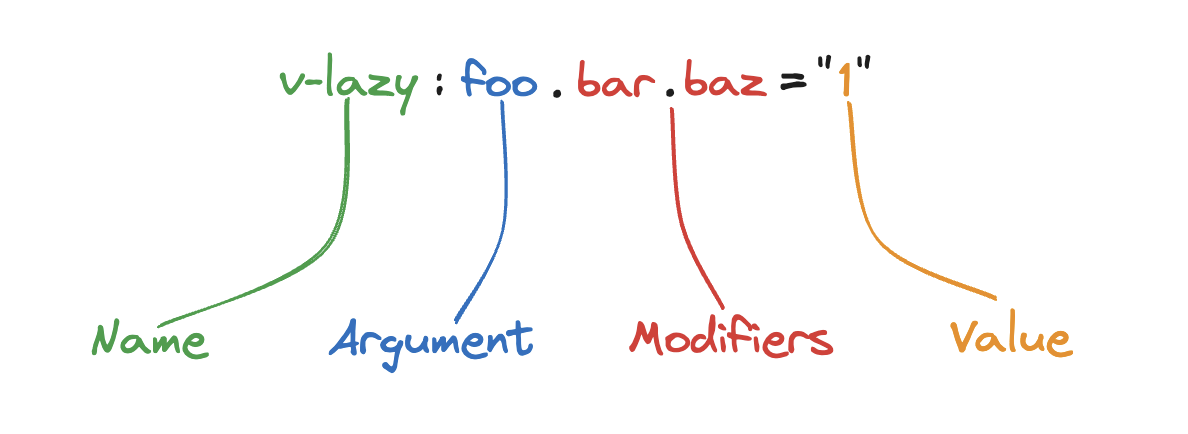
指令的语法如上图所示,总共分为四个部分
- Name:指令的唯一标识;
- Argument:指令参数,向指令传递字符串参数;
- Modifiers:修饰符,用于传递布尔值类型的参数,一般用于开启指令中的某些功能;
- Value:动态参数,和参数的区别在于可以是任何类型包括响应式值。
钩子
和组件的生命周期类似,
const myDirective = {
  // 在绑定元素的 attribute 前
  // 或事件监听器应用前调用
  created(el, binding, vnode, prevVnode) {
    // 下面会介绍各个参数的细节
  },
  // 在元素被插入到 DOM 前调用
  beforeMount(el, binding, vnode, prevVnode) {},
  // 在绑定元素的父组件
  // 及他自己的所有子节点都挂载完成后调用
  mounted(el, binding, vnode, prevVnode) {},
  // 绑定元素的父组件更新前调用
  beforeUpdate(el, binding, vnode, prevVnode) {},
  // 在绑定元素的父组件
  // 及他自己的所有子节点都更新后调用
  updated(el, binding, vnode, prevVnode) {},
  // 绑定元素的父组件卸载前调用
  beforeUnmount(el, binding, vnode, prevVnode) {},
  // 绑定元素的父组件卸载后调用
  unmounted(el, binding, vnode, prevVnode) {}
}
- el:指令绑定到的元素。这可以用于直接操作 DOM。
- binding:一个对象,包含以下属性。
- value:传递给指令的值。
- oldValue:之前的值,仅在
beforeUpdate和updated中可用。 - arg:传递给指令的参数。
- modifiers:一个包含修饰符的对象 (如果有的话)。
- instance:使用该指令的组件实例。
- dir:指令的定义对象。
- vnode:代表绑定元素的底层 VNode。
- prevNode:代表之前的渲染中指令所绑定元素的 VNode。仅在
beforeUpdate和updated钩子中可用。
透传
与属性的透传类似,当在组件上使用自定义指令时,它会始终应用于组件的根节点,如果组件有多个根结点时会忽略并抛出异常。
<MyComponent v-demo="test" />

<!-- MyComponent 的模板 -->

<div> <!-- v-demo 指令会被应用在此处 -->
  <span>My component content</span>
</div>
不推荐在组件上使用自定义指令。
注册
自定义指令有两种注册方式:全局注册和局部注册,全局注册之后在所有的组件中都可以绑定自定义指令,局部注册仅在组件作用域内可用。
通过app.directive()方法进行全局注册,第一个参数是指令的名称,第二个参数时函数的钩子对象。指令名称可以是驼峰风格或者短横线风格,Vue内部会统一转为短横线并在开头添加v-,例如:
import { createApp } from 'vue'
import App from './App.vue'

const app = createApp(App)
app.directive('myFocus', {
  mounted(el) {
    el.focus();
  }
})
app.mount('#app')
在使用时通过v-my-focus来绑定自定义指令
<template>
  <input v-my-focus />
</template>
局部注册,在 <script setup> 中,任何以 v 开头的驼峰式命名的变量都可以被用作一个自定义指令。
<template>
    <input v-my-focus />
</template>

<script setup>
const vMyFocus = {
  mounted: (el) => el.focus()
}
</script>
TS 中使用
如果要在TS环境中添加对自定义指令的类型提示,可以在新建d.ts类型声明文件来添加对自定义指令的支持。
// src/directives.d.ts
import { vLazyOptions } from './directives/vLazy'

declare module 'vue' {
  export interface ComponentCustomProperties {
    vLazy: typeof vLazyOptions
  }
}
在定义自定义指令的时候,为了便携更加方便也可以通过声明类型的方式来增加提示,
import type { Directive } from 'vue';

export const vLazyOptions: Directive<HTMLImageElement, 'a' | 'b'> = {
  beforeMount(el, binding) {
    console.log(binding)
  },
}
Directive<T, V>支持泛型,T用于表示元素类型,即钩子中的el参数类型,V则表示钩子中binding.value的类型

常见使用场景
语法其实并不是很复杂,就是在实际的开发中很难想到使用自定义指令的形式来实现某些功能,下面看几个例子,来找一下使用自定义指令的感觉。
图片懒加载
图片懒加载是一个常见的优化手段,在图片进入可视区域时在进行图片请求,可以减少页面初始化时的并发网络请求。
常见的实现方案有很多,这里使用IntersectionObserver来实现,唯一的缺陷的兼容性差一nainai。
import type { Directive } from 'vue';

export const vLazyOptions: Directive = {
  beforeMount(el, binding) {
    console.log(binding)
    el.$data_src = binding.value;
  },
  mounted(el) {
    const io = new IntersectionObserver(entries => {
      const realSrc = el.$data_src;
      entries[0].isIntersecting && realSrc && (el.src = realSrc);
    });
    el.$io = io;
    io.observe(el);
  },
  updated(el, binding) {
    el.$data_src = binding.value;
  },
  unmounted(el) {
    el.$io.disconnect();
  }
}
使用组件
<template>
    <img v-lazy="'/img/code.png'" height="200" width="200">
</template>
防抖/节流
防抖和节流是前端交互常见的一种优化手段,具体原理可以看下这里,本文只讲自定义指令相关的内容。
import type { Directive } from "vue";

export const vDebounceOptions: Directive<any, Function> = {
  mounted(el, binding) {
    const { modifiers, arg = '400', value } = binding;
    const { click = true, input } = modifiers;

    if (typeof value !== 'function') {
      throw new Error('防抖指令只接受函数作为值')
    }

    if (isNaN(Number(arg))) {
      throw new Error('防抖指令只接受数字作为参数')
    }

    el.timer = null
    el.handler = function () {
      if (el.timer) {
        clearTimeout(el.timer);
      }
      el.timer = setTimeout(() => {
        value();
      }, Number(arg));
    };

    if (click) {
      el.addEventListener('click', el.handler);
    }

    if (input) {
      el.addEventListener('input', el.handler);
    }
  },
  beforeMount(el) {
    if (el.timer) {
      el.timer = null;
      clearTimeout(el.timer);
    }
    el.removeEventListener('click', el.handler);
    el.removeEventListener('input', el.handler);
  }
}
使用方法
<template>
  <main>
    <input
       v-model="text"
       v-debounce:1000.input="handle"
     />
  </main>
</template>
文本复制
文本复制也算是一个比较常见的场景了,当点击某元素(一般是button或者icon)时,将制定的文本内容复制到系统剪贴板上。
我们也可以将这个过程通过自定义指令实现。
import type { Directive } from 'vue';

function copyToClipboard(e: MouseEvent) {
  //@ts-ignore
  const value = e.target.copyText;
  if (navigator.clipboard) {
    navigator.clipboard.writeText(value);
  } else {
    const input = document.createElement('input');
    input.value = value;
    document.body.appendChild(input);
    input.select();
    document.execCommand('copy');
    document.body.removeChild(input);
  }
}

export const vClipboardOptions: Directive<HTMLElement & { copyText: string }, string | number | boolean> = {
  mounted(el, binding) {
    el.copyText = String(binding.value);
    el.addEventListener('click', copyToClipboard);
  },
  updated(el, binding) {
    el.copyText = String(binding.value);
  },
  unmounted(el) {
    el.removeEventListener('click', copyToClipboard)
  }
}
使用组件
<script>
import { ref } from 'vue';

const text = ref('')
</script>

<template>
    <main>
      <input v-model="text" />
    <p v-clipboard="text">{{ text }}</p>
  </main>
</template>
权限验证
个人认为权限相关的场景是最适合自定义指令的场景之一,根据业务的权限规则设计好指令之后,只需要在需要限制权限的元素或者组件上添加指令即可,会比单个元素控制权限要更容易维护和使用。
(示例并不通用,权限在不同的项目中存在业务差异,需要根据项目自身进行开发)
import type { Directive } from "vue";
import { usePermissionStore } from "@/stores/permission";
import { checkPermsAll, checkPermsAny } from "@/utils";

export const vPermissionOptions: Directive<any, Array<string>> = {
  mounted(el, binding) {
    const { permission } = usePermissionStore(); // 从pinia中获取权限数据
    const { value, modifiers } = binding;

    if (!value) {
      throw new Error('缺少权限标识,例如‘v-permission=["a", "b"]’')
    }

    if (modifiers.and) {
      if (!checkPermsAll(value, permission)) {
        el.parentNode && el.parentNode.removeChild(el)
      }
    } else {
      if (!checkPermsAny(value, permission)) {
        el.parentNode && el.parentNode.removeChild(el)
      }
    }
  }
}

// store/permissioin.ts
export const usePermissionStore = defineStore('counter', () => {
  const permissionRaw = ref<PermissionDTO[]>()
  async function initPermission() {
    const res = await fetchPermission();
    if (res) {
      permissionRaw.value = res;
    }
  }

  const permission = computed(() => {
    return fixPermission(permissionRaw.value || [])
  })

  return { permission, initPermission }
})

// main.ts
const app = createApp(App)

app.use(createPinia())
app.use(router)】
app.directive('permission', vPermissionOptions)

await usePermissionStore().initPermission(); // 需要在绑定DOM元素之前初始化完成权限列表
app.mount('#app')
注意这里要在mounted中进行节点的移除。
使用方法
<template>
  <main>
    <Button
      v-permission="['SYS:USER:DELETE']"
      @click="runDeleteUser"
    >
      删除
      </Button>
  </main>
</template>