
众所周知 vuex 和 vue-router 身上都“流着 vue 的血”,随着 vue3.0 的推出,这两兄弟也紧跟其后发布了最新的版本。
默认读者掌握 vuex 和 vue-router 的使用方法,不再赘述如何使用,如果不会请自行查看官网文档
mini-vuex4.0
Vuex4.0版本中使用了 vue 的 provide 和 inject 方法来挂载和取出 store 实例,使用新版的 reactive 方法来实现 state 数据的响应式
创建主体框架
我们可以根据使用方法反推内部构造,首先我们需要实现 useStore 和 createStore 两个方法,上面我们说了这里使用了 provide/inject,所以需要一个key
// store key 用于注入和取出 store 实例
const STORE_KEY = "__store__";

export function useStore() {
  // 获取 provide() 注入的 store 实例
  return inject(STORE_KEY);
}

// 实例化 store
export function createStore(options) {
  return new Store(options);
}

class Store() {
  constructor(options) {}
}
四大核心
state
state 部分我们需要进行的处理很简单,使用 reactive 代理一下就行
class Store {
  constructor(options) {
    this.$options = options;
    // 对 state 的数据进行响应式
    this._state = reactive({ data: options.state });
  }

  // 读取 state 时返回响应式的数据
  get state() {
    return this._state.data;
  }
}
mutations
mutations 中包裹了一些方法,这些方法统一接收 state 和自定义参数,调用时使用 commit(‘methodName’)方式进行调用,所以我们需要实现 commit 方法
class Store {
  constructor(options) {
    this.$options = options;
    // 对 state 的数据进行响应式
    this._state = reactive({ data: options.state });

    // 将 mutations 挂载带 store 实例
    this._mutations = options.mutations;
    // commit 方法
    this.commit = (type, payload) => {
      this._mutations[type](this.state, payload);
    };
  }

  // 读取 state 时返回响应式的数据
  get state() {
    return this._state.data;
  }
}
这里之所以写在构造函数中是因为用箭头函数的形式可以保留 this 的指向
actions
actions 与 mutations 无什么两样,官方给出的说明是 actions 中可以进行异步操作,下面是尤雨溪给出的回答
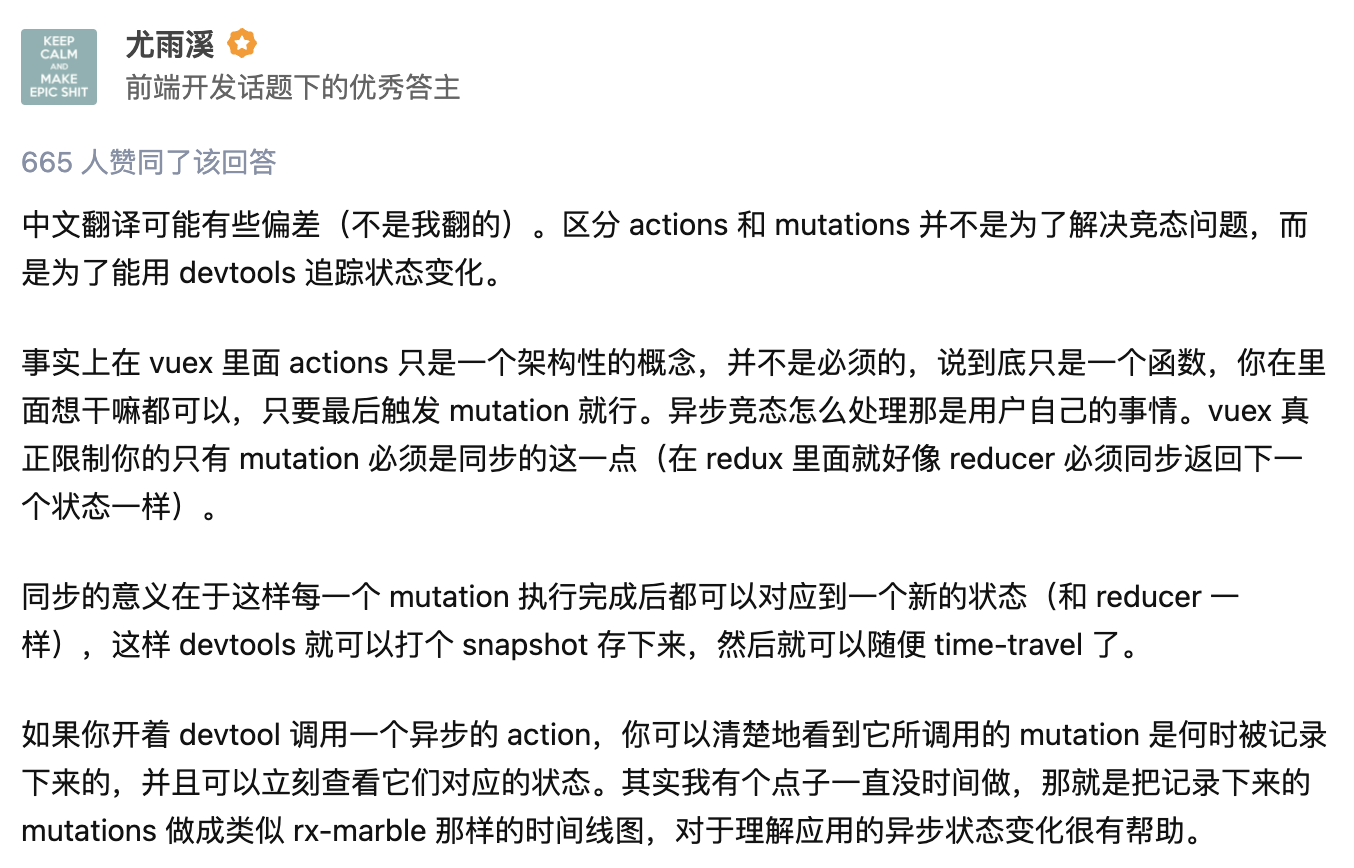
这里我们不考虑太多,我们所实现的区别仅在于传参方式与mutations 不同
class Store {
  constructor(options) {
    this.$options = options;
    // 对 state 的数据进行响应式
    this._state = reactive({ data: options.state });

    // 将 mutations 挂载带 store 实例
    this._mutations = options.mutations;
    // commit 方法
    this.commit = (type, payload) => {
      this._mutations[type](this.state, payload);
    };

    // 挂载 actions
    this._actions = options.actions;

    this.dispatch = (type, args) => {
      this._actions[type]({ commit: this.commit, state: this.state }, args);
    };
  }
  // 读取 state 时返回响应式的数据
  get state() {
    return this._state.data;
  }
}
getters
getters 的实现方式与上一版的大抵相同,顺便我们实现 install 方法
class Store {
  constructor(options) {
    this.$options = options;
    // 对 state 的数据进行响应式
    this._state = reactive({ data: options.state });

    // 将 mutations 挂载带 store 实例
    this._mutations = options.mutations;
    // commit 方法
    this.commit = (type, payload) => {
      this._mutations[type](this.state, payload);
    };

    // 挂载 actions
    this._actions = options.actions;

    this.dispatch = (type, args) => {
      this._actions[type]({ commit: this.commit, state: this.state }, args);
    };

    // 挂载 getters
    options.getters && this.handleGetters(options.getters);
  }

  // 绑定 getters, 源码中 getters 相关的放在了 store-util.js 中
  handleGetters(getters) {
    this.getters = {};
    Object.keys(this.$options.getters).forEach((getterKey) => {
      Object.defineProperty(this.getters, getterKey, {
        get: () => getters[getterKey](this.state),
        enumerable: true, // for local getters
      });
    });
  }

  // 读取 state 时返回响应式的数据
  get state() {
    return this._state.data;
  }

  // main.js 中, app.use(store)会调用 install 方法
  // 使用 provide 将 store 实例注入
  install(app) {
    app.provide(STORE_KEY, this);
  }
}
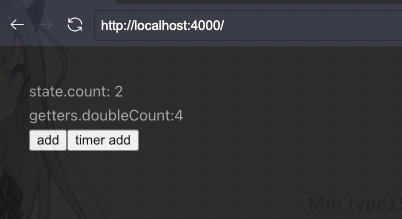
测试
我们来创建一个测试
import { createStore } from "../lib/mini-vuex";

const store = createStore({
  state: {
    count: 0,
  },
  mutations: {
    add(state) {
      state.count++;
    },
  },
  actions: {
    asyncAdd({ commit, state }) {
      setTimeout(() => {
        console.log(state.count);
        commit("add");
        // commit("add");
      }, 1000);
    },
  },
  getters: {
    doubleCount(state) {
      return state.count * 2;
    },
  },
});

export default store;
然后我们在组件中调用
<template>
  state.count: {{ store.state.count }} <br />
  getters.doubleCount:{{ store.getters.doubleCount }} <br />
  <button @click="clickHandler">add</button>
  <button @click="clickAsync">timer add</button>
</template>

<script setup>
import { useStore } from "./lib/mini-vuex";

const store = useStore();

function clickHandler() {
  store.commit("add");
  console.log(store.count);
}

function clickAsync() {
  store.dispatch("asyncAdd");
}
</script>
可以在本文最后进入在线测试
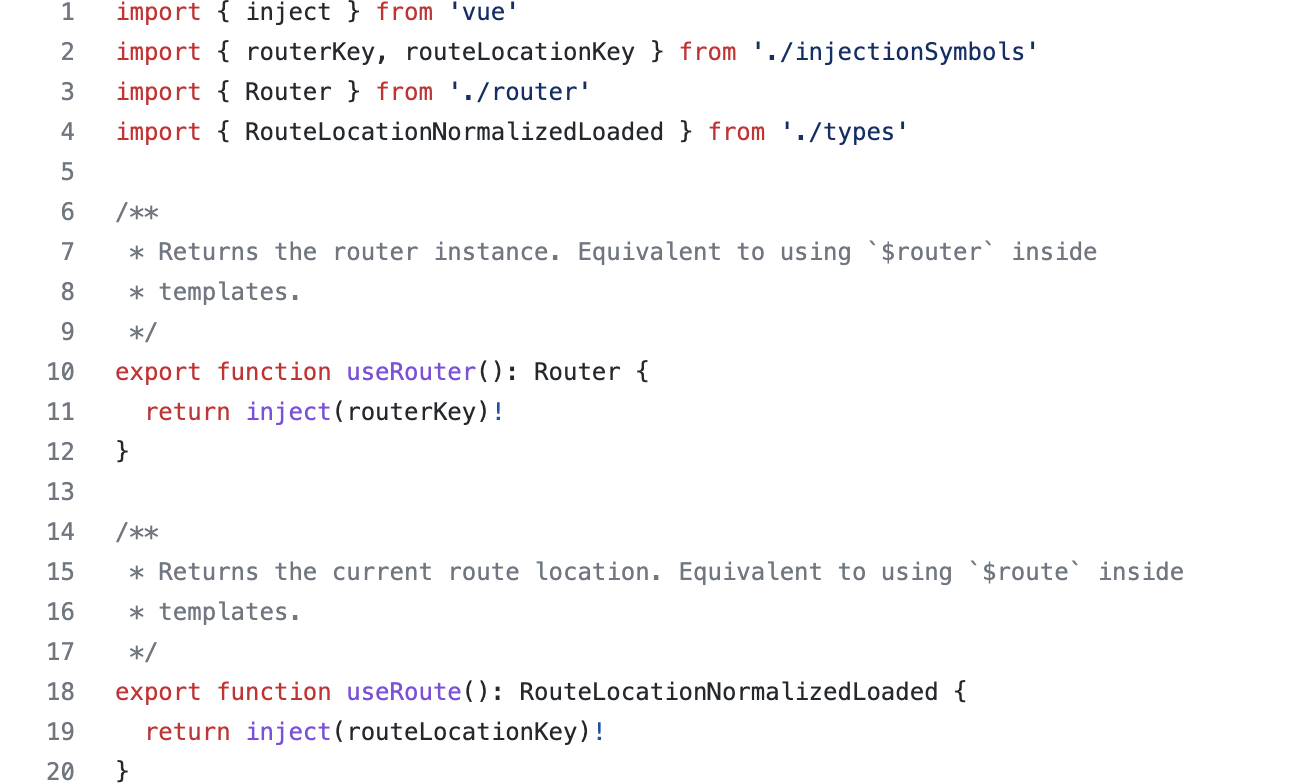
mini-vue-router4.0
路由作为现代前端的基础设施,其地位越来越重要,我们可以根据路由来渲染对应的页面,从而实现前后端分离。
通过 URL 区分路由的机制上,有两种实现方式,一种是 hash 模式,通过 URL 中 # 后面的内容做区分,我们称之为 hash-router;另外一个方式就是 history 模式,在这种方式下,路由看起来和正常的 URL 完全一致。
在 vue-router3 中对应两个函数,分别是 createWebHashHistory 和 createWebHistory。
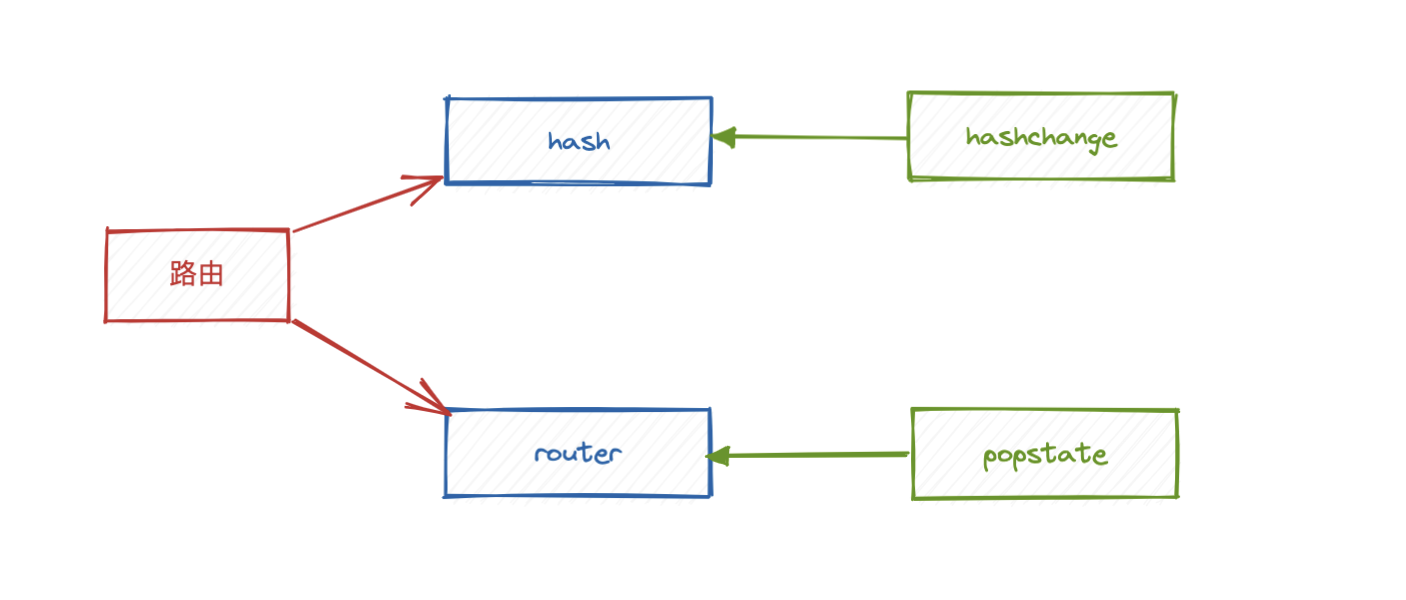
popstate 事件有局限性,只有浏览器的动作(后退、前进……)会触发,我们平常使用的 push 等操作需要手动触发,这里在源码中也有体现
主体框架
同样,我们先把架子搭起来
import { ref, inject } from "vue";
import RouterLink from "./RouterLink.vue";
import RouterView from "./RouterView.vue";
const ROUTER_KEY = "__router__";
const ROUTE_KEY = "__route__";
export function createRouter(options) {
return new Router(options);
}
export function useRouter() {
return inject(ROUTER_KEY);
}
export function useRoute() {
return inject(ROUTE_KEY);
}
class Router {
constructor(options) {
this.history = options.history;
this.routes = options.routes;
// 按照源码的意思, 应该在 createWebHistory 中创建响应式 location
this.current = ref(this.history.url());
this.history.bindEvents(() => {
this.current.value = this.history.url();
console.log(this.current.value);
});
}
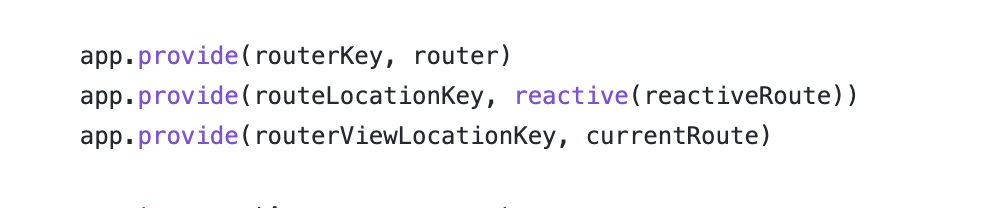
install(app) {
app.provide(ROUTER_KEY, this);
app.provide(ROUTE_KEY, this.routes);
app.component("router-link", RouterLink);
app.component("router-view", RouterView);
}
}
挂载的组件再下一节,route 相关的我们这里不做重点,重心放在 router 上,这一块源码中的 key 是 routeLocationKey,我这里也找了好一会
核心实现
然后是两种路由模式,这里按照源码的意思应该是 hash 模式是在 history 的基础上实现的,我们就不按照官方的方式实现了
export function createWebHashHistory() {
  function bindEvents(fn) {
    window.addEventListener("hashchange", fn);
  }

  function push(path) {
    window.location.hash = path;
  }

  return {
    bindEvents,
    push,
    // replace,
    url: () => window.location.hash.slice(1) || "/",
  };
}

export function createWebHistory() {
  function bindEvents(fn) {
    window.addEventListener("popstate", fn);
  }

  function push(path) {
    window.history.pushState({ path }, "", path);
    // popstate 并不会被触发,需要手动改变 current
    this.current.value = path;
  }

  return {
    bindEvents,
    push,
    // replace,
    url: () => window.location.pathname || "/",
  };
}
然后是常用的几种路由方法,这些方法大都依赖于浏览器提供的 history 对象上的 API
push(to) {
    this.history.push.call(this, to);
  }

  go(n = 0) {
    window.history.go(n);
  }

  back() {
    window.history.back();
  }
这里添加 call是因为保障history 模式下 push 时改变 current 时 this 指向不会改变(link 组件中),这种写法其实是不规范的,应该在 createWebHistory 内部维护,但我们毕竟是“丐版”,就不那么较真了
路由组件
vue-router 提供了两个全局组件router-link和router-view
view 组件就是根据 router.current 的值动态渲染组件,因为current 是响应式的,所以组件可以根据路由自动切换
<template>
  <component :is="component"></component>
</template>
<script setup>
import { computed } from "vue";
import { useRouter } from ".";
let router = useRouter();
const component = computed(() => {
  const route = router.routes.find(
    (route) => route.path === router.current.value
  );
  return route ? route.component : null;
});
</script>
link 组件默认渲染为 a 标签,可以自定义渲染标签,我们就不搞那么逼真了,只单纯的实现功能就算了
<template>
  <a @click="clickHandler">
    <slot />
  </a>
</template>

<script setup>
import { useRouter } from ".";

// import { defineProps } from "vue";
let props = defineProps({
  to: { type: String, required: true },
  replace: { type: Boolean, default: false },
});

const router = useRouter();

function clickHandler() {
  // if (props.replace) router.replace(props.to);
  // else
  router.push(props.to);
}
</script>
现在一个“丐版”vue-router 就完成了
体验